Start to finish - 1.75-Inch Festival Ball Shells with D1 Glitter Stars
In this article I am going to explain how to make a paper "Festival Ball" sized ball shell, from start to finish. A festival ball is the type of shell a consumer can buy from a local fireworks stand around Independence Day.
This project is designed and written for those who are new to shell building.
Recommended Prerequisite Projects
Before we get started you will need black powder to lift your shells into the air and burst your shells when they reach the apex of their flight. At one time black powder was available at most sporting goods stores, now it has become very hard to find. For this reason, the first thing most fireworks makers need to learn is how to make black powder. Making black powder using one of the two kits from Skylighter is quick and easy and as an added benefit, the black powder you make at home usually is about 1/3 the cost of store-bought.
Making Black Powder Quick & Easy OR Red Gum Black Powder
If you are one of the lucky few who can find commercial black powder locally; you can purchase a can of Goex FFg for this project. For these small shells a granulation called FFg (or 2Fg) will function well for lift and burst.
NOTE: Stay away from using Black Powder substitutes like Pyrodex or 777, as these are NOT actual black powder, and will not work reliably as a lift or burst for our shell building purposes.
Next, you will also need to be able to reduce your chemicals to very fine powders so they mix well and produce compositions which burn completely. This next project will walk you through that process:
Grinding Chemicals With a Coffee Grinder
Safety Precautions
Making fireworks can be a fun and fulfilling activity, but remember fireworks are explosives! Common sense safety is the most important part of every successful fireworks project. Before we dive into the project, let's review some important safety practices.
- Read and understand the fireworks safety articles.
- Read through this entire project and collect all of the materials you'll need before you get started.
- Wear eye protection, gloves, cotton protective clothing, and a dust mask or respirator when dealing with fine powders.
- Keep the amount of open and exposed pyrotechnic material to a minimum, preferably in a closed container far away from your immediate work area.
- DO NOT work inside a dwelling or garage, work outside when mixing pyrotechnic compositions.
- NO smoking or open flames in the work area, remember we are working with energetic materials - accidents can and WILL happen if you are careless or intoxicated, save the adult beverages for later.
Making The Stars
Now that we have the safety pep talk out of the way, we're gonna need to make some stars for our shell! Stars responsible for the points of light or "starburst" effect that we see in the sky when a fireworks shell explodes.
Stars consist of a pyrotechnic composition which is bound into pellets, these can either be cut, pumped, rolled, or pressed. For simplicity, we will be using cut stars for our festival ball shell, as it requires the least amount of equipment and no special tooling.
For this project, we will be using the D1 Glitter composition. It is inexpensive, easy to make, and quite beautiful in the sky! This composition provides a nice, long hanging gold glittering effect, with large gold strobing "pops" in the charcoal tail which is sure to be a crowd-pleaser.
D1 Glitter Formula
| Ingredient | Percent | Grams |
| Potassium nitrate: | 53% | 53g |
| Sulfur: | 18% | 18g |
| Charcoal: | 11% | 11g |
| Atomized Aluminum: | 7% | 7g |
| Sodium Bicarbonate: | 7% | 7g |
| Dextrin: | 4% | 4g |
| Total: | 100% | 100-gram batch |
Screened Black Powder Prime Formula
| Ingredient | Percent | Grams |
| Potassium nitrate: | 75% | 75g |
| Charcoal: | 15% | 15g |
| Sulfur: | 10% | 10g |
| Total: | 100% | 100-gram batch |
(You'll mix each of these two formulas separately.)
Before weighing your chemicals ensure that all of them are a fine, talc like powder. If any of your chemicals are granular, or clumpy you may put them into a blade-type coffee grinder, or ball mill them individually. This is likely only necessary with your potassium nitrate, as every other chemical should already be finely powdered.
For each formula, you'll need two small containers, one to weigh your chemicals in, and one to hold the chemicals once weighed. This way if you accidentally dispense too much of a given chemical when weighing it can be removed uncontaminated from the weighing container. I like to use a small disposable plastic cup to weigh my chemicals in, and a 1-2-quart deli-style container with a lid to hold the pre-weighed chemicals and later mix my comp in.
You'll also need a fine kitchen screen with around 40-holes per inch, or framed 40-mesh screen from Skylighter. Framed screens and a quality scale are by far the most important tools in any firework makers shop, so I highly recommend spending a little more and buying quality tools now and saving a lot of future frustration.
To mix the composition weigh out each chemical individually, then add it to your mixing container. Once you have each chemical weighed out, screen the loosely mixed chemicals together through your 40 mesh screen 4 times to consolidate the mix and remove any clumps. Then return the mixture to your mixing container and shake it gently to continue the mixing process. Repeat the screening process once more for a total of 8 passes through your screen.
Once you have completed these steps for each formula you'll have your D1 glitter composition and screened black powder prime composition stored separately in two mixing containers.
CUTTING THE STARS / SUPPLIES NEEDED
- Rolling pin - or in this case, a 2" fiberglass mortar (included in kit)
- 2 x 1/4-inch diameter wooden dowels
- Wax paper
- 2 x Flexible Cutting Boards
- Sharp, straight-edged knife
- Nitrile gloves
- Spray bottle filled with water
- Scale which can weigh accurately down to a gram
Wetting your D1 mixture is critical. Over-wetting will result in an unworkable mess, and under-wetting will result in stars that crumble when fully dry. To ensure you get the right consistency you'll need to add water to the composition slowly, while kneading the mass, working the added water throughout the composition.
Note: You will only be wetting the D1 Glitter composition. Your black powder prime will be kept dry!
To “cut” stars we are looking for a soft, clay-like consistency that when squeezed into a ball, in a gloved hand, holds its shape without cracking, but does not squeeze out water leaving the gloved hand wet. To accomplish this goal we will mist in some water, knead the comp then perform a squeeze test. Once you've done this process a couple of times you will learn to "visually" see when the comp is ready without needing to do the squeeze test.
We can short cut this process slightly knowing that we have 11-grams of charcoal in this 100-gram batch, we know we will need at least 11-grams of water.
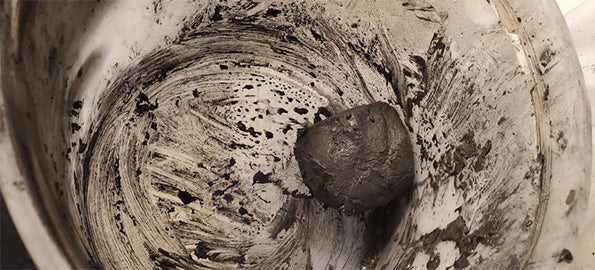
Put the mixing container containing the thoroughly mixed D1 composition on your digital scale, and tare it. [Tare function on a digital scale "zeros" the display allowing you to measure only the additions]. Start dampening the composition by spraying it with water, removing the container from the scale and mixing the water into the composition with one hand.
Once you have added all 11-grams of water, your composition should look something like this:
While this consistency would be perfect for pumped or pressed stars, in order to cut them the composition must be a lot wetter. Keep adding water and kneading the composition with your hands until it is slightly more pliable than Playdoh.
When the composition is wet enough to form a ball when squeezed in your hands, without any cracks forming, it is the perfect amount of dampness.
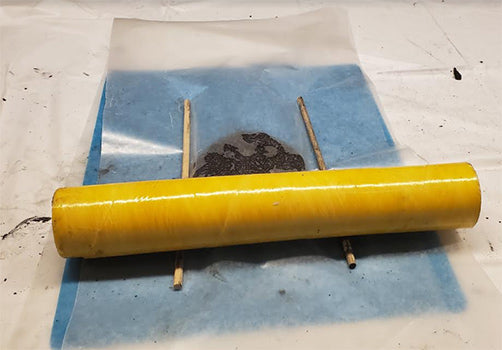
Next cut off a sheet of wax paper and place it on your cutting board, and put the ball of composition on the wax paper. Press down on the comp with your hands creating something resembling a pancake. Place a second sheet of wax paper on top of the composition, and place one of your 1/4-inch wooden dowels on each side of the patty, on top of the paper like so:

These dowels will serve as a gauge allowing us to "roll" the patty to a consistent 1/4-inch pancake.
Using a rolling pin - OR the fiberglass mortar supplied with your kit place it horizontally on top of your wooden dowels (which determine the thickness of your stars/patty) and start rolling the tube over the patty back and forth vertically, using the dowels as a guide. You may also use your second cutting board for this purpose, instead of a rolling pin / tube if you choose.
Next, remove the 2 wooden dowels and carefully remove the top sheet of wax paper from the patty. Using a coarse strainer or your 40-mesh screen sift approximately 30-grams (1-ounce) of screen mixed black powder prime on top of the patty. Using a gloved hand gently distribute the black powder prime over the patty.
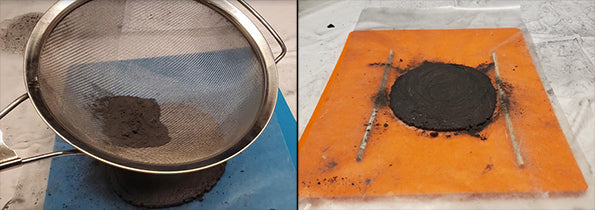
Next, put a sheet of wax paper back on the patty and place your second cutting board on top. Carefully flip the patty over using the two cutting boards, and repeat the priming step on the opposite side of the patty.
Once you are done, it is time to start cutting your stars!
Remove the top layer of wax paper, and start cutting the patty into 1/4-inch wide strips on the horizontal plane by pressing straight down on the patty using a sharp, straight edged knife. DO NOT attempt to cut by using a slicing motion and dragging the knife across the patty, as this will likely skew or break the patty.
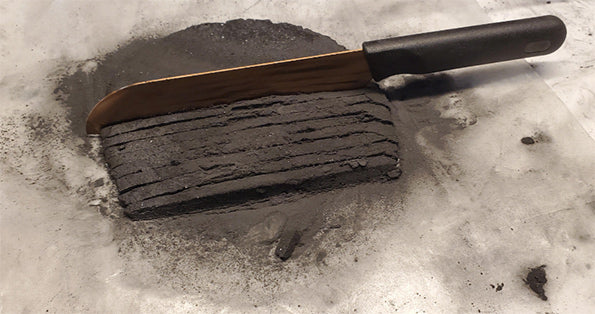
Repeat this step until the patty is sliced completely into evenly spaced strips. If you start having problems with the strips sticking together, try pulling the blade towards you as you are cutting to space the strips out a bit. Applying a small amount of your black powder prime between the strips will help reduce sticking.
Once the patty has been sliced all the way through repeat the same step on the opposite plane while keeping the spacing the same, at a 1/4-inch or slightly smaller.
When you finish cutting the rest of the patty, take your remaining screened mixed Black Powder prime and dust the now cut stars one last time. Pick up the stars by the wax paper, and gently lift the edges of the paper to separate the stars and roll them in the prime. They should be completely separated, tiny cubes.
Transfer the stars from the wax paper onto a drying screen. Place them in a shady area, with good airflow, outside and away from ignition sources for at least 24 hours before putting them in direct sunlight. Allow them to dry completely for 2-3 days before moving on to the next step.
If you have not already purchased 2FG black powder or made your home made black powder now is a good time to begin that process while your stars dry.
Building The Shell
We know what you're thinking - FINALLY we get to do the fun part!
If you ordered the complete festival-ball kit, you should have the following materials already. If not, they can be purchased from Skylighter.
Materials List
| - 1.75" paper hemispheres | (ITEM #PS2017) |
| - Green Visco Safety Fuse | (ITEM #GN1006 or similar) |
| - Quick Fuse | (ITEM #GN1207) |
| - Roll of 1" gummed tape. | (ITEM #MS1501) |
Additionally, you will need:
- 3/32" Drill bit or similarly sized awl.
- Hot melt glue gun and glue sticks
- 1" Wide masking tape
- 1" Dowel
- Anvil cutters or a sharp razor blade
- Sponge
Lastly, you will ALSO need your freshly made D1 glitter stars and black powder made in the previous segment of this article.
Start off by setting aside 2 shell casing halves, and drilling a hole in the middle of one half with your 3/32" drill bit. Next, cut off a 1-1/4" long piece of visco fuse with either anvil cutters or a sharp razor blade, this will be our time fuse. NEVER use scissors for cutting fuse, the friction from the two metal surfaces can cause ignition. It is also a good idea to burn a 1-foot length of fuse and time it with a stop watch, to get average burn speed regardless of the burn time indicated on the package. The roll I used for this project burns at about 2-1/4" seconds per inch, which is perfect for this type of shell.
Next, cut off a 2" long piece of 1" wide masking tape, lay it on a flat surface and wrap it around the center most part of your visco fuse, leaving about an 1/8" exposed on either side. The tape should form tightly to the fuse leaving no gaps. Press the tape firmly with your fingers as you go to ensure a snug fit.
The reason we do this is to "fire proof" the fuse. Unlike 1/4" Chinese time fuse which burns internally, visco burns all the way through ejecting fire and sparks on the outside. Therefore, using it as is would set the shell off before it got to the desired height, the masking tape will contain the fire until it reaches the center of the shell.
Now that we have that out of the way, take your fuse and insert it into the hole we drilled in the hemisphere earlier. Push the fuse in until it is about level with the centerline of the shell equator on the inside of the shell, the fuse should fit rather snug. Using your hot glue gun, apply a generous bead of glue on the inside of the shell around your time fuse - repeat this step on the outside as well. Set it aside to cool for a few minutes before moving on to the next step.
The next step will be to start lining our shell with stars, set the two halves of your shell side by side and start placing your cut stars around the walls of the shell casing inside of each half, creating one layer of stars. Try not to have any stars sticking up over the equator of each half as this will make closing the shell difficult later on. If you do have some voids to be filled near the equator, this is where your undersized smaller cut stars will come in handy.
Once your two halves are lined with stars, take your granulated black powder and start filling the center void in the shell with a teaspoon a little at a time. It helps to settle the powder by lightly tapping the outside of the shell casing with a small dowel.

Fill the shell until the black powder burst charge is slightly overfilled. Doing so will result in a tightly packed shell, without empty spaces which could allow our stars to migrate within the shell.
Now comes the fun. We will need to marry the two halves and secure the two halves together with layers of gummed paper in a process called "pasting" the shell.
Bringing the two halves together may seem a little daunting, but with a little practice and the proper technique, it's actually quite easy. Hold the completed shell halves touching each other from edge to edge, and close the two halves together in one swift motion - sort of like closing a plastic Easter egg.
If you have a gap on the equator of the shell, lightly tap the shell with a wooden dowel while applying pressure to the two halves. Settling due to the vibrations will allow the shell to close removing the gap.
Once closed, use some 1" masking tape and wrap the equator with 2 turns. This will keep your shell contents secured during pasting. I also recommend taping over the fuse to prevent it from becoming wet during the next steps.
PASTING
Now we need to paste the shell, to give it both strength and flameproofing. For this project we will be using strips of gummed paper tape using the 3 strip pasting method. The 3 strip method is unique in the sense that each layer pasted around the shell is actually two layers because of the strips overlapping.
Generally the rule of thumb for pasting ball shells is 2 layers per inch. Due to the small size of this shell, we are going to paste 6 layers (or 3 turns with our 3 strip pasting method).
For this next step, you're gonna need a bowl of water and a wet sponge to activate your gummed tape. Cut up several pieces of your 1" wide gummed tape 2" long and 1/2" wide. Start with about 30 strips and cut more as needed.
I've laid this next part out into steps, as you will be repeating the next three steps consecutively. However, before we get into actually pasting the shell. I'm going to demonstrate the three strip pasting method with colored strips of tape on a basketball.
By following these steps, you will be able to better understand the process of actually pasting the shell by following the preceding steps.
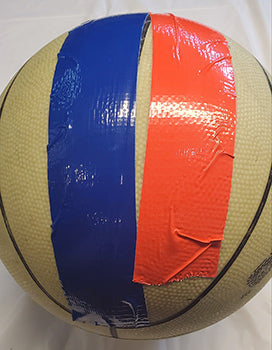
I'm going to use three different colors of tape to demonstrate the method. Please remember the colors and make sure to follow along closely.
For our first strip in the sequence, we will identify it by a BLUE strip.
The second strip will be identified by a RED strip.
Last but not least, our third strip will be identified by a PINK strip.
I'm going to be using a basketball to demonstrate the method. Holding the basket ball with the lines going vertically we will assume the top of the ball is the NORTH pole, and bottom being the SOUTH pole.
Step 1)
Place the first strip, which is shown by the BLUE tape, vertically going from north to south as shown in the following picture. We will be working from left to right.
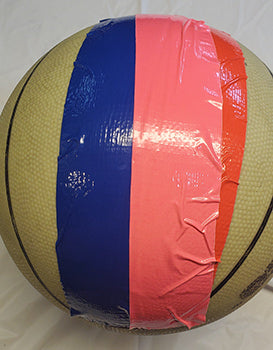
Step 2)
Next, our second strip, shown by the RED tape, will get placed vertically to the right of our first strip. Only the strip will start about a 1/4 of the shell diameter higher than our first, as shown in our next picture.
Step 3)
Finally, our third strip, which is identified by the PINK tape, will be placed in between the BLUE and RED strips we used in steps 1 and 2, as shown.
Now that we have our first 3 strips laid down, we will basically be repeating steps 1 & 2 consecutively until we have completely pasted the sphere.
For the fourth strip, we will be repeating step 2. We will be using the edge of the RED strip we placed in step 2, as a guide.
Next, we will be repeating step 3 placing our next strip between the red, and the blue strip we just pasted. Follow steps 2 and 3 until you've completely wrapped the shell.
By this point you should have a basic understanding of the basics of pasting. If you feel you are ready, move on to the next step. Otherwise, I suggest reading the above several times over. This method of pasting can be somewhat complicated to demonstrate, but in practice its quite simple once you've preformed it once or twice. This method can be used to paste even much larger aerial shells effortlessly.
Now for pasting the actual shell, using the process explained above.
1) Place your first strip vertically halfway around the axis starting at the base of the green visco fuse going all the way to the opposite pole.
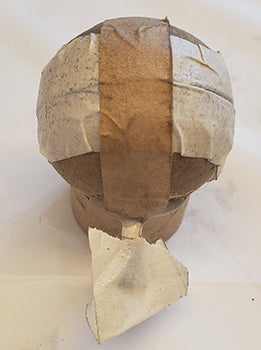
2) The next strip will go to the right of the first strip, but starting about a half inch higher from the fuse. I used the bottom edge of the masking tape as a guide, as you can see in the following picture.
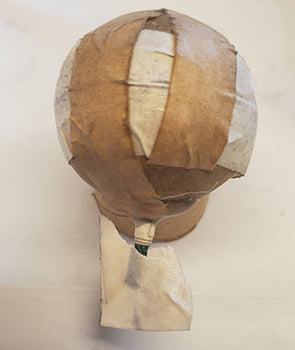
3) Our third strip will go vertically filling the space in-between the first 2 strips, starting at the fuse like the first strip. For the fourth strip, we will repeat step 2, only we will start to the right of the 3rd strip.
Repeat steps 1, 2 and 3 until you've made your way around the shell. Allow the shell to dry for a few minutes before pasting your next layer(s). It is a good idea to alternate poles between layers, as shown in this next photo. This way you don't end up with buildup at the north and south poles.
When you've pasted 3 laps around the shell allow it to dry in a safe location, preferably outside. Due to the small amount of layers, the pasting should dry in a few hours on a nice sunny day.
Once dry, we can start lifting the shell. First we need a lift cup, one can be made quite easily using a 1" dowel for a former, and about 2 feet of our 1" gummed tape wet with a sponge. Be sure to leave the first 2.5 inches of tape dry when rolling your lift cup, so it won't stick to your former making it difficult to slide off.
Note: it is important to allow your shell to fully dry before applying the lift cup.

Next, cut your visco fuse at a 45 degree angle to expose the black powder core. Punch a small hole 3/32" hole about a 1/4" from one end of the lift cup. Place your newly fabricated lift cup over the visco fuse, and glue it on using a hot glue gun. Make sure to orientate the fuse hole closest to the bottom of the shell as shown below.

Cut a piece of quick fuse about 13" long, and insert that into the fuse hole of your lift cup. It's also a good idea to put a couple turns of tape around the fuse hole to secure the fuse and prevent any powder leakage from occurring. Weigh out 5 grams of granulated black powder on your digital scale. Next, dump the black powder into your lift cup and cover the bottom of your lift cup with masking tape as shown below.
Using a small dab of hot glue, glue your quick fuse to the top of the shell to anchor it for lowering into your mortar tube. Once dry, cut a 3" piece of visco fuse and tape it to the end of your quick fuse shell leader. CAUTION: NEVER light the quick fuse directly without some kind of safety / visco fuse attached. It will set the shell off almost instantly!
The shell is now ready to be loaded into your mortar and fired! Make sure your mortar is either buried 2/3 of its length in dirt, or in a rack. Drop your shell in your secured mortar with the fuse extending out of the mortar, with you head, hands and body out of the path of the shell, light the green visco leader and get away to a safe distance.
Please remember to do so in a large area away from trees and dry brush, and away from any dwellings. The typical rule of thumb is 75' of clearance per inch of shell size, so you should have at least 130 feet of space between the mortar and spectators.
Have fun, and be safe!
Get your festival ball project supplies at Skylighter:
Make your first aerial shells from start to finish faster then you ever thought possible!
40 finished festival ball shells.
If you order today you can get all the materials you need to make 40 amazing festival ball shells and save 20% off cost of the individual items by ordering the kit!
Each Kit Contains:
- Potassium Nitrate (1 pound)
- Air Float Charcoal (1 pound)
- Sulfur (1 pound)
- Atomized Glitter Aluminium (1 pound)
- Sodium Bicarbonate (1 pound)
- Dextrin (1 pound)
- 1.91" Fiberglass Mortar Tube (1 ea.)
- Visco Safety Fuse (20 ft.)
- Quick Fuse (40 ft.)
- Paper Shells 1.75 Dia. (40 sets)
- Gummed Paper Tape 1 inch width (1 roll)
This kit is a great place to learn the art of fireworking.