Make Cardboard Mortar Tubes Last a Long Time
Spiral and parallel wound tubes make great, cheap mortar tubes that can last a very long time, if you know just a few tricks.
Plastic and fiberglass tubes are even better, of course, but cost a lot more per tube.
Plastic bases for cardboard mortars can work as bases, but I don't recommend 'em. They are weak, and prone to splitting, breaking or completely blowing apart. For small mortars, say an inch or less in ID, plastic bases are fine. For anything bigger, go with wooden bases.
So, if you are willing to do just a little bit of work, you can save yourself a bundle on mortars. This great project from Ned Gorski will show you how to make mortars that work, survive your fireworks use, and that you can re-use over and over again.
In a nutshell, you do two things to cardboard mortars:
Harry Gilliam

Some of Skylighter's Cardboard Mortar Tubes
How can we easily make and attach economical mortar bases for such tubes? It's actually easy with a few basic tools, and the bases we make are heavier and more substantial than plastic ones. This results in safer, more stable mortars to boot.
Safety Notes:
After black powder ignites inside a mortar, the inside of the gun will be coated with a layer of chemical fouling from the residue of the burnt black powder. This residue is hygroscopic. It will absorb moisture out of the air. This quickly swells the tube, dissolves the glue in the tube, and causes it to unravel, basically ruining an unprotected paper tube.
However, it is easy to waterproof and harden paper tubes with wood hardener or polyurethane. These protective coatings will moisture-proof, strengthen, and harden the tubes, and protect them from damage over time.

Use Polyurethane or Wood Hardener to Treat Paper Tubes
Paper tubes can simply be dunked into a can of polyurethane, one end at a time. Coat any unreachable spots on both the inside and outside of the tube using a foam paint brush such as the one shown in the photo above.
Another easy way to treat cardboard tubes is to make a simple, homemade trough out of sturdy aluminum foil. Pour a shallow pool of the treatment liquid into the trough and roll the tube in it until it is thoroughly coated inside and out.
After treatment, set the tubes aside in a safe and warm location to dry thoroughly.
Mortars treated in this way will last for many more firings than untreated tubes would.
Au contraire! Not so fast there, mortar podnah.
When a fireworks shell is launched from a mortar, the same gas pressure that fires the shell into the air is also exerted downward onto the surface of the base, and outward against the walls of the mortar tube.

Lift-Gas Forces Acting on Shell, Mortar-Tube, and Base
If the paper tube has been glued "flat" onto the wood base, only a small and relatively weak glue joint exists where the tube meets the base. This joint is not strong enough to reliably resist the downward and outward lift gas forces. It will likely fail.
When fired, the tube will expand a little and the base will be pushed downward. Quite possibly the joint between the tube and the base will fail and separate. If and when this occurs, the lift gasses will vent out of the tube through the failed joint instead of exerting upward pressure on the shell. The shell will then either fail to reach the correct altitude or even fail to leave the mortar at all. As a result the shell will either explode in the mortar or at a dangerously low altitude.
But, to prevent this problem there's a simple way to create a much stronger joint between the tube and the base. We can make a shallow circular groove, matching the bottom of the mortar, in the wood base. The mortar will then be securely glued into the groove.

Paper Mortar Tube Glued into Groove in Wood Base
This simple modification of the glue joint between the paper tube and the wood base greatly increases the strength of that joint. Enclosing the bottom of the mortar within the groove will help prevent it from expanding outward from the gas pressure when fired. The larger glued contact surface between tube and base will better resist the downward force of the lift gas. It is very hard to get this kind of glued joint to fail.
And the wooden base, heavier than a plastic base, will give your mortar assembly greater stability and reduce the chances of tipping over and firing into your audience.
There are a couple of types of hole-saws available. One commonly available type, shown at bottom center of the photo below, is adjustable. This tool can be used with a power drill for making holes ranging from 1-1/8 to 2-1/2-inches in diameter.
The other type of hole-saw consists of a round "saw blade," yellow, upper right in the photo below. These are mounted on a "mandrel," as seen at lower right below, which can be used with a range of saw sizes. Once mounted on the mandrel, they can be chucked into a standard power drill for use.

Adjustable and Standard Hole-Saws
The circular groove we want to create in our mortar base will be approximately 1/4-inch deep and 1/4-inch wide. If we use the non-adjustable, "saw-blade" type hole-saw to create our 1/4-inch-wide groove in the wood base, we will need to use two closely-spaced sizes in succession, since each of these saws creates a groove that is only about 1/8-inch wide.
A hole-saw with an outside diameter (OD) slightly larger than the paper tube's OD, and a hole-saw with an ID slightly smaller than the tube's ID, can be used--one after the other--to create a circular groove which will be just the right size for our paper tube. If you already have a good selection of the "saw-blade" type hole-saws on hand and the appropriate mandrel(s) to mount them (or you're looking to invest in a set), these tools provide a good option.
However, if you're starting from scratch, the adjustable hole-saw is a less expensive, if not-quite-so robust option.
An adjustable hole-saw can create our desired 1/4-inch-wide groove all in one operation using only one tool. An adjustable hole saw like the one pictured above will cost you about $15 to $20 at hardware stores or online.
Bending one of the adjustable hole saw's three cutting legs outward about 1/8-inch will widen the groove to 1/4-inch wide when it is used. This will also increase the maximum cutting diameter from 2-1/2-inches to 2-3/4-inches, ideal for the TU2238, 2-1/2-inch ID, 2-3/4-inch OD, tubes shown above.

Bending One Leg of the Adjustable Hole-Saw Outward 1/8-Inch
5-1/2-inch-square pieces of soft, white-wood 2x6 construction lumber are perfect to use as single-mortar bases. Measure in from one end of a piece of such lumber 5-1/2-inches and mark a square cut line at that point. Don't saw that piece off yet though. It's much easier and safer to secure and drill a larger piece of wood when drilling.
Put an X at the center of that 5-1/2-inch square. From that center point, measure 1/2-tube-OD up, down, right and left and mark as in the photo below.

Square Base Measured and Tube-Centering Marks Drawn
Center one end of the paper tube on those four marks, and draw its outline on the base.

Tube Circumference Drawn in Center of Wood Base
Put groove-ID hash marks 1/4-inch in from the outer circumference ring. These marks will show you if the groove ID is being cut properly once you start drilling.

Groove ID Marks 1/4-inch inside Outer Circumference Ring Mark
Securely clamp the board to your workbench to prevent it from moving during the drilling operation. Use an awl to make an indentation at the center of the 'X.' This will help you to correctly center the hole-saw pilot bit when the drilling starts.
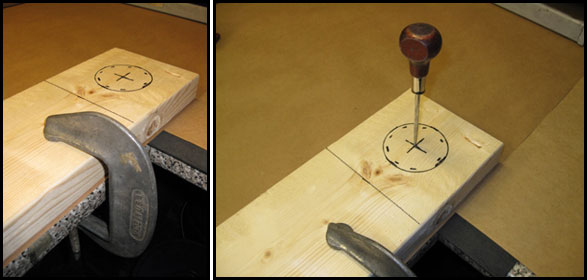
Board Clamped to Workbench, and Center-Point Punched with an Awl
Using the instructions for the adjustable hole-saw, adjust it so that the outermost leg will cut just out to the outer circumference circle, and the innermost leg will cut in just to the groove ID hash marks.
Safety Note: It can get "ugly" if your long hair, shirt sleeve, loose jewelry, or shirt-tail get tangled up with that spinning hole-saw once the cutting starts. For these reasons, be sure that none of the above are out loose where they can get caught up by the tool.
Slowly begin drilling the groove, and verify that a 1/4-inch-wide groove is being cut and positioned correctly. The bend in the one hole-saw leg, and/or the overall diameter adjustment may need to be slightly adjusted to end up with a groove that is just the right thickness and correctly positioned in the wood base.

Drilling the Groove with the Adjustable Hole-Saw
Once the adjustments have been dialed in, slowly drill the groove until it is about 1/4-inch deep, and its bottom is nice and square and clean.

1/4-Inch-Deep, 1/4-Inch-Wide Groove in Wood Base
Test fit the mortar tube. It should fit snugly into the groove in the base and stand on its own.

Mortar Tube Test-Fitted into the Groove
Clean all the sawdust out of the groove. Then saw the square base off the longer piece of lumber.

Grooved Base Cut Off the Length of 2x6 Lumber
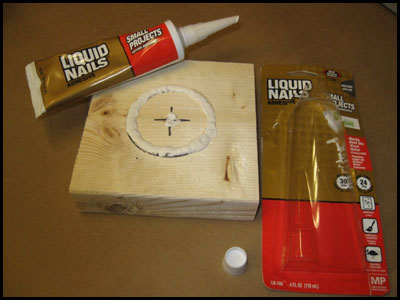
Groove and Pilot Hole Filled with Construction Adhesive
Force the paper tube down into the glue-filled groove. Create a neat, smooth glue fillet by wiping the excess glue off with your finger and onto a paper towel.

Paper Tube Glued into Groove in Base
Allow the adhesive to dry for 24 hours before use.

Creating Visco Fuse Hole Near Bottom of Mortar Tube
Home Depot and other hardware stores sell long spikes (typically 3/8-inch diameter by 10-inches long) for timber-framing or for securing landscape timbers. Drilling a couple of holes in the mortar's wood base to accept such spikes will allow those spikes to be driven into the ground for a secure mortar installation. They're easy and quick to remove after use, and you can use them over and over again.

Mortar Base Equipped with Stabilization Spikes
Determine the number of mortars to be installed, and use a piece of lumber long enough to accommodate them with some space between each mortar.

Planning the Installation of Multiple Mortars on One Base
Mark the centered mortar locations.

Evenly Spaced Mortar Locations Marked on Base
Drill the grooves in the base.
Base Grooves Drilled with Adjustable Hole-Saw
Clean the base and prepare it for mortar gluing.

Base Ready to Have Mortar Tubes Glued in
Fill the pilot holes with glue, and glue the mortar tubes into the base grooves. Allow to dry for 24 hours before fusing, loading, and use.

Single Base with Multiple Mortar Tubes Glued into It
Plastic and fiberglass tubes are even better, of course, but cost a lot more per tube.
Plastic bases for cardboard mortars can work as bases, but I don't recommend 'em. They are weak, and prone to splitting, breaking or completely blowing apart. For small mortars, say an inch or less in ID, plastic bases are fine. For anything bigger, go with wooden bases.
So, if you are willing to do just a little bit of work, you can save yourself a bundle on mortars. This great project from Ned Gorski will show you how to make mortars that work, survive your fireworks use, and that you can re-use over and over again.
In a nutshell, you do two things to cardboard mortars:
- Treat them to make them waterproof.
- Mount them on solid wooden bases.
Harry Gilliam
Making Wood Bases for Paper Mortars
By Ned Gorski
Why Make Wooden Bases?
Let's say we've either scrounged or purchased some paper tubes to use as fireworks mortars. Even though some store-bought tubes come with plastic bases, most don't. And tubes we get from dumpster-diving will never come with an appropriate base.Some of Skylighter's Cardboard Mortar Tubes
How can we easily make and attach economical mortar bases for such tubes? It's actually easy with a few basic tools, and the bases we make are heavier and more substantial than plastic ones. This results in safer, more stable mortars to boot.
Safety Notes:
- Of all the acceptable, commonly used mortar materials, paper is surely the safest. If a device malfunctions and explodes in a cardboard mortar, only lightweight paper fragments will be sent flying.
- Minimum wall thickness should be 3/32 to 1/8-inch for paper-tube mortars up to 2-1/2-inches inside diameter. Thicker is better, of course.
- Your finished mortar length should be about five to seven times the inside diameter of the tube. (You can use shorter tubes for mines.)
Treating Paper Mortars for Long Life
If you're going to go to the trouble of assembling paper tubes with nice wood bases to make mortars, you might as well ensure you get as much use out of them as possible. Here's why treating them first is a must.After black powder ignites inside a mortar, the inside of the gun will be coated with a layer of chemical fouling from the residue of the burnt black powder. This residue is hygroscopic. It will absorb moisture out of the air. This quickly swells the tube, dissolves the glue in the tube, and causes it to unravel, basically ruining an unprotected paper tube.
However, it is easy to waterproof and harden paper tubes with wood hardener or polyurethane. These protective coatings will moisture-proof, strengthen, and harden the tubes, and protect them from damage over time.
Use Polyurethane or Wood Hardener to Treat Paper Tubes
Paper tubes can simply be dunked into a can of polyurethane, one end at a time. Coat any unreachable spots on both the inside and outside of the tube using a foam paint brush such as the one shown in the photo above.
Another easy way to treat cardboard tubes is to make a simple, homemade trough out of sturdy aluminum foil. Pour a shallow pool of the treatment liquid into the trough and roll the tube in it until it is thoroughly coated inside and out.
After treatment, set the tubes aside in a safe and warm location to dry thoroughly.
Mortars treated in this way will last for many more firings than untreated tubes would.
The Rationale for a Well-Made Solid Wood Base
You might be thinking, "Hey, this is a no-brainer. I'll just apply a bead of wood-glue to the bottom of the paper tube, and glue it to the surface of a piece of lumber, et voila, a finished mortar!"Au contraire! Not so fast there, mortar podnah.
When a fireworks shell is launched from a mortar, the same gas pressure that fires the shell into the air is also exerted downward onto the surface of the base, and outward against the walls of the mortar tube.
Lift-Gas Forces Acting on Shell, Mortar-Tube, and Base
If the paper tube has been glued "flat" onto the wood base, only a small and relatively weak glue joint exists where the tube meets the base. This joint is not strong enough to reliably resist the downward and outward lift gas forces. It will likely fail.
When fired, the tube will expand a little and the base will be pushed downward. Quite possibly the joint between the tube and the base will fail and separate. If and when this occurs, the lift gasses will vent out of the tube through the failed joint instead of exerting upward pressure on the shell. The shell will then either fail to reach the correct altitude or even fail to leave the mortar at all. As a result the shell will either explode in the mortar or at a dangerously low altitude.
But, to prevent this problem there's a simple way to create a much stronger joint between the tube and the base. We can make a shallow circular groove, matching the bottom of the mortar, in the wood base. The mortar will then be securely glued into the groove.
Paper Mortar Tube Glued into Groove in Wood Base
This simple modification of the glue joint between the paper tube and the wood base greatly increases the strength of that joint. Enclosing the bottom of the mortar within the groove will help prevent it from expanding outward from the gas pressure when fired. The larger glued contact surface between tube and base will better resist the downward force of the lift gas. It is very hard to get this kind of glued joint to fail.
And the wooden base, heavier than a plastic base, will give your mortar assembly greater stability and reduce the chances of tipping over and firing into your audience.
Creating the Circular Groove in a Piece of Wood
The best way to make the circular groove is with a hole saw.There are a couple of types of hole-saws available. One commonly available type, shown at bottom center of the photo below, is adjustable. This tool can be used with a power drill for making holes ranging from 1-1/8 to 2-1/2-inches in diameter.
The other type of hole-saw consists of a round "saw blade," yellow, upper right in the photo below. These are mounted on a "mandrel," as seen at lower right below, which can be used with a range of saw sizes. Once mounted on the mandrel, they can be chucked into a standard power drill for use.
Adjustable and Standard Hole-Saws
The circular groove we want to create in our mortar base will be approximately 1/4-inch deep and 1/4-inch wide. If we use the non-adjustable, "saw-blade" type hole-saw to create our 1/4-inch-wide groove in the wood base, we will need to use two closely-spaced sizes in succession, since each of these saws creates a groove that is only about 1/8-inch wide.
A hole-saw with an outside diameter (OD) slightly larger than the paper tube's OD, and a hole-saw with an ID slightly smaller than the tube's ID, can be used--one after the other--to create a circular groove which will be just the right size for our paper tube. If you already have a good selection of the "saw-blade" type hole-saws on hand and the appropriate mandrel(s) to mount them (or you're looking to invest in a set), these tools provide a good option.
However, if you're starting from scratch, the adjustable hole-saw is a less expensive, if not-quite-so robust option.
An adjustable hole-saw can create our desired 1/4-inch-wide groove all in one operation using only one tool. An adjustable hole saw like the one pictured above will cost you about $15 to $20 at hardware stores or online.
Bending one of the adjustable hole saw's three cutting legs outward about 1/8-inch will widen the groove to 1/4-inch wide when it is used. This will also increase the maximum cutting diameter from 2-1/2-inches to 2-3/4-inches, ideal for the TU2238, 2-1/2-inch ID, 2-3/4-inch OD, tubes shown above.
Bending One Leg of the Adjustable Hole-Saw Outward 1/8-Inch
5-1/2-inch-square pieces of soft, white-wood 2x6 construction lumber are perfect to use as single-mortar bases. Measure in from one end of a piece of such lumber 5-1/2-inches and mark a square cut line at that point. Don't saw that piece off yet though. It's much easier and safer to secure and drill a larger piece of wood when drilling.
Put an X at the center of that 5-1/2-inch square. From that center point, measure 1/2-tube-OD up, down, right and left and mark as in the photo below.
Square Base Measured and Tube-Centering Marks Drawn
Center one end of the paper tube on those four marks, and draw its outline on the base.
Tube Circumference Drawn in Center of Wood Base
Put groove-ID hash marks 1/4-inch in from the outer circumference ring. These marks will show you if the groove ID is being cut properly once you start drilling.
Groove ID Marks 1/4-inch inside Outer Circumference Ring Mark
Securely clamp the board to your workbench to prevent it from moving during the drilling operation. Use an awl to make an indentation at the center of the 'X.' This will help you to correctly center the hole-saw pilot bit when the drilling starts.
Board Clamped to Workbench, and Center-Point Punched with an Awl
Using the instructions for the adjustable hole-saw, adjust it so that the outermost leg will cut just out to the outer circumference circle, and the innermost leg will cut in just to the groove ID hash marks.
Safety Note: It can get "ugly" if your long hair, shirt sleeve, loose jewelry, or shirt-tail get tangled up with that spinning hole-saw once the cutting starts. For these reasons, be sure that none of the above are out loose where they can get caught up by the tool.
Slowly begin drilling the groove, and verify that a 1/4-inch-wide groove is being cut and positioned correctly. The bend in the one hole-saw leg, and/or the overall diameter adjustment may need to be slightly adjusted to end up with a groove that is just the right thickness and correctly positioned in the wood base.
Drilling the Groove with the Adjustable Hole-Saw
Once the adjustments have been dialed in, slowly drill the groove until it is about 1/4-inch deep, and its bottom is nice and square and clean.
1/4-Inch-Deep, 1/4-Inch-Wide Groove in Wood Base
Test fit the mortar tube. It should fit snugly into the groove in the base and stand on its own.
Mortar Tube Test-Fitted into the Groove
Clean all the sawdust out of the groove. Then saw the square base off the longer piece of lumber.
Grooved Base Cut Off the Length of 2x6 Lumber
Gluing the Mortar Tube into the Base Groove
Fill the center pilot-hole and the groove with construction adhesive.Groove and Pilot Hole Filled with Construction Adhesive
Force the paper tube down into the glue-filled groove. Create a neat, smooth glue fillet by wiping the excess glue off with your finger and onto a paper towel.
Paper Tube Glued into Groove in Base
Allow the adhesive to dry for 24 hours before use.
Drilling a Fuse Hole if Desired
If the mortar is to be fused into its bottom with visco ignition fuse, use a sharp awl or a drill and 1/8-inch drill bit to create a fuse hole about 1/4-inch above the glue fillet.Creating Visco Fuse Hole Near Bottom of Mortar Tube
Securely Erecting the Mortar
If the mortar is to be used on a hard, flat, level surface, it can be fired as-is without further stabilization. But if the mortar is to be used on a dirt or grass surface, you should take extra precautions to secure it in an upright position and prevent it from tipping over.Home Depot and other hardware stores sell long spikes (typically 3/8-inch diameter by 10-inches long) for timber-framing or for securing landscape timbers. Drilling a couple of holes in the mortar's wood base to accept such spikes will allow those spikes to be driven into the ground for a secure mortar installation. They're easy and quick to remove after use, and you can use them over and over again.
Mortar Base Equipped with Stabilization Spikes
How to Make a Line of Mortars on One Base
Sometimes it's nice to have a line of mortars on one base where they can be fused together as a multiple-shot device, like a consumer-fireworks "cake." Using the same general processes as above, this is easy to do.Determine the number of mortars to be installed, and use a piece of lumber long enough to accommodate them with some space between each mortar.
Planning the Installation of Multiple Mortars on One Base
Mark the centered mortar locations.
Evenly Spaced Mortar Locations Marked on Base
Drill the grooves in the base.
Base Grooves Drilled with Adjustable Hole-Saw
Clean the base and prepare it for mortar gluing.
Base Ready to Have Mortar Tubes Glued in
Fill the pilot holes with glue, and glue the mortar tubes into the base grooves. Allow to dry for 24 hours before fusing, loading, and use.
Single Base with Multiple Mortar Tubes Glued into It