How to Make a Star Pattern Shell
Introduction
A shell which bursts with a ring pattern, a smiley-face, or a star pattern can be a unique and creative addition to a fireworks display. Suddenly, after a procession of fairly typical full, spherical shell bursts, a simple ring of stars, or a display of four or five of them fired simultaneously, changes the focus of attention of the audience. "Hey, here's something different," they'll think to themselves.
Pattern Shell with a Star Inside a Ring
Pattern shells have some distinct advantages and disadvantages to their construction. They don't use nearly the quantity of stars that a fully loaded shell would use, so if I have a few stars of a particular size and color, they might come in useful in a pattern shell. Patterns can be chosen to coincide with a particular theme in a show, with blue stars in a patriotic section, or pink hearts in a romantic interlude.
On the other hand, it will be hit-or-miss when it comes to the pattern's orientation in the sky when the shell bursts. The smiley-face may display upside-down, or the ring may be seen on edge by a portion of the audience, looking more like a simple line in the sky. For this reason, most display designers choose to fire 4, 5, or 6 of the same or similar patterns at the same time. That will usually result in the audience in a particular location seeing at least 1 or 2 of them in the desired orientation.

Six Ring Pattern Shells, With Only Three Oriented Toward the Camera
If 6 ring-pattern shells of different colors are fired at once, the audience at one end of the field may see, say, the blue and red ones as true rings, and imagine all of them being the same shape.
Ring shells can use simple color stars, which leave no tail behind them, as in the photo above, or tailed stars can be employed, as below.

M.C. Escher's Lithograph, "Vuurwerk" (Fireworks)
This Escher print, "Vuurwerk," is on the cover of Pyrotechnica XI. It shows a pattern I would expect a ring shell of slow-burning, silver-tailed stars to display. It would have to be oriented so that the ring broke "flat" in order to display the "parasol" of stars just right.
A small rising tail produces the "handle" to the umbrella.
An advantage to using patterns such as rings, stars, squares or triangles is that they can break in many directions that still have them look correct, as long as they don't break on-edge to the viewer. A smiley-face has to break in just the right direction to be recognizable.
The star-in-a-ring pattern shown below would look correct if it was rotated any number of degrees clockwise or counter-clockwise. It would also look fine if it was flipped 180 degrees front to back. The only way it would not show up well is if it broke on-edge to the viewer.
Star in a Ring Pattern Shell
My friend, Mike B., made the heart-pattern shell shown below. While it did not break on-edge to the audience, unfortunately it did break almost upside-down. The fortunate thing about hearts is that they look good in almost any orientation, and the audience can make out what they are supposed to be representing.

Heart Pattern Shell
Making a pattern shell
I want to make a blue star-pattern shell. I don't want to make my stars much smaller than 3/8-inch in diameter, so that they burn long enough to allow the pattern to show up. Additionally, ball shells break more symmetrically than cylinder shells. For these reasons, I've settled on assembling an 8-inch ball shell for this project. With 3/8-inch stars, a smaller shell simply wouldn't allow the use of enough stars to create a nice star pattern.The general construction techniques I'll be using when assembling and finishing this shell were detailed in "Tiger Willow Shells in 2-1/2 Days, Day 1", "Tiger Willow Shells in 2-1/2 Days, Day 2" and "Tiger Willow Shells in 2-1/2 Days, Day 3". I'll be using 1/4-inch time-fuse in this shell, though, instead of a spolette. The use of time-fuse was explained in "Fireworks Shell Making Using 4-Inch Plastic Balls".
The first thing I did was draw a pattern of the stars that would fit the inside diameter of one of my 8-inch shell casings, which has an ID of 7.25 inches. 360 degrees divided by 5 gave me 72 degrees between each of the points of the 5-pointed star, which I measured out with my protractor.
My 3/8-inch pumped stars actually end up being about 7/16-inch in diameter once they are primed, so I drew lines of that size star on my pattern. Precision in these initial planning stages, right through the actual construction of the shell, will result in a more precise star-pattern in the sky when the shell bursts.

Star Pattern for an 8-Inch Ball Shell
I took a piece of tissue paper, cut a circle out of it about 1/2-inch larger in radius than my drawing above, and traced the star pattern onto it.
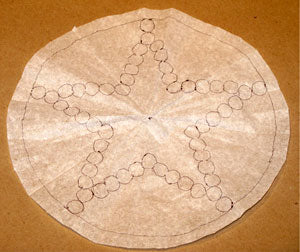
Star Pattern Traced Onto Tissue Paper
Then I made some blue stars. "Tiger Willow Shells in 2-1/2 Days, Day 1" and Day 2 included instructions for making and priming pumped stars.
Although I didn't need a large number of these stars, it was important that all the stars were consistent in size. For this reason I used a 3/8-inch star plate to make a pound of the Shimizu Blue star included in 14 Great Cut Star Fireworks Formulas.
| Shimizu Blue Star Formula | Percentage | 16-ounce batch | 450-gram batch |
| Potassium Perchlorate | 0.61 | 9.75 ounces | 274.5 grams |
| Copper Carbonate | 0.12 | 1.9 ounces | 54 grams |
| Parlon | 0.13 | 2.1 ounces | 58.5 grams |
| Red Gum | 0.09 | 1.45 ounces | 40.5 grams |
| Dextrin | 0.05 | 0.8 ounces | 22.5 grams |
I dampened this composition with an additional 10% water, and pumped and dried the stars. I primed them with the black powder "meal prime" which is also in that formula table cited above. I add an additional 5% of 200-mesh magnalium to the prime, which improves the ignition of perchlorate stars.
Constructing the Shell
As I said above, the shell was constructed in the standard fashion, except for the details below.Once I had the time-fuse and passfire-tube installed in the shell casing, I hot-glued a 1.5-inch wide tissue paper ring inside each hemisphere at the equator. These bands served the purpose of locking the shell's contents into the hemispheres later on when I closed the shell.

Tissue Paper Bands Hot-Glued at the Equators of Each Hemisphere
Then I filled the fused hemisphere with black-powder-coated rice hulls, folded the tissue-paper band over onto the hulls, and hot-glued a tissue-paper disc onto the whole shebang to cover and seal it. As I loaded the hemi with the coated hulls, I packed them tightly one layer at a time to make sure the casing was solidly filled. I also filled the hemi slightly higher than the equator. This half of the shell held 29.4 ounces (825 grams) of the coated hulls.

Fused Shell Hemisphere Filled With Black-Powder-Coated Rice Hulls
Then I filled the un-fused hemi with coated rice hulls up to within about 3/8 inch of the rim. I made sure the rice hulls were tightly packed and very level. This filling was loosely capped off with the tissue paper disc which had the star-pattern traced on it.

Second Shell Hemisphere Filled to Within 3/8 Inch of Rim, and Capped With Star Patterned Tissue Paper Disc
Starting with the points of the star, blue stars were lightly hot-glued onto the tissue pattern. These stars only had a small dot of hot glue put on them where they touched the pattern. Just before the shell bursts, the tissue paper disintegrates and the stars are free to fly out in the star shape.

Hot-Gluing Blue Stars Onto Tissue Paper Pattern
Then I filled in around the stars with more black-powder-coated hulls, tightly filling all the voids and bringing the level of the rice hulls slightly above the rim of the casing. This hemi actually took about 35 ounces (1000 grams) of the coated rice hulls, for a total of about 4 pounds (1800 grams) in the whole shell. This was all capped with another hot-glued disc of tissue paper.

Black-Powder-Coated Rice Hulls Filled in around Blue Stars, Both Hemispheres Capped and Ready to be Mated
Because the tissue paper rings and discs were glued to the shell casing hemispheres, it was easy to flip one of the hemis over onto the other and close the shell up, ready for pasting, lifting and leadering.
With the blue stars sandwiched between the layers of tissue paper, with the rice hulls really packed in tightly and the hemis overfilled and slowly tapped and brought together, the star pattern was held firmly in place.
I've developed a nifty trick for bringing the stuffed hemis together at the equator. I use 4 strap-clamps, available at Home Depot or stores which cater to woodworkers.
As the clamps are slowly tightened, tapping the shell with a solid, heavy rod brought the two halves together and solidly packed the contents. Then the joint was closed with strips of masking tape. This method is so much easier than "laying" on the shell while tapping it in order to close it.

Closing an Aerial Shell Using Strap-Clamps and Masking Tape
Warning: I use a non-sparking, aluminum rod for tapping on the shell. But, the metal strap-clamp parts are not non-sparking. I'm working around relatively exposed black powder on rice hulls during this process. I'm very careful to avoid smacking the metal clamp ratchets, which could potentially cause sparks.
Then I pasted the shell, allowed it to dry, and lifted and leadered it. A small rising comet tail was attached to direct the viewer's eye toward where the shell will break.
When I shot this shell, it did indeed break a bit on its "side" relative to the camera, as shown in the photo below. There were viewers down and to the left of the shell-burst, and they said that the star really looked nice, big, and symmetrical.
Oh, well, maybe I'll get to see it next time.
Star Pattern Shell Bursting
Final Thoughts
I enjoy making pattern shells. They offer a unique challenge in shell construction, and use less of the chemicals that go into stars. More black-powder-coated rice hulls are used than in a typical chrysanthemum or peony aerial shell, but these are the less expensive ingredients.I think an audience enjoys the variety that these pattern shells bring to a display.
The next time I make a shell like the one in this project, I think I'll add a red ring around the blue star pattern so the sky is filled a bit more when the shell bursts.
I'm working on my version of a way to at least have aerial shells burst with their equators level with the earth. This will allow rings, star patterns, etc, to display well for anyone underneath them. The method is one that I've heard about over the years, but have never seen, where a rope is attached to the bottom of the shell to produce drag on the shell's way up. This keeps the shell oriented with its "bottom" down on the way up.
I plan on shortening the shell's time fuse delay so that the shell bursts before apogee while it is still oriented correctly. I'll keep you posted on the progress in this project.
Have fun and stay green,
Ned
Materials Needed
- Black Powder Coated Rice Hulls
- Copper Carbonate (CH8087)
- Dextrin (CH8107)
- Magnalium, -200 mesh (CH2073)
- Paper Hemispheres, 8-inch (PS2080)
- Parlon (CH8210)
- Potassium Perchlorate (CH5400)
- Red Gum (CH8230)
- Time Fuse (GN2010)
- Tissue Paper