Instructions For Making Ematches With GN5051 Electric Match Dip Kit
Making electric matches is a dangerous activity. If you do it wrong, you could hurt yourself very badly or start a fire. Before you start read the instructions completely. They can save your life.
- First and foremost, think safety. The attitude to have is that there could be an accident. Think about what could go wrong, about what you could do to prevent that from happening, and what you would do if you something did go wrong. For instance, if there were a fire, where would you go? What would you put it out with? Etc.
- You should only mix these chemicals in a well-ventilated area away from any heat source or sparks.
- Your kit comes with several jars of chemicals. To maintain a good seal on the jars keep their lids screwed on tight. Keep the inside of the lids and the lips of the jars clean and free from any unused pyrogen.
- Wear a long sleeve cotton shirt, and long cotton pants. In the event of a flash fire, cotton garments will protect your skin. Do NOT wear synthetics. In a flash fire, they will melt to your skin.
- Use eye protection. Glasses or slip-on plastic goggles will protect your eyes in the event of a flash fire.
- Do not allow small children near these chemicals.
- Never stare directly at a burning electric match without the aid of welding goggles.
- Do not store any mixed chemicals or finished electric matches in an inhabited building.
- Store this product in an environment that will be maintained at a temperature between -20 to 140 degrees F.
- Wash hands thoroughly after each use.
- Dispose of any leftover or unwanted pyrogen in accordance with all applicable laws. We recommend that you burn it. Storage life of unused pyrogen has not been determined at this time.
Electric matches (often called ematches) are used to remotely ignite fireworks. Once they are made, they are fairly safe to use and handle. The small explosion made by an ematch is about the same power as a toy cap. But they are friction and impact sensitive, so some care should be taken in using them with fireworks or around black powder and other explosive compositions.
An ematch can be used only one time. They work this way. At the heart of each ematch is a very thin nichrome wire bridging a small gap on the leading edge of a chip cut from circuit board material. This nichrome wire is soldered to the chip on both sides of the gap. When an electrical current is introduced to the wire, it heats up and melts. The heat from the melting wire then ignites one or more layers of pyrotechnic material (“pyrogen”) coating the tip of the ematch. It is this ignition, which creates the characteristic pop or snap sound of the ematch explosion.
This kit is designed to make it easy for you to make electric matches. All the materials have been pre-measured for you. The kit is designed to be used with electric match heads and with match heads that already have wires soldered on to them. Because there are so many variables in making ematches, we cannot guarantee your success with them. But if you follow these directions, you should be able to make very reliable ematches, which will light just about any kind of firework or fuse.
How to Make Electric Matches
This kit should contain:- 1-Bottle "A" Fuel
- 1-Bottle "B" Oxidizer
- 1-Bottle "C" Solvent
- 1-Plastic Pipette
- 5-Wooden Flat Toothpicks
- 2-Wooden "Stir Sticks"
- 1-Heavy Paper Shop Towel
Place Bottle "A" Fuel on a stable flat surface in a safe place for working, away from any source of flame or anything flammable. Remove the cap from the bottle and stir the wet fuel with one of the wooden stir sticks until it is smooth and uniform. Make sure to get all of the fuel from the bottom of the bottle included in the mixture. Never use anything metallic to stir the fuel.
Shake Bottle "B" Oxidizer vigorously and transfer all of the contents into Bottle "A." Be sure to completely empty Bottle "B" into Bottle "A." The mixture of the Oxidizer and Fuel is now a sensitive pyrogen. Using the stir stick blend the pyrogen mixture until it is smooth and uniform.
The pyrogen will be rather thick until it is completely mixed. It should end up being the consistency of Hershey's Chocolate Syrup. If necessary, add 20 drops from Bottle "C" Solvent to adjust the viscosity. Repeat as needed until the pyrogen drips very slowly and smoothly from the stirring stick as it is withdrawn from the bottle. Do not use anything but Bottle "C" Solvent for thinning. If any pyrogen gets on the top of the glass bottle, gently push it back into the bottle, and wipe it clean. Do not allow any of the pyrogen to remain on the rim or threads of the bottle or to be caught under the cap. The mixed pyrogen is friction sensitive.
The viscosity of the pyrogen must be adjusted to produce a coating that is approximately the same thickness as the ignition chip circuit board--1/10 inch (2.5 mm).
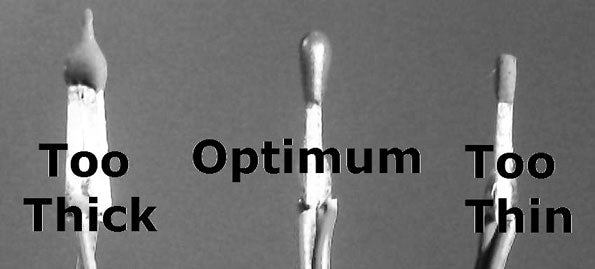
Figure 1: Optimum Thickness of Pyrogen
Before beginning to dip your Ignition Chips, dip a flat toothpick into the pyrogen to check the thickness of the coating. The pyrogen should coat smoothly and produce a rounded shape. If a "tail" or point is produced, the viscosity is too high/thick. Add 20 drops of Solvent and stir until smooth. Repeat if necessary to further reduce the viscosity. If the viscosity is too low the coating will be too thin. There are two ways to correct this problem: either leave the cap off the pyrogen for a while, stirring occasionally to evaporate some of the solvent, or dip each match repeatedly until the coating looks like the ematch in the center of Figure 1 above. Dispose of the dipped toothpicks by carefully burning them in a safe place.
When you are certain that the pyrogen is uniformly mixed and smooth, and has the proper viscosity, take an Ematch Blank (#GN5040) and slide the plastic shroud back off the ignition chip. Kink the wire to hold the shroud back while dipping. Then, dip the narrow end (the end without wires) into the pyrogen about 1/8 to 3/16 of an inch (3 to 4.5mm). The coating on your ematch should look like the center "Optimum" ematch in Figure 2.
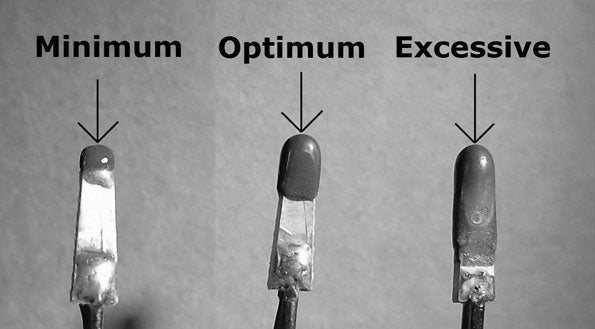
Figure 2: Optimum Length of Pyrogen
While this may not seem to be much pyrogen, no more is necessary. This small amount of pyrogen will produce a 1.5-inch fireball from the end of the plastic shroud. The best way to get the correct coating is to dip the ignition chip into the pyrogen slowly and withdraw it very slowly (taking 2-3 seconds) from the pyrogen to allow the excess to flow from the ignition chip without leaving a "tail." Hang the ignition chip, head down, to dry for at least 15 minutes before firing.
The shelf life of the mixed pyrogen, with the cap screwed tightly on, is more than a year. The mixed pyrogen is an explosive, and must be stored in compliance with BATF rules. To dispose of any unused, mixed pyrogen, dilute the pyrogen with lacquer thinner, pour it on a paper shop towel and burn carefully outdoors in a safe place while still wet.
If you have any problems or questions, please let us know.