How to Make Firework Shells Quick & Easy Using Plastic Parts
These little, quick-and-easy shells are perfect for testing stars in a star shell, and also for simple shells for a backyard display. You can even attach gold glitter rising tails to the top of them.
With a little assembly line, a bunch of these small shells can be quickly made for launch the same day.
I'll be starting with Skylighter #PL1020 plastic aerial fireworks shell casings. These casings come with a 3/32-inch hole in the cap to accommodate visco time fuse. One could also use PL1022 casings, which come with a 7/32-inch hole in the cap. (I won't be using the fuse hole in the cap, so the size of the hole makes no difference.)

PL1022 Plastic Aerial Fireworks Shell Casings
I'll also be using 1/4-inch Chinese time fuse, GN2010, and super-fast paper firecracker fuse, GN1205. This same paper fuse can be used as a quickmatch leader by wrapping it with peel-and-stick aluminum foil duct-tape, or standard GN3001 quickmatch may be used.

1/4-Inch Holes Drilled in the Bottoms of Plastic Shell Casings
In the 4-inch plastic ball shell project, I describe 1/4-inch time fuse, how to determine its burn rate, and how to split and cross-match it.
The roll of time fuse that I'm currently using burns at a rate of 2.2 seconds per inch. For these little shells I want a 1.5-second time delay, which is about 5/8-inch of time fuse. I also add one inch to that length because I'll be splitting each end 1/2-inch for the cross-matching, so I cut 1-5/8-inch lengths of the time fuses for these six shells.
I split and cross-match one end of each fuse with short pieces of black-match out of the fast paper firecracker fuse or out of quickmatch.

Split and Cross-Matched Lengths of Time Fuse
After making sure the time fuses fit through the holes in the plastic cans, I put a ring of hot-glue around the mid-point of one fuse at a time, and insert the fuses into the plastic casings. I pull each fuse through until the cross-matching on the fuse is almost against the bottom of the can, keeping the cross-matching just out of the inside hot-glue.

Cross-Matched Time Fuse Hot-Glued into the Bottom of Shell Casing
Then I add another bead of hot-glue around the outside of the time fuse to really seal the lift gasses out of the shell when it is launched.

Time Fuses Sealed on the Outside of the Plastic Shell Cans
I fill the holes and recesses in the casing caps with hot-glue now.

Recesses in Shell Casing Caps Filled with Hot-Glue
Making and Testing High-Powered Black Powder included several different ways of making and granulating black powder. In the following step, either granulated BP or BP coated on rice hulls may be used. Either commercial or homemade black powder would be suitable.
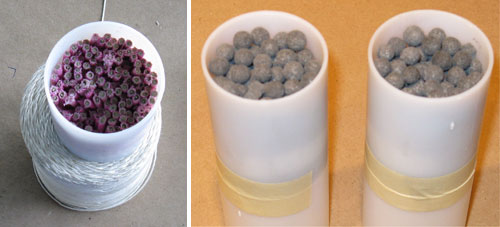
I fill the bottom of the shell can with BP coated rice hulls up to the level of the tip of the time fuse.

Bottom of Shell Casing Filled with Black Powder on Rice Hulls
Then I cut a circle out of cheap tissue paper and press it down on top of the black powder charge. A small paper cup, with the sides slit with scissors, is the perfect size for pushing the tissue paper down into the plastic can.
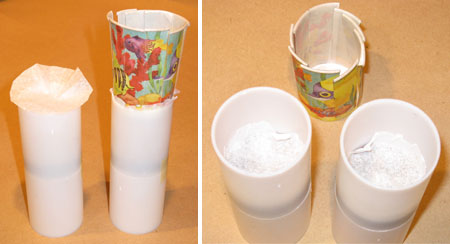
Pushing Circles of Tissue Paper into Plastic Shell Casings
Then it is a simple matter of filling the shell casings with stars or flying fish fuse, up to a level which will allow the caps to be glued on.
Shell Casings Filled with Flying Fish Fuse and Round Stars
Note: In some of these photos, I've temporarily taped the fused end of the shells that I'm working on onto the open end of empty casings so that the shell will stand upright during construction.
Next simply glue on the shell caps with PVC plumbing cement or thickened methylene chloride. I also further secure the cap on with a layer of masking tape.

Cap of Plastic Shell Casing Glued and Taped in Place
The outside end of the time fuse is now split with a razor blade, and cross-matching is inserted and tied in place.

Time-Fuse, Split and Cross-Matched
I weigh out 1/2-ounce of 2FA lift powder for each shell. Fg or FFg commercial sporting black powder could also be used.
I place the lift powder in a plastic baggie, insert a piece of quickmatch leader with some of the black match bared, and tape the baggie closed around the quickmatch leader. The excess baggie plastic is trimmed off with scissors.

Black Powder Lift in Plastic Baggie, with Quickmatch Leader
I hot-glue the leader to the side of the shell, and cover the lift powder and time-fuse with aluminum-foil duct tape.

Bottom of Shell Covered with Aluminum-Foil Duct Tape
Then I tape some lengths of visco safety fuse into the leaders, and the shells are ready to be loaded into mortars and fired.

Aerial Fireworks Shells Ready to Be Loaded and Fired
If I had wanted a more traditional shell starburst, I would have mixed the black-powder-rice-hull burst with the stars throughout the shell, and perhaps would have used some of the slow-flash booster.
The sky-mine type of burst was achieved with the shells made in this project, as evidenced by the plastic parts when they were retrieved from the field after firing.
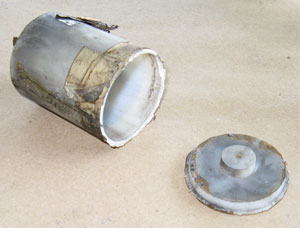
Plastic Shell Parts after Shell Has Been Fired
Here's a video of thes 2-Inch Fireworks Shells. One made with lemon crackling flying fish, one with red crackling flying fish, and one made with variegated (multi-colored) stars.
2-Inch Firework Shells
Note: I tried a shell with falling leaves fuse, and while some of the fuse pieces lit, many did not. I've heard that some of these "special effects" fuses, in order to ensure good ignition, need to be primed by dipping their ends in nitrocellulose lacquer and then in fine black powder. I did not try that, though, and will leave it up to the reader's experimentation.
First I construct two of the shells, in this case using multi-colored stars, using the same construction as outlined above, except that I want a one-second delay on the first shell, and a two-second delay on the second shell.
To accomplish this, I cut one piece of fuse 1-7/16-inches long, and the other piece 1-7/8-inches long. After splitting and cross-matching, this will produce the two delays I am looking for.
After I construct the two shells, I hot-glue 1-1/2-inch chipboard discs into the recesses in the ends of the shells to make those ends flat and flush.

Plastic Shell Casings and Time Fuse for Peanut Shell, and Filled Casings with Paper Discs Glued in Ends
Then, I hot-glue the two shells end-to-end, and cross-match the two time fuses. I also reinforce the joint between the shells with two turns of masking tape.

Assembled Peanut Shells with Cross-Matched Time Fuses
The shell is lifted and leadered as the shells above were, except I increased the amount of lift powder to 0.65 ounce.

Lift Powder and Shell Leader
The quickmatch is hot glued to the side of the shell, and next to the top time fuse. I open up a small "window" in the side of the quickmatch so that fire transfers to the top time fuse when the leader lights.

Passfire "Window" in Quickmatch Leader at Upper Shell's Time Fuse
Then it's simply a matter of using aluminum foil tape to cover the bottom of the shell and the passfire "window" at the top.

Sealing the Shell's Top and Bottom with Aluminum Foil Duct Tape
Inserting some visco safety fuse finishes off the shell, and she's ready for the firing line.
Video of This Peanut Shell
Note: This type of shell, where the time fuses of both shells are ignited at the same time during the shell's lift out of the mortar, is called a peanut shell, or a "piled shell." A "multiple-break" shell is one in which each successive shell takes fire from the burst of the preceding one.
Have fun with these simple shells,
Ned
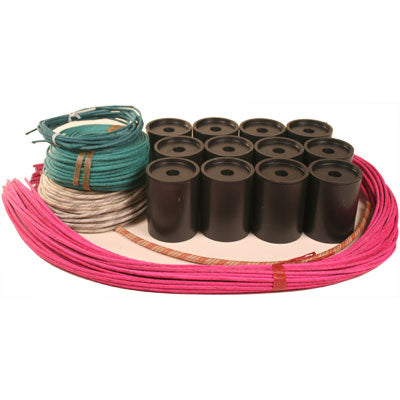
Materials Needed
Make Your First Aerial Shells From Start to Finish
Get enough materials to make 12, two-inch crackling flying fish canister shells.
With a little assembly line, a bunch of these small shells can be quickly made for launch the same day.
I'll be starting with Skylighter #PL1020 plastic aerial fireworks shell casings. These casings come with a 3/32-inch hole in the cap to accommodate visco time fuse. One could also use PL1022 casings, which come with a 7/32-inch hole in the cap. (I won't be using the fuse hole in the cap, so the size of the hole makes no difference.)
PL1022 Plastic Aerial Fireworks Shell Casings
I'll also be using 1/4-inch Chinese time fuse, GN2010, and super-fast paper firecracker fuse, GN1205. This same paper fuse can be used as a quickmatch leader by wrapping it with peel-and-stick aluminum foil duct-tape, or standard GN3001 quickmatch may be used.
Shell Construction
I will not be inserting time fuse in the caps of these shells, but through 1/4-inch holes drilled in the bottom of the plastic cans. This makes the assembly that I'm about to describe really easy.1/4-Inch Holes Drilled in the Bottoms of Plastic Shell Casings
In the 4-inch plastic ball shell project, I describe 1/4-inch time fuse, how to determine its burn rate, and how to split and cross-match it.
The roll of time fuse that I'm currently using burns at a rate of 2.2 seconds per inch. For these little shells I want a 1.5-second time delay, which is about 5/8-inch of time fuse. I also add one inch to that length because I'll be splitting each end 1/2-inch for the cross-matching, so I cut 1-5/8-inch lengths of the time fuses for these six shells.
I split and cross-match one end of each fuse with short pieces of black-match out of the fast paper firecracker fuse or out of quickmatch.
Split and Cross-Matched Lengths of Time Fuse
After making sure the time fuses fit through the holes in the plastic cans, I put a ring of hot-glue around the mid-point of one fuse at a time, and insert the fuses into the plastic casings. I pull each fuse through until the cross-matching on the fuse is almost against the bottom of the can, keeping the cross-matching just out of the inside hot-glue.
Cross-Matched Time Fuse Hot-Glued into the Bottom of Shell Casing
Then I add another bead of hot-glue around the outside of the time fuse to really seal the lift gasses out of the shell when it is launched.
Time Fuses Sealed on the Outside of the Plastic Shell Cans
I fill the holes and recesses in the casing caps with hot-glue now.
Recesses in Shell Casing Caps Filled with Hot-Glue
Making and Testing High-Powered Black Powder included several different ways of making and granulating black powder. In the following step, either granulated BP or BP coated on rice hulls may be used. Either commercial or homemade black powder would be suitable.
I fill the bottom of the shell can with BP coated rice hulls up to the level of the tip of the time fuse.
Bottom of Shell Casing Filled with Black Powder on Rice Hulls
Then I cut a circle out of cheap tissue paper and press it down on top of the black powder charge. A small paper cup, with the sides slit with scissors, is the perfect size for pushing the tissue paper down into the plastic can.
Pushing Circles of Tissue Paper into Plastic Shell Casings
Then it is a simple matter of filling the shell casings with stars or flying fish fuse, up to a level which will allow the caps to be glued on.
Shell Casings Filled with Flying Fish Fuse and Round Stars
Note: In some of these photos, I've temporarily taped the fused end of the shells that I'm working on onto the open end of empty casings so that the shell will stand upright during construction.
Next simply glue on the shell caps with PVC plumbing cement or thickened methylene chloride. I also further secure the cap on with a layer of masking tape.
Cap of Plastic Shell Casing Glued and Taped in Place
The outside end of the time fuse is now split with a razor blade, and cross-matching is inserted and tied in place.
Time-Fuse, Split and Cross-Matched
Lifting and Leadering the Shells
I'll be shooting these babies out of a 2-1/2-inch HDPE mortar that I own. It's the smallest one that I have that these shells will fit into, and they will be a slightly loose fit.I weigh out 1/2-ounce of 2FA lift powder for each shell. Fg or FFg commercial sporting black powder could also be used.
I place the lift powder in a plastic baggie, insert a piece of quickmatch leader with some of the black match bared, and tape the baggie closed around the quickmatch leader. The excess baggie plastic is trimmed off with scissors.
Black Powder Lift in Plastic Baggie, with Quickmatch Leader
I hot-glue the leader to the side of the shell, and cover the lift powder and time-fuse with aluminum-foil duct tape.
Bottom of Shell Covered with Aluminum-Foil Duct Tape
Then I tape some lengths of visco safety fuse into the leaders, and the shells are ready to be loaded into mortars and fired.
Aerial Fireworks Shells Ready to Be Loaded and Fired
The Aftermath
My goal with this type of shell construction was the creation of a sort of "sky-mine" effect, where the shell contents are propelled out of the open end of the shell casing. I did not want the whole shell casing splitting open and bursting like a typical aerial shell. I thought the sky-mine effect would look better, especially with the flying fish fuse.If I had wanted a more traditional shell starburst, I would have mixed the black-powder-rice-hull burst with the stars throughout the shell, and perhaps would have used some of the slow-flash booster.
The sky-mine type of burst was achieved with the shells made in this project, as evidenced by the plastic parts when they were retrieved from the field after firing.
Plastic Shell Parts after Shell Has Been Fired
Here's a video of thes 2-Inch Fireworks Shells. One made with lemon crackling flying fish, one with red crackling flying fish, and one made with variegated (multi-colored) stars.
2-Inch Firework Shells
Note: I tried a shell with falling leaves fuse, and while some of the fuse pieces lit, many did not. I've heard that some of these "special effects" fuses, in order to ensure good ignition, need to be primed by dipping their ends in nitrocellulose lacquer and then in fine black powder. I did not try that, though, and will leave it up to the reader's experimentation.
A "Peanut" Shell Using Plastic Shell Casings
It is easy to construct a peanut shell with these small plastic shell casings. (A peanut shell is actually a shell that breaks twice, with a delay between breaks. It is called a peanut, because some shells made this way are constructed of two small, spherical shells. When taped together they resemble a peanut.)First I construct two of the shells, in this case using multi-colored stars, using the same construction as outlined above, except that I want a one-second delay on the first shell, and a two-second delay on the second shell.
To accomplish this, I cut one piece of fuse 1-7/16-inches long, and the other piece 1-7/8-inches long. After splitting and cross-matching, this will produce the two delays I am looking for.
After I construct the two shells, I hot-glue 1-1/2-inch chipboard discs into the recesses in the ends of the shells to make those ends flat and flush.
Plastic Shell Casings and Time Fuse for Peanut Shell, and Filled Casings with Paper Discs Glued in Ends
Then, I hot-glue the two shells end-to-end, and cross-match the two time fuses. I also reinforce the joint between the shells with two turns of masking tape.
Assembled Peanut Shells with Cross-Matched Time Fuses
The shell is lifted and leadered as the shells above were, except I increased the amount of lift powder to 0.65 ounce.
Lift Powder and Shell Leader
The quickmatch is hot glued to the side of the shell, and next to the top time fuse. I open up a small "window" in the side of the quickmatch so that fire transfers to the top time fuse when the leader lights.
Passfire "Window" in Quickmatch Leader at Upper Shell's Time Fuse
Then it's simply a matter of using aluminum foil tape to cover the bottom of the shell and the passfire "window" at the top.
Sealing the Shell's Top and Bottom with Aluminum Foil Duct Tape
Inserting some visco safety fuse finishes off the shell, and she's ready for the firing line.
Video of This Peanut Shell
Note: This type of shell, where the time fuses of both shells are ignited at the same time during the shell's lift out of the mortar, is called a peanut shell, or a "piled shell." A "multiple-break" shell is one in which each successive shell takes fire from the burst of the preceding one.
Have fun with these simple shells,
Ned
Materials Needed
- #5 Cylinder Shell (PL1020)
- Aluminum Foil Duct Tape
- Black Powder Coated Rice Hulls
- Disk, Chipboard, 1-1/2 inch
- Flying Fish Fuse
- Hot-glue
- Lift Powder, 2FA, Fg or FFg
- Masking Tape
- Methylene Chloride (CH8193)
- Paper Cup, small
- Plastic Bag
- Razor Blade
- Super-fast Paper Firecracker Fuse (GN1205), if not using GN3001
- Time Fuse, 1/4-inch (GN2010)
- Tissue Paper
Make Your First Aerial Shells From Start to Finish
in an Hour or Less!
2-inch Cylinder Shell Kit

Check Out the Kit & Order Here