Making 1.75-Inch Bag & Piston Mines
Introduction
In its simplest form, a fireworks mine is a device which shoots a spray of stars skyward from ground level. This dramatic low-level effect, complementing and contrasting with high aerial shells, can lend welcome variety to any fireworks display.Mines can be used to augment the beats in music. Many mines spaced out across your firing area may be fired simultaneously in what is called a "mine front." Or they can be fired in rapid sequence down the line from one side of the field to the other in what is called a "mine run."
These mines are quick, easy and inexpensive to make. So, many of them can be made to provide more devices for a show--and homemade devices at that!
Fireworks Mines

Mine "Front" of Blue Mines with Shells Above
The construction of these mines and the equipment used to fire them can vary considerably, and many different effects can be created. For example:
- Standard length mortar tubes will fire tall, narrow sprays of stars. Short mortars will create short, wide star-sprays.
- Fast burning stars will create vertical rays of light which burn out at the top. Slower burning stars will arc over, creating gracefully drooping spark displays.
- Other inserts besides stars may be used in mines. Small homemade devices or "repurposed" consumer fireworks devices such as hummers, bees, whirlwinds, and reports, as well as flying-fish-fuse, and go-getters may be used, either individually or in combinations with each other.
Materials Needed
- Black Powder Lift (Fg, 2FA or 4FA)
- Cardboard Discs, 1-5/8"
- Consumer Mortar Tubes (PL3170, PL3182)
- Cotton String
- Digital Scale (TL5021)
- Duct Tape
- Elmers Glue
- Firework Stars, 3/8"
- Fuse Cutter, Razor Blade or Anvil Cutters
- Hole Punch or Drill, 3/8"
- Kraft Paper
- Leader Fuse: Quickmatch (CH3001) or Super-Fast Paper Fuse (GN1205)
- Masking Tape
- Miter Box
- Plastic Baggies, Small
- PVC Pipe, 1" ID x 6" long
- Saw
- Scissors
- Tubes, 3/4" ID (TU1065, TU1068)
- Visco Fuse (GN1000, GN1001, GN1004)
The Mortar
Fireworks mines are fired from a mortar. The mines in this project are designed to be fired from a mortar (also called a "gun," "tube," or a "pipe" by seasoned pyros) that has an inside diameter (ID) of approximately 1.75-inches. Some mortar tubes in this class will actually have ID's which are slightly larger, such as the standard-length and short HDPE and fiberglass mortars in the picture below. These have an ID between 1.88 and 1.94 inches.The actual inside diameter (ID) of the mortar(s) you choose to use determines the correct diameter of the mine that you will make for it. So it is important to have the mortars you are going to use and to know their IDs before you start. The construction and diameter of the mines we are about to make can be varied slightly to ensure a good fit of the mines in the mortars that you have on hand.
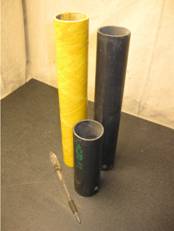
1.75-Inch-Class Fireworks Mortars, Standard and Shortened
Fireworks mortars may be made out of heavy cardboard, HDPE plastic (high-density polyethylene), or fiberglass. PVC plumbing pipe (polyvinyl chloride), ABS plastic (acrylonitrile butadiene styrene), and metal should never used for mortars to fire these kinds of devices. If a mine explodes while inside a tube made of one of these materials, the tubes can and do rupture and spray dangerous shrapnel. (Some specially constructed steel mortars are still used to fire very large cylindrical fireworks shells, but these require particular stringent safety precautions to be observed when they are used.)
Making a Simple Bag Mine
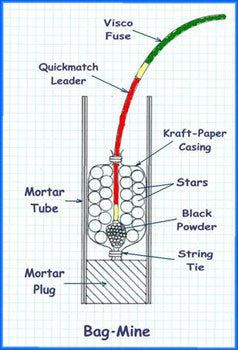
Bag Mine Cross Section
The first tool that is necessary when making a bag mine is a case former. A case former is used to roll paper into a mine or a shell casing (tube). The former should have an outside diameter (OD) that is about 1/4-inch less than the inside diameter (ID) of the mortar that the mine will be fired from.
A nice former for these mines can be made from a 6-inch long piece of 1-inch ID PVC plumbing pipe with some wraps of duct tape around it. Note that the actual OD of the case former is not as important as the 1/4-inch of difference between the OD of the former and the ID of the mortar you'll be using.

Making a Case Former for a Bag Mine
Note: An inexpensive measuring caliper, such as this one from Harbor Freight, comes in handy for many pyro projects, shown in use above:

The kraft-paper mine casing will be made out of paper similar to that which grocery bags are made of. You can actually use grocery bags. Rolls of kraft paper may also be purchased at stores like Costco (white butcher paper), Staples, or Wal-Mart in the shipping supplies department.
For a bag mine casing, a piece of this paper is cut 7 inches wide, and long enough to wrap around the case-former twice, plus 1/2 inch. For the case-former I'm using, which is properly sized as above to the mortar I'm using, that length is 11.25 inches.

Cutting the Casing Paper for a Bag Mine
Note: A relatively inexpensive paper cutter, like the one shown being used above, is a very useful tool to have in the pyro workshop. These cutters are available at stores like Staples or online. Of course, the paper may also be cut with a pair of scissors or a razor-knife and a straightedge.
Leaving 1.5 inches of the paper hanging off the end of the former, wrap one turn of the paper onto it, keeping the edges of the paper aligned. A short distance beyond the overlap, run a stripe of Elmer's glue across the width of the paper as shown below to secure that first turn. Make sure the glue cannot get onto the former. That glue, securing the first paper-turn, will prevent the casing from telescoping out when it is removed from the former.
Wrap the final turn of paper onto the former and secure it with another stripe of glue. Hot-glue may be used instead of the Elmer's if you prefer.
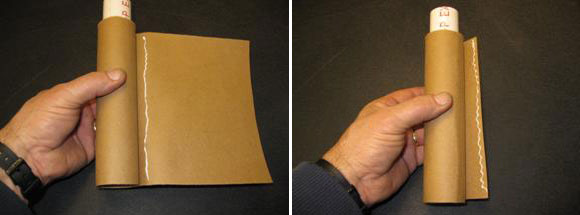
Wrapping and Gluing the Paper around the Former
There should be 1.5 inches of the casing hanging past the lower end of the former. Bunch that paper-overhang together at the end of the case former as shown below. Tie the bunched paper together with some string in a clove hitch knot and secure the knot with an overhand knot. Clip off the excess paper and string with a pair of scissors.
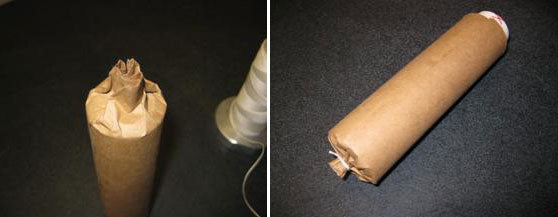
Bunching and Tying Casing Paper Overhang
This has formed the bottom of the bag mine casing, which may now be removed from the former.
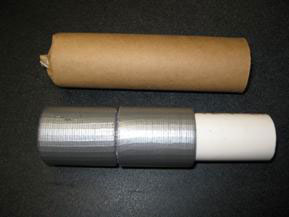
Bag Mine Casing Removed from Former
Now it's time to make a baggie of lift powder attached to a quick match mine leader. The black powder (BP) lift charge should be contained in a baggie, as shown in the cross-section sketch above, so that the powder stays at the bottom of the mine and does not migrate up between the stars during handling.
Note: The amount of lift charge for a mine will be the same as the lift charge used under a similar-sized aerial shell. But black powder lift charges can vary quite a bit depending on the strength of the powder that is used. If commercial BP is used, between 0.15 and 0.3 ounce (3.5 to 7 grams) of lift powder will be sufficient. A good place to start when using Goex Fg powder for this mine is 0.2 ounce (5 grams). If homemade BP or another brand of BP is used, more or less of it may be required. Black powder in the 2FA to 4FA (Cannon-grade to Fg) size range works nicely in these devices. Some experimenting should be done to dial in the correct lift charge, which will also depend on the burn duration of the stars, the length of the mortar the mine is fired from, and the effect that is desired.
Weigh out the desired amount of black powder and put it in the corner of a plastic sandwich baggie.
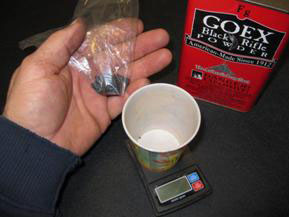
Black Powder Lift Charge in Plastic Baggie
Cut a length of quick match about 3 inches longer than the inside length of the mortar which is to be used. Do not use scissors, as they can cause an accidental ingnition. Always cut fuse with a very sharp razor blade, or with a Handi-Cut type (anvil) cutter such as this:
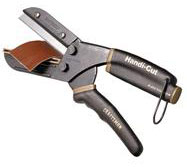
Use Anvil Cutters, not Scissors for Cutting Quick Match
Note: Paper-wrapped fast-fuse may be used as the leader, instead of quick match. The fast-fuse must be wrapped with masking tape or aluminum-foil duct-tape first, though. The tape wrapping speeds the fuse's burn rate, and protects it from sparks and moisture. Then the wrapped fuse is used in the same way as quick match.
Remove the paper covering from about 3/4-inch of the black match in the quick match, and bend it back on itself.
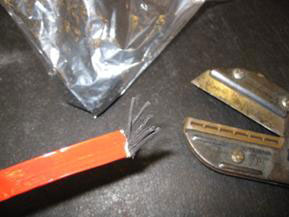
Quick Match Cut to Length, 3/4-Inch of Black Match Bared and Bent Back
Insert the bare black match end of the quick match leader, with the bare match bent back on itself, down into the black powder in the baggie. Make sure it is inserted all the way to the corner of the baggie. The bent black match "hook" will prevent the leader from being easily pulled out of the lift baggie.
Close the baggie around the quick match right above the black powder, and use masking tape to seal the baggie tightly there. Clip off the excess plastic baggie just above the masking tape, and use another wrap of masking tape to secure the first tape-wrap to the quick match leader.
The leader should not be able to be pulled out of the baggie of lift powder now.
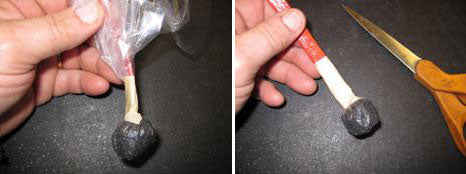
Inserting and Securing Quick Match Leader in Lift Baggie
Insert a 4-inch piece of visco ignition fuse about 1/2 inch into the other end of the leader, and secure it with a wrap of masking tape.
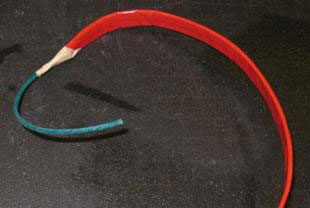
Visco-Fuse Installed in Mine Leader
We'll use simple 3/8-inch firework stars to fill this mine. The stars used in a mine like this should fill the casing to a depth about equal to the inside diameter of the paper mine casing (1.5 to 2 inches). In this case, about 1/4-cup of stars does the trick.
Warning: It can be tempting to say, "Hey, if a one-ID-tall increment of stars makes a nice effect, two should be twice as nice." That can be a big mistake. It is easy to overfill a mine. When a mine is overfilled, the internal pressure is too high when the lift charge ignites. Instead of propelling the stars out of the mortar, everything in the tube explodes, destroying the mortar and creating a dangerous situation for anyone nearby.
Insert the leader and lift baggie down into the center of the paper casing, pushing the lift baggie all the way down to the bottom. Then pour the stars into the mine and gently shake the casing to settle the stars as much as possible.
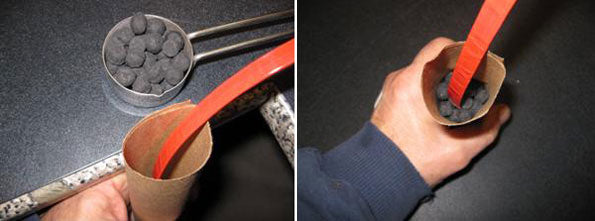
Adding the Lift, Leader, and Stars to the Mine Casing
Bunch the empty top of the paper casing around the leader at the top of the stars, and tie another secured clove hitch knot at that point. Clip off the excess casing paper carefully with a pair of scissors if desired. This is not absolutely necessary, but it gives the finished device a neater appearance. It also minimizes the flaming fallout when the mine is fired, and the amount of debris to be cleaned up after the show.
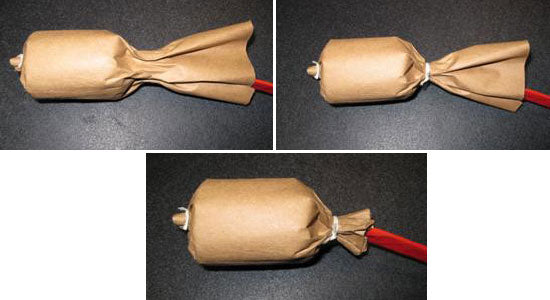
Securing Casing Paper at Top of Stars, and Extra Paper Removed
This cutaway shows what simple bag mine construction looks like once it is completed.
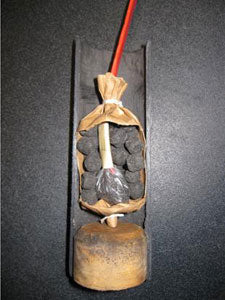
Cutaway of a Simple Star-Filled Bag Mine
Bag mines are about as quick and easy to make as any fireworks device can be. That baggie of lift powder, once it's ignited, will simply pressurize the whole mortar and all the stars will be ignited and propelled out of it.
But looking at the cutaway, you can also imagine a potential problem that sometimes arises when a bag mine is fired. Most of the stars are sitting above the baggie of lift powder, and they will feel the full force of the lift gasses under them, and will be propelled high in the sky.
But, the few stars that sit down and around the baggie of black powder will not feel as much lift pressure. They will be ejected from the mortar, but often these stars bounce out of the gun somewhat half-heartedly, and often come back to the ground burning.
So, the question arises, "Is there some improvement on this construction method which will ensure that all the stars get propelled fully out of the mortar, and high into the sky?"
The answer to that is "Yes." Enter the "Piston Mine Method" of construction.
Making a Mine using the Piston Method
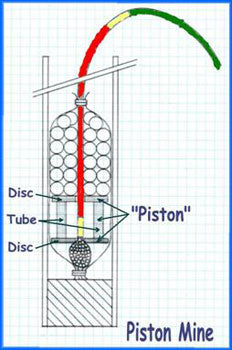
Cross-Section of a Piston Mine
You can see from the cross-section sketch that a piston mine is basically the same as a bag mine except for the inclusion of a "piston" between the baggie of lift powder and the stars.
This piston will be pushed forcefully out of the mortar when the lift powder ignites, pushing all the stars in front of it. A hole through the center of the piston permits some flame and hot gas from the black powder lift charge to flow up through it (and also around the sides of the piston), igniting the stars. Then the piston will push the lit stars out of the mortar in one cohesive bunch, producing a nice upward star-spray with no stragglers to come back to earth burning.
The piston is made from two cardboard discs and a section of cardboard tube. The discs should be the same diameter as the former that was used in the bag mine method, that is, 1/4-inch smaller in diameter than the ID of the mortar.

Cardboard Discs and Tube Used to Make Piston
The OD of the cardboard tube can be the same as the disc diameter, or a little smaller. A section of the tube is cut as long as about 1/2 the mortar ID.
In this case, the mortar is 1-7/8 inches ID, so the discs are 1-5/8 inch diameter, and the tube section is cut 1-inch long. In the photo above, a section of 3/4-inch ID tube is shown (one-pound rocket motor tube).
Note: The section of paper tube must be cut so that it has nice, flat, square ends. This is most easily done with a carpentry miter-box and a nice sharp saw, such as the pull-saw shown below. These are relatively inexpensive tools which are available at home-improvement stores. They come in handy for many fireworking projects.

Miter Box and Pull Saw Used to Cut Paper Tube
A mallet, punch, and ramming post are used to punch 3/8-inch holes in the center of each disc. You can also drill holes through, as well.
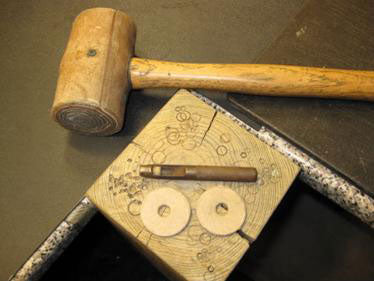
3/8-Inch Holes Punched in Center of Discs
Note: Hole punches often come in very handy in this hobby. Sets of inexpensive hole punches like the one shown above are available at stores such as Harbor Freight.
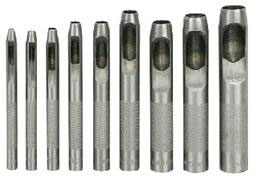
Set of Steel Hole Punches
Using either hot-glue or Elmer's, glue the discs onto the ends of the tube, centering the tube on each disc, and keeping everything nicely aligned.
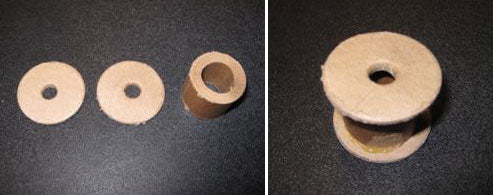
Individual Pieces of the Piston Glued Together
Make up a lift baggie and leader assembly as described previously. Thread the leader through the holes in the piston discs as shown, pulling the baggie up snugly to the bottom of the piston.
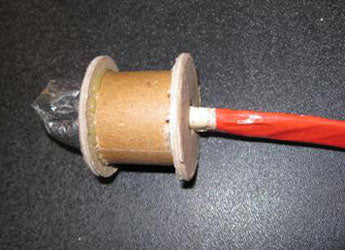
Mine Leader Threaded Through Piston
Now, follow all the previously described mine construction techniques as shown for the bag mine.
Since we have the piston made and it is the same diameter as the case former, we can use the piston as the case former this time.
To begin, roll the casing paper up on the piston as shown below. Keep the edges of the casing aligned as you do so, and keep the first turn of the paper wrapped tightly on the piston. Glue the paper as before after the first turn and again when finished rolling.
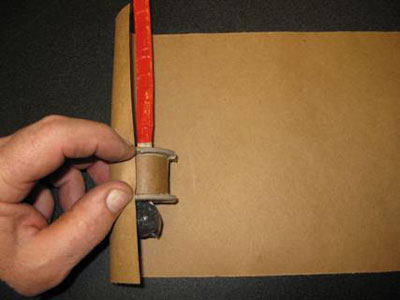
Rolling the Mine Casing on the Piston
Tie the casing closed at the bottom of the baggie of lift powder. Then, fill the casing with stars or other garnitures, and tie it closed around the leader, all as before.
This completes the mine made with the piston method, as shown in the cutaway below.
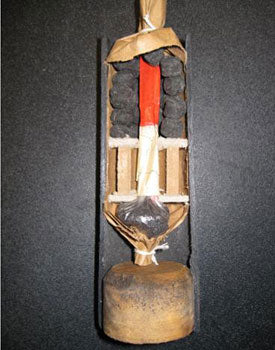
Cutaway of Piston Method Mine
Note: The short mortar in the photo has been used for illustration purposes only. With a mine like this, the mortar should be at least twice as long as is shown in this photo in order to ensure complete ignition and ejection of all the stars.
Note: In pyro circles, you'll sometimes hear piston mines referred to as mines made with the "Meinhart method." Back in the '80's, John "Skip" Meinhart helped pioneer this method of mine construction.
Comparing Bag Mines to Piston Mines
The following video shows eight 1.75-inch mines. All the stars used were 3/8-inch pumped stars. The stars used in the first four mines were Chrysanthemum 6:0.55 Potassium Nitrate
0.33 Airfloat Charcoal
0.07 Sulfur
0.05 Dextrin
And the stars in the second four mines used the same star formula, except an additional 15% (+0.15) titanium (-24+40 mesh spherical Ti) was added to the composition.
With the first mine of each star-type, a bag-mine was fired from a short mortar. When short mortars were used, they were cut just long enough to extend 1-inch above the top of the mine.
With the second mine of each star-type, a piston-mine was fired from a short mortar.
The third shot of each star-type was a bag-mine fired from a standard-length mortar.
And, the final, fourth mine of each star-type was a piston-mine fired from a standard-length mine.
The eight mines are then shown in slow-motion at the end of the video for careful observation of them.
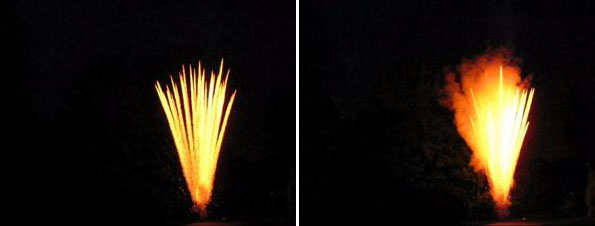
Chrysanthemum-6 Stars, Bag-Mine/Short Mortar (left), and Piston-Mine/Short Mortar (right)
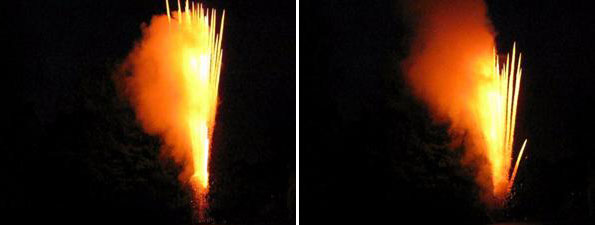
Chrysanthemum-6 Stars, Bag-Mine/Long Mortar (left), and Piston-Mine/Long Mortar (right)
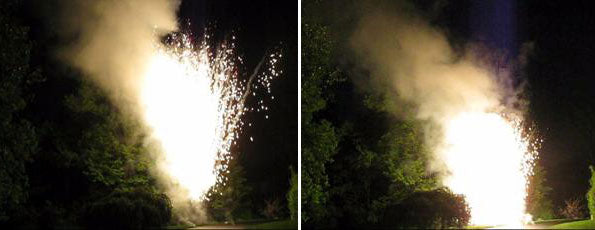
Chrysanthemum-6-Ti Stars, Bag-Mine/Short Mortar (left), and Piston-Mine/Short Mortar (right)
Chrysanthemum-6-Ti Stars, Bag-Mine/Long Mortar (left), and Piston-Mine/Long Mortar (right)
Bag vs. Piston Mine Conclusions
The short mortars produce a lower, wider star-spray effect. The longer, standard length, mortars produce a higher, narrower spray of stars. This variety of low and high effects can be effectively used in a fireworks display.The effect produced by the charcoal stars is very different than the dramatic, long-lived titanium-spark effect produced by the stars which include that titanium. Once again, a lot of variety can be produced by varying the type of stars which are used in the mines.
The piston mines performed a little better with the long mortars, in my opinion, producing a slightly higher and tighter spray of stars, in general. The bag mines were perfectly functional, though.
But, with the short mortars, the bag mines definitely outperformed the piston mines.
Experimentation
Now that you've mastered these two mine construction techniques, you're ready to go out into the field and start experimenting.How much of your lift powder is required to create the mine display you are striving for?
What different effects are created with short mortars versus long mortars? (Mortars are easily cut off with a sharp, fine-toothed hacksaw.)
How does the piston method mine effect compare to mines made with the bag method?
What is the difference between the display of fast-burning stars, and that of slower burning stars?
What garnitures besides stars can you use in your mines? Hummers, whirlwinds, small reports, go-getter stars, daytime smoke stars, etc?
How can you incorporate these quickly-made devices in your next backyard fireworks display to add some low altitude creativity to the show?
You have your work cut out for you now ... and your fun!
