Make Stinger Missile Fireworks Rockets (Spin Stabilized)
"Stinger Missile" is a term which has come to be used among fireworkers to refer to spin-stabilized rockets. These missiles are guided on a straight path by gyroscopic forces, due to their spinning as they rise. As a result they do not need fins or a stick to keep them headed upward.
Stinger-Missile Spin-Up and Launch
Due to their simplicity, stingers are very quick and easy to make, providing a fun, backyard fireworking project. Once you've learned the techniques that follow, you'll be able to make finished stinger missile rockets in about 5 minutes, including the installation of a heading.
During their flight, the missiles project a stream of sparks downward through their bottom nozzle aperture, and they also create a sideways-circle of sparks from the spin-up vent hole.
The missiles can also carry a small payload of colored stars, a small shell, or a report. On their ascent, these rockets create a unique "whirring" sound. And when they are done flying, there is only a small tube containing some clay, falling from the sky. This minimal fallout hazard can be an advantage over a stick-stabilized rocket.
Launch and Flight of a Stinger Missile
The project I'm about to describe has been inspired by two sources: In the 1980's, Warren Klofkorn wrote an article for American Fireworks News entitled Stinger Missiles. He based his design on a commercial Class C device called the Warhead Launcher. That project is included in The Best of AFN II compilation.
As far as I know it was Warren who coined the term "Stinger Missile" for these little babies.
Then, in the late 90's and inspired by Warren's project, Dan Williams wrote an article which was published in the fledgling Skylighter newsletter, titled How to Make Stinger Missile Rockets. Dan illustrated the tooling used to make these missiles that Skylighter has carried ever since.
Both Warren and Dan described using a rocket press to consolidate the fuels in the motors. But they can be made with a simpler process of hand-ramming. I'll demonstrate that method here, but feel free to use a press and a tube-support if you're so inclined.
I'll also update Dan's project with a few videos and new photos.
The photo below shows a set of 3/4" Stinger tooling, along with a homemade tube support. (The same tooling may also be used to make traditional, stick-stabilized, black-powder motors, simply by using a hotter fuel than would be used with a longer, standard black-powder-motor spindle and tooling.)
And, in The Best of AFN III, in AJS's article Screaming Banshee Rockets, a whistle-fuel motor is described which can be made with this same tooling. A rocket press is required, though, any time a motor is made using whistle fuel.

Tooling Used to Make 3/4-Inch Stinger Missiles
NOTE: The tube support and optional drill guide shown above are not included in tooling you get from Skylighter. And you only need to use the support if a motor is to be pressed with a hydraulic or arbor press. You won't need one if you're going to hand ram your stingers. If the fuel should ever ignite when you are hand-ramming a Stinger, the paper tube would simply split and the fuel would burn. But if the tube support was on the tube, it might explode violently and spread metal and plastic shrapnel far and wide. The optional drill guide is a handy tool when drilling stingers, because you need only one drill guide for any size stinger it is sold separably.

Paper Tubes Used to Make Stinger Missiles
Of course, sections of longer, 3/4-inch ID rocket tubes can be cut to produce tubes for these motors.
See this project on making your own paper tubes for tips on optionally hardening tubes by soaking them in Minwax Wood Hardener. Some folks use polyurethane, lacquer, or spar-varnish instead of the wood-hardener. Treating the tubes in this way is not necessary, but it does make the tubes stronger and less capable of absorbing moisture.
The most important safety precautions are: always minimizing the amount of exposed pyrotechnic compositions, wearing safety glasses, wearing cotton clothing, and safely storing compositions and devices.
This project uses commercial airfloat charcoal. All the chemicals must be fine enough to easily pass a 40-mesh screen. No ball-milling is necessary but the potassium nitrate and sulfur can be milled individually in a blade-type coffee grinder to ensure they'll pass through the 40-mesh screen. If you use a hotter charcoal or ball-mill your composition, it may be necessary to slow the fuel down by adding some charcoal, and re-granulating it.
After screening and shaking the chemicals together, use rubber-gloved hands and a spray bottle to spray enough water into the composition that it becomes dampened like brown sugar. It should form a ball when squeezed together, but the ball should crumble easily when poked with a finger.
Grate the dampened composition through a 20-mesh screen onto kraft-paper lined trays, forming layers of comp that are about 1/8-inch thick on the paper. Dry the granulated powder thoroughly and gently run the dry powder through the screen again to break up any lumps in it.
If for some reason, after testing a motor, you determine that your fuel is not hot enough to produce good flights, more potassium nitrate may be added to it, followed by re-granulating it.
And conversely, if the fuel proves to be too powerful, more charcoal may be added, once again, followed by re-granulation.
Each motor will use about 0.6 ounce of fuel, so an 8-ounce (227 gram) batch will make 13 or 14 motors.
To make nozzle and bulkhead mixes which are more resistant to erosion and moisture, see the project on making rocket nozzle mix.
Simply roll the o-ring down toward the bottom end of the rammer prior to inserting it into the motor tube. As the drift is pushed into the tube, the o-ring will contact the top of the tube, and seal the gap between it and the rammer, preventing excess clay or fuel from billowing out.

Rubber O-Rings Installed on Rammers

Cross-Section of a Stinger Missile
Align a motor-tube next to the base and spindle as shown. Put a mark on the tube 3/8-inch above the flat spindle-base. Then align the hollow rammer alongside the tube, with the bottom of the rammer even with the mark on the tube.
Put a mark on the rammer where the top of the tube is. Then wrap masking tape around the rammer, with the bottom edge of the tape on the mark as shown.

Putting a "Top of Nozzle" Mark on Rammer
Once a 3/8-inch-thick nozzle has been rammed, that bottom tape-edge will be even with the top of the tube. You'll be able to adjust the amount of clay rammed into a nozzle, so that the tape-edge does in fact align with the top of the tube that way.
That bottom tape-edge also serves as a "do not pass" line on the hollow rammer. That drift is never rammed farther into the tube than that line. That prevents the drift from ever getting jammed onto the spindle.
Now, to ram a nozzle, first place a tube onto the spindle so it's sitting square on the tooling-base. Place the tube and tooling base onto a solid ramming post.
When using finely-powdered, pure bentonite clay for the nozzle, one rounded teaspoonful (about 6 grams) will create the desired 3/8-inch thick nozzle. If a different "nozzle mix" is being used, this amount will have to be adjusted through trial and error until a 3/8-inch thick nozzle is created after the clay is rammed.
Put a funnel into the end of the paper tube, and introduce the clay into it. Tap the funnel so all the clay drops into the tube.
Remove the funnel, slide the o-ring down near the bottom of the hollow rammer, and insert that rammer slowly into the tube, compacting the clay as you do so. Slide the rammer gently up and down a few times to settle the clay to the bottom of the tube.
Now, ram the nozzle solid with about 12 good whacks of a heavy mallet, such as a rawhide mallet or a dead-blow plastic-faced hammer. Don't use a metal hammer or a rubber mallet.
The tube should bulge out ever-so-slightly where the nozzle has been rammed. This slight bulge can be felt by sliding your fingers up and down the tube in that area. Ram the nozzle until this faint bulge can be felt.
If the tube splits in that area, the clay nozzle has been rammed too forcefully.
If the correct amount of clay was used, the rammed nozzle should be 3/8-inch thick. This can be verified by seeing that the tape line on the drift is even with the top of the tube. The amount of clay measured out for future nozzles can be adjusted to create that nozzle thickness.
Remove the rammer and tap any excess clay out of the tube and back into the bucket of clay. Also, visually verify that there is no clay left in the hollow rammer. If there is, use a drill bit or an awl to remove it.
Hand ramming a bentonite clay nozzle for a stinger missile rocket.
Reinsert the hollow rammer into the tube until it contacts the top of the nozzle. Verify that the tape-line on the drift is even with the top of the tube. Now remove the drift and hold it alongside the tube in that same position. Mark where the top of the nozzle is on the side of the tube. Put another mark about 1/8-inch above that first mark.

Spin-Hole Location Marked on Stinger Tube
A hole drilled right between those two marks will create a spin-hole that is just above the top of the nozzle.

The Latest Version of the Stinger Missile Spin-Hole Drill Guide

Choose the drill-guide hole which allows the drill bit to just skim across the inside of the tube-wall. The distance between the drill bit and the drill guide's base surface should be the same as the thickness of the tube's wall.

Mark the groove in the guide which is just above that chosen hole.

Slide the drill bit through the guide hole until it is lined up halfway through the tube. Install a piece of masking tape with its edge right at the outside of the guide.
How to use Skylighter's stinger missile drill guide to drill the side vent hole in a stinger missile rocket.
Using a nice, sharp drill bit helps the drilling process a lot.
So, referring to the cross-section drawing, you can see that the ignition Visco-fuse should be cut on a sharp angle, and inserted only far enough to have its end flush with the inside tube wall.

Angle-Cut on End of Installed Ignition Fuse
Cut a 3-inch piece of the Visco ignition fuse on that sharp angle, as shown, with a razor blade or razor-anvil-cutters.

Cutting Fuse on Angle
Now insert the fuse through the spin-hole of the motor-tube until its end is flush with the inside of the tube. Verify this by looking down into the tube. Bend the fuse over against the outside of the tube. Apply a drop of super-glue to the outside of the spin-hole where the fuse enters.
That glue will hold the fuse in place, and perhaps more importantly will flameproof the hole somewhat, preventing it from enlarging as the motor burns. The super glue is not absolutely necessary, but it can be a good idea.
Note: One drop of the super glue is all that is necessary to flameproof the hole and hold the fuse in place. Too much glue can seep through the hole and seal the end of the fuse and prevent it from passing fire to the fuel.
Secure the fuse in place with a square of masking tape as the glue dries.

Inserting, Gluing, and Taping Visco Ignition Fuse

Assembly of Stinger Missile
For these motors, then, we want to ram fuel increments about 3/8-inch tall. One level 1/2 teaspoon of the fuel will yield a rammed increment of that thickness.
You can see that the first three fuel-increments are compacted around the spindle and form the motor's hollow core. These fuel increments are thrust fuel--they burn rapidly as the rocket ascends. The bottom part of increment #4 also burns during this thrust phase.
The top part of increment #4 and all of increment #5 are delay fuel increments. They have less surface area and burn more slowly, which decreases heat and pressure. This delay fuel produces a gentle coasting of the rocket at the end of its flight.
Increments 1, 2, and 3 are always rammed with pure fuel. No metal is added to these increments, to avoid any sparking hazard or any damage to the spindle due to the metal. No charcoal is added in these increments, because that would slow the fuel down; and we're looking for maximum thrust from these increments.
Increments 4 and 5 may be rammed with pure fuel, or they may have additives to create sparks.
The photos and videos at the beginning of this project show flights of motors which had a little spherical titanium added to increments 4 and 5.
In a moment I'll show flights of some motors which had 80-mesh charcoal added to these increments above the spindle.
Alternatively, increment #5 can use a completely different composition which looks quite different than the ascending portion of the flight.
For instance Klofkorn mentions using a Green Star composition for the last increment. Other dry colored compositions may be experimented with as well.
Warning: Some colored compositions containing metal are more impact sensitive than the charcoal-based fuel we are hand-ramming. Gently consolidating these comps using hand-pressure alone--not mallet-ramming them--is safer. If they need to be packed tighter than hand-pressure a hydraulic or arbor press can be used.
Dan Williams mentions the option of using glitter, or this charcoal delay composition for increment #5:
Shimizu's "Chrysanthemum of Mystery"
0.45 Potassium Nitrate
0.50 Charcoal
0.05 Dextrin
For the purposes of this project, we stick with the options of finishing the rocket using thrust fuel alone or adding either a metal or some coarse charcoal to the delay increments. Either of these options will slow the fuel slightly, and create visually appealing sparks as the rocket ascends.
But first, verify the motor will fly well with the fuel we've made by using straight thrust fuel in all 5 increments.
Before ramming any fuel, put a "do not pass" mark on the solid rammer. This mark prevents the rammer from contacting the tip of the spindle when fuel is being rammed, which prevents accidental ignition of the fuel and the spindle from getting bent.
To create the "do not pass" line, first slide the solid rammer into the tube which has had the nozzle already rammed in it, and which is still on the spindle. Slide the drift in until it contacts the tip of the spindle. Make a little temporary mark on the rammer at the top of the tube.
Now, pull the rammer out 1/4-inch, and put a "do not pass" mark all around the drift at the top of the tube, as shown. This is the line beyond which the solid rammer is never driven into a tube with fuel in it.
A sure-fire way to prevent that from happening is to put a 1/16-inch-thick wrap of masking-tape-layers around the drift, with the bottom edge of the tape aligned with the "do not pass" line, as shown.
If you happen to forget where the "do-not-pass" line is when using the rammer, the o-ring will come up on the drift and contact the bottom edge of the tape-wrap, preventing the drift from going into the tube any further. This is a good, positive, safety precaution to employ.


"Do Not Pass" Mark, and Tape-Wrap, on Solid Rammer
Now we can ram some fuel in the motor. Each increment of fuel will be a flat teaspoonful, which should weigh 3 grams. The first thing to do is to verify that is the case with your fuel. Measure out a flat teaspoonful of your fuel and weigh it in a small cup. Verify that it weighs about 3 grams. Adjust the measure of your fuel to that weight.
The first 3 increments of the fuel will be rammed with the hollow rammer, since this fuel is rammed around the spindle, as shown in the drawing.
Safety Note: Measure out about 1/4-cup of your fuel into a paper cup, and close the tub containing the rest of the fuel. Minimizing the exposure of compositions and devices that you're not currently working with greatly reduces the risk of serious damage in case of an accidental ignition. Don't keep any unneeded compositions or finished fireworks devices in the same room or area where you are working.
Safety Note: When hand-ramming compositions, wearing a leather glove on the hand which will be steadying the device greatly reduces the chance of an injury in case of an accidental ignition. Also wear safety glasses and cotton clothing (long sleeves, long pants). Once again, don't use the PVC tube-support when hand-ramming.
Hand ramming the black powder fuel into a stinger missile rocket motor.
Put the funnel into the mouth of the motor tube, and introduce one increment of the fuel into it. Remove the funnel, and slide the hollow drift into the tube, using the rubber o-ring to minimize dust blow-by.
Ram that increment of fuel with 8 solid whacks of the mallet. After about 4 whacks, you can feel the fuel really getting solid under the rammed drift. After 8 whacks the fuel will feel very solid. We're not looking for bulges in the tube as we were when ramming the clay nozzle.
If the tube bulges or splits, too much force is being used on the mallet. But enough force should be used to really consolidate the fuel into a solid mass. There's a bit of "feel" you need to develop as you get used to the mallet.
Repeat this process for fuel increments 2 and 3, using the hollow rammer. After increment 3 has been rammed, the fuel should be solid right up to about the tip of the spindle.
Clean any excess fuel out of the hollow drift's core using an awl or drill bit. It is very important that no fuel be allowed to build up inside that core. If fuel is allowed to build up in there, sooner or later fuel can be "pinched" between the top of that core and the tip of the spindle, which could cause accidental ignition during the ramming.
Now ram fuel increments 4 and 5 using the solid rammer, keeping an eye on the "do not pass" line to make sure it never goes beyond the top of the tube.
Remember that for this first motor, we're using straight fuel for all the increments. Once we verify that the motors fly well with this fuel, we'll experiment with additions to the delay fuel to make it more interesting.
Straight fuel, using airfloat charcoal, will create a fine-charcoal-spark spray as the rocket ascends, and there will be a cool "whirring" sound if all goes as planned.
It is also possible to create charcoal sparks in a rocket's tail during flight, as shown below.
Launch and flight of a stinger missile rocket with a bushy 80-mesh charcoal tail.
To include either metal or charcoal sparks in a stinger missile's tail as it ascends, the metal or charcoal is added to the last two fuel increments. As was mentioned already, the thrust fuel around the spindle (the first three increments) is never modified.
Metal sparks can be created by the addition of titanium, ferro-titanium, or other metals. Charcoal (orange) sparks will be created by adding charcoal which is coarser than the airfloat charcoal already in the fuel--typically 80-mesh or 36-mesh charcoal.
To include these spark-additives in a fuel increment, measure out the flat-teaspoonful of the standard fuel for that increment, and put it in a separate paper cup. Add a "pinch" of the metal or charcoal into the fuel.
Swirl the fuel and the additive together, and then ram that increment into the motor.
Repeat this process for the final increment of the fuel.
Note: Hand-ramming fuels containing metal particles increases the danger of accidental ignition. Some metals are safer than others. For example, spherical titanium has less rough edges to grind against each other than sponge titanium does. Aluminum and magnalium do not spark at all. Granular ferro-titanium has hard, rough, sharp surfaces. So, when you are hand-ramming metal-containing fuels, for your own well-being follow all the safety precautions prescribed above.
The rocket motor can be flown as-is, without a heading, to test the power of the fuel.
Once the fuel's performance has been verified, a heading can be added to the stinger motor.
To do this, gently hand-twist-drill a passfire hole through the clay bulkhead into the fuel about 1/16-inch, using a 3/16-inch drill bit. Dump the loose clay back into its tub.
Warning: If there is metal in the top increment of fuel, it is especially important to be very careful when hand-twist-drilling the passfire hole through the clay bulkhead. Do the drilling outdoors, with gloved hands and eye protection. Drill slowly by twisting the bit by hand, only penetrating the fuel grain a short distance.
Put two small pinches of the rocket fuel into the empty end of the rocket motor, filling the passfire hole with fuel. Place one large star, or several small stars into that void on top of the loose fuel. Pieces of flying-fish-fuse may be used instead of stars.
Note: Because of the rocket's short length and spin-stabilization, headings on stinger missiles are typically small and lightweight. One large star or a few small ones make nice finishing touches on these rockets, and this is an easy way to test new stars. A small amount of report composition may be used instead of stars to signify the end of the missile's flight.
Cap the end of the motor with four 3-inch strips of masking tape over the end of the motor, rotated at 45-degrees to each other. Press the tape down tightly on the top and sides of the paper tube. Then wrap some masking tape around the motor at its top to cover the strips of tape.
Ramming Increments of Fuel in Stinger Motor
Harry Gilliam at Skylighter likes to put small consumer fireworks festival balls (sometimes called reloadables or artillery shells) on his stingers. He does not use a clay bulkhead. He strips the green fuse out of the shell, and completely removes the lift cup from the bottom of the shell (saving the black powder). Then he simply seats the festival ball time fuse right top of the stinger fuel, and uses masking tape to attach it to the stinger. To make these fly straight, you may actually have to shorten your stinger to less than 3 inches.
The motor is now ready to be removed from the spindle. Twisting it in a clockwise direction, as viewed from the top, will loosen the motor from the spindle without loosening the spindle in the base.
Tap any loose clay from the motor and the spindle, and the missile is ready to launch.
The launch pin must have a smaller diameter than the core in the rocket motor and it must be long enough to hold the rocket up off of the wood base by about 1/2-inch.
Make a launch pin and base for launching stinger missile rockets.
The launching base and missile are now ready to take out and fly. Have fun.
If the nozzle blows out of the end of the tube, it was not rammed solidly enough, and future models need to have the nozzle rammed harder, resulting in the slight bulge in the tube described in that section.
If the motor flies weakly, then the traditional solution to that problem is to add a percent or two of potassium nitrate, re-granulate and dry the fuel, and try another motor. Or try milling the potassium nitrate to make it into a finer powder. Repeat this until pleasing flights are achieved.
If the motor blows up, then the fuel is too hot, and the traditional solution to that problem is to add a percent or two of airfloat charcoal, re-granulate and dry the fuel, and try another motor. Repeat this until successful flights result.
If your stinger flies off to one side, or rises and then starts to fly in a different direction, it may be top heavy. This is caused by tubes which are too long--long stingers will wobble as they spin and not fly straight up. Or your heading may be too long or too heavy. Reduce tube length accordingly.
Whatever modifications you make to the fuel and/or tube length, keep notes of them and their results so that you can repeat your success in the future.
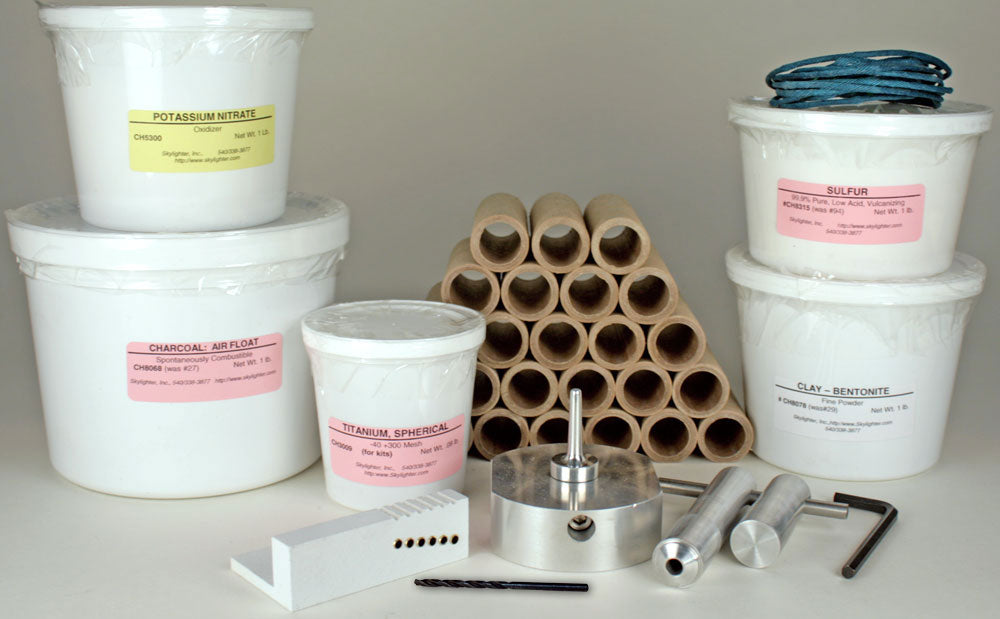
Enough supplies to make 25 complete 3/4-Inch Stinger Missile spin stabilized rockets with silver titanium tails.
Stinger-Missile Spin-Up and Launch
Due to their simplicity, stingers are very quick and easy to make, providing a fun, backyard fireworking project. Once you've learned the techniques that follow, you'll be able to make finished stinger missile rockets in about 5 minutes, including the installation of a heading.
During their flight, the missiles project a stream of sparks downward through their bottom nozzle aperture, and they also create a sideways-circle of sparks from the spin-up vent hole.
The missiles can also carry a small payload of colored stars, a small shell, or a report. On their ascent, these rockets create a unique "whirring" sound. And when they are done flying, there is only a small tube containing some clay, falling from the sky. This minimal fallout hazard can be an advantage over a stick-stabilized rocket.
Launch and Flight of a Stinger Missile
The project I'm about to describe has been inspired by two sources: In the 1980's, Warren Klofkorn wrote an article for American Fireworks News entitled Stinger Missiles. He based his design on a commercial Class C device called the Warhead Launcher. That project is included in The Best of AFN II compilation.
As far as I know it was Warren who coined the term "Stinger Missile" for these little babies.
Then, in the late 90's and inspired by Warren's project, Dan Williams wrote an article which was published in the fledgling Skylighter newsletter, titled How to Make Stinger Missile Rockets. Dan illustrated the tooling used to make these missiles that Skylighter has carried ever since.
Both Warren and Dan described using a rocket press to consolidate the fuels in the motors. But they can be made with a simpler process of hand-ramming. I'll demonstrate that method here, but feel free to use a press and a tube-support if you're so inclined.
I'll also update Dan's project with a few videos and new photos.
Stinger Missile Fireworks Tool Set & Kit
You can get a complete Stinger Missile Fireworks Kit containing the tooling, tubes, chemicals, and fuse to make 3/4-inch Stinger Missile Rockets at Skylighter.The photo below shows a set of 3/4" Stinger tooling, along with a homemade tube support. (The same tooling may also be used to make traditional, stick-stabilized, black-powder motors, simply by using a hotter fuel than would be used with a longer, standard black-powder-motor spindle and tooling.)
And, in The Best of AFN III, in AJS's article Screaming Banshee Rockets, a whistle-fuel motor is described which can be made with this same tooling. A rocket press is required, though, any time a motor is made using whistle fuel.
Tooling Used to Make 3/4-Inch Stinger Missiles
NOTE: The tube support and optional drill guide shown above are not included in tooling you get from Skylighter. And you only need to use the support if a motor is to be pressed with a hydraulic or arbor press. You won't need one if you're going to hand ram your stingers. If the fuel should ever ignite when you are hand-ramming a Stinger, the paper tube would simply split and the fuel would burn. But if the tube support was on the tube, it might explode violently and spread metal and plastic shrapnel far and wide. The optional drill guide is a handy tool when drilling stingers, because you need only one drill guide for any size stinger it is sold separably.
Rocket Motor Tubes
Standard one-pound stinger missile tubes are 3/4-inch ID x 3-inches long. These should be parallel wound tubes with a wall-thickness between 1/8-inch and 1/4-inch. Skylighter TU1060 tubes were designed specifically for these motors for a reason: Their thinner walls mean this short rocket is carrying less dead weight and will fly higher.Paper Tubes Used to Make Stinger Missiles
Of course, sections of longer, 3/4-inch ID rocket tubes can be cut to produce tubes for these motors.
See this project on making your own paper tubes for tips on optionally hardening tubes by soaking them in Minwax Wood Hardener. Some folks use polyurethane, lacquer, or spar-varnish instead of the wood-hardener. Treating the tubes in this way is not necessary, but it does make the tubes stronger and less capable of absorbing moisture.
Safety
Please read and observe these fireworks safety instructions. These essays detail safety precautions for mixing compositions and for making and storing fireworks devices.The most important safety precautions are: always minimizing the amount of exposed pyrotechnic compositions, wearing safety glasses, wearing cotton clothing, and safely storing compositions and devices.
Stinger Fuel
These one-pound stingers fly well using a 75/15/10 black-powder mix.| Chemical | Factor | % | 8 Oz | 227 Grams |
| Potassium nitrate | 0.75 | 75% | 6 oz | 170 g |
| Charcoal, airfloat | 0.15 | 15% | 1.2 oz | 34 g |
| Sulfur | 0.10 | 10% | 0.8 oz | 23 g |
This project uses commercial airfloat charcoal. All the chemicals must be fine enough to easily pass a 40-mesh screen. No ball-milling is necessary but the potassium nitrate and sulfur can be milled individually in a blade-type coffee grinder to ensure they'll pass through the 40-mesh screen. If you use a hotter charcoal or ball-mill your composition, it may be necessary to slow the fuel down by adding some charcoal, and re-granulating it.
After screening and shaking the chemicals together, use rubber-gloved hands and a spray bottle to spray enough water into the composition that it becomes dampened like brown sugar. It should form a ball when squeezed together, but the ball should crumble easily when poked with a finger.
Grate the dampened composition through a 20-mesh screen onto kraft-paper lined trays, forming layers of comp that are about 1/8-inch thick on the paper. Dry the granulated powder thoroughly and gently run the dry powder through the screen again to break up any lumps in it.
If for some reason, after testing a motor, you determine that your fuel is not hot enough to produce good flights, more potassium nitrate may be added to it, followed by re-granulating it.
And conversely, if the fuel proves to be too powerful, more charcoal may be added, once again, followed by re-granulation.
Each motor will use about 0.6 ounce of fuel, so an 8-ounce (227 gram) batch will make 13 or 14 motors.
Nozzle and Bulkhead Clay
Pure, dry, powdered bentonite clay (Skylighter CH8078) may be used for both the nozzles and the bulkheads in these motors.To make nozzle and bulkhead mixes which are more resistant to erosion and moisture, see the project on making rocket nozzle mix.
Rammer O-Rings
When hand-ramming bentonite clay or rocket fuel, it helps a lot to have rubber o-rings on the rammers, as shown below. These o-rings are readily available in various sizes in the plumbing-supplies departments of stores like Home Depot.Simply roll the o-ring down toward the bottom end of the rammer prior to inserting it into the motor tube. As the drift is pushed into the tube, the o-ring will contact the top of the tube, and seal the gap between it and the rammer, preventing excess clay or fuel from billowing out.
Rubber O-Rings Installed on Rammers
Cross-Section of a Stinger Missile
Ramming a Nozzle in a Motor-Tube
The first step to making a motor is ramming a clay nozzle in the paper tube. We need to be able to verify that the correct amount of clay has been rammed to produce the desired 3/8-inch-thick nozzle. Putting a "top of nozzle" mark and a masking-tape line on the hollow rammer facilitates this.Align a motor-tube next to the base and spindle as shown. Put a mark on the tube 3/8-inch above the flat spindle-base. Then align the hollow rammer alongside the tube, with the bottom of the rammer even with the mark on the tube.
Put a mark on the rammer where the top of the tube is. Then wrap masking tape around the rammer, with the bottom edge of the tape on the mark as shown.
Putting a "Top of Nozzle" Mark on Rammer
Once a 3/8-inch-thick nozzle has been rammed, that bottom tape-edge will be even with the top of the tube. You'll be able to adjust the amount of clay rammed into a nozzle, so that the tape-edge does in fact align with the top of the tube that way.
That bottom tape-edge also serves as a "do not pass" line on the hollow rammer. That drift is never rammed farther into the tube than that line. That prevents the drift from ever getting jammed onto the spindle.
Now, to ram a nozzle, first place a tube onto the spindle so it's sitting square on the tooling-base. Place the tube and tooling base onto a solid ramming post.
When using finely-powdered, pure bentonite clay for the nozzle, one rounded teaspoonful (about 6 grams) will create the desired 3/8-inch thick nozzle. If a different "nozzle mix" is being used, this amount will have to be adjusted through trial and error until a 3/8-inch thick nozzle is created after the clay is rammed.
Put a funnel into the end of the paper tube, and introduce the clay into it. Tap the funnel so all the clay drops into the tube.
Remove the funnel, slide the o-ring down near the bottom of the hollow rammer, and insert that rammer slowly into the tube, compacting the clay as you do so. Slide the rammer gently up and down a few times to settle the clay to the bottom of the tube.
Now, ram the nozzle solid with about 12 good whacks of a heavy mallet, such as a rawhide mallet or a dead-blow plastic-faced hammer. Don't use a metal hammer or a rubber mallet.
The tube should bulge out ever-so-slightly where the nozzle has been rammed. This slight bulge can be felt by sliding your fingers up and down the tube in that area. Ram the nozzle until this faint bulge can be felt.
If the tube splits in that area, the clay nozzle has been rammed too forcefully.
If the correct amount of clay was used, the rammed nozzle should be 3/8-inch thick. This can be verified by seeing that the tape line on the drift is even with the top of the tube. The amount of clay measured out for future nozzles can be adjusted to create that nozzle thickness.
Remove the rammer and tap any excess clay out of the tube and back into the bucket of clay. Also, visually verify that there is no clay left in the hollow rammer. If there is, use a drill bit or an awl to remove it.
Hand ramming a bentonite clay nozzle for a stinger missile rocket.
Drilling the Tangential Spin-Hole
Now it's time to drill the spin-hole through the side of the motor tube, right above the top of the nozzle.Reinsert the hollow rammer into the tube until it contacts the top of the nozzle. Verify that the tape-line on the drift is even with the top of the tube. Now remove the drift and hold it alongside the tube in that same position. Mark where the top of the nozzle is on the side of the tube. Put another mark about 1/8-inch above that first mark.
Spin-Hole Location Marked on Stinger Tube
A hole drilled right between those two marks will create a spin-hole that is just above the top of the nozzle.
Using the Optional Drill Guide
The Latest Version of the Stinger Missile Spin-Hole Drill Guide
Choose the drill-guide hole which allows the drill bit to just skim across the inside of the tube-wall. The distance between the drill bit and the drill guide's base surface should be the same as the thickness of the tube's wall.
Mark the groove in the guide which is just above that chosen hole.
Slide the drill bit through the guide hole until it is lined up halfway through the tube. Install a piece of masking tape with its edge right at the outside of the guide.
How to use Skylighter's stinger missile drill guide to drill the side vent hole in a stinger missile rocket.
Using a nice, sharp drill bit helps the drilling process a lot.
Installing Rocket Motor Ignition Fuse
When one of these stinger missiles is ignited, ideally the fuel grain is lit right where it meets the inside of the tube. That may give the motor a little more time to burn and spin up, before fire is transferred to the hollow core in the motor's fuel grain. Once that core is ignited, the rocket will launch rapidly and still be spinning.So, referring to the cross-section drawing, you can see that the ignition Visco-fuse should be cut on a sharp angle, and inserted only far enough to have its end flush with the inside tube wall.
Angle-Cut on End of Installed Ignition Fuse
Cut a 3-inch piece of the Visco ignition fuse on that sharp angle, as shown, with a razor blade or razor-anvil-cutters.
Cutting Fuse on Angle
Now insert the fuse through the spin-hole of the motor-tube until its end is flush with the inside of the tube. Verify this by looking down into the tube. Bend the fuse over against the outside of the tube. Apply a drop of super-glue to the outside of the spin-hole where the fuse enters.
That glue will hold the fuse in place, and perhaps more importantly will flameproof the hole somewhat, preventing it from enlarging as the motor burns. The super glue is not absolutely necessary, but it can be a good idea.
Note: One drop of the super glue is all that is necessary to flameproof the hole and hold the fuse in place. Too much glue can seep through the hole and seal the end of the fuse and prevent it from passing fire to the fuel.
Secure the fuse in place with a square of masking tape as the glue dries.
Inserting, Gluing, and Taping Visco Ignition Fuse
Ramming Increments of Fuel in the Stinger Motor
Now it's time to ram the increments of fuel in the motor. You can see from the motor cross-section drawing that there are 5 increments of fuel. When hand-ramming fuel in a device like this, it's a good idea to only ram as much fuel with each increment as it takes to produce a rammed fuel section that is between 1/2 and 2/3 of the tube ID tall.Assembly of Stinger Missile
For these motors, then, we want to ram fuel increments about 3/8-inch tall. One level 1/2 teaspoon of the fuel will yield a rammed increment of that thickness.
You can see that the first three fuel-increments are compacted around the spindle and form the motor's hollow core. These fuel increments are thrust fuel--they burn rapidly as the rocket ascends. The bottom part of increment #4 also burns during this thrust phase.
The top part of increment #4 and all of increment #5 are delay fuel increments. They have less surface area and burn more slowly, which decreases heat and pressure. This delay fuel produces a gentle coasting of the rocket at the end of its flight.
Increments 1, 2, and 3 are always rammed with pure fuel. No metal is added to these increments, to avoid any sparking hazard or any damage to the spindle due to the metal. No charcoal is added in these increments, because that would slow the fuel down; and we're looking for maximum thrust from these increments.
Increments 4 and 5 may be rammed with pure fuel, or they may have additives to create sparks.
The photos and videos at the beginning of this project show flights of motors which had a little spherical titanium added to increments 4 and 5.
In a moment I'll show flights of some motors which had 80-mesh charcoal added to these increments above the spindle.
Alternatively, increment #5 can use a completely different composition which looks quite different than the ascending portion of the flight.
For instance Klofkorn mentions using a Green Star composition for the last increment. Other dry colored compositions may be experimented with as well.
Warning: Some colored compositions containing metal are more impact sensitive than the charcoal-based fuel we are hand-ramming. Gently consolidating these comps using hand-pressure alone--not mallet-ramming them--is safer. If they need to be packed tighter than hand-pressure a hydraulic or arbor press can be used.
Dan Williams mentions the option of using glitter, or this charcoal delay composition for increment #5:
Shimizu's "Chrysanthemum of Mystery"
0.45 Potassium Nitrate
0.50 Charcoal
0.05 Dextrin
For the purposes of this project, we stick with the options of finishing the rocket using thrust fuel alone or adding either a metal or some coarse charcoal to the delay increments. Either of these options will slow the fuel slightly, and create visually appealing sparks as the rocket ascends.
But first, verify the motor will fly well with the fuel we've made by using straight thrust fuel in all 5 increments.
Before ramming any fuel, put a "do not pass" mark on the solid rammer. This mark prevents the rammer from contacting the tip of the spindle when fuel is being rammed, which prevents accidental ignition of the fuel and the spindle from getting bent.
To create the "do not pass" line, first slide the solid rammer into the tube which has had the nozzle already rammed in it, and which is still on the spindle. Slide the drift in until it contacts the tip of the spindle. Make a little temporary mark on the rammer at the top of the tube.
Now, pull the rammer out 1/4-inch, and put a "do not pass" mark all around the drift at the top of the tube, as shown. This is the line beyond which the solid rammer is never driven into a tube with fuel in it.
A sure-fire way to prevent that from happening is to put a 1/16-inch-thick wrap of masking-tape-layers around the drift, with the bottom edge of the tape aligned with the "do not pass" line, as shown.
If you happen to forget where the "do-not-pass" line is when using the rammer, the o-ring will come up on the drift and contact the bottom edge of the tape-wrap, preventing the drift from going into the tube any further. This is a good, positive, safety precaution to employ.
"Do Not Pass" Mark, and Tape-Wrap, on Solid Rammer
Now we can ram some fuel in the motor. Each increment of fuel will be a flat teaspoonful, which should weigh 3 grams. The first thing to do is to verify that is the case with your fuel. Measure out a flat teaspoonful of your fuel and weigh it in a small cup. Verify that it weighs about 3 grams. Adjust the measure of your fuel to that weight.
The first 3 increments of the fuel will be rammed with the hollow rammer, since this fuel is rammed around the spindle, as shown in the drawing.
Safety Note: Measure out about 1/4-cup of your fuel into a paper cup, and close the tub containing the rest of the fuel. Minimizing the exposure of compositions and devices that you're not currently working with greatly reduces the risk of serious damage in case of an accidental ignition. Don't keep any unneeded compositions or finished fireworks devices in the same room or area where you are working.
Safety Note: When hand-ramming compositions, wearing a leather glove on the hand which will be steadying the device greatly reduces the chance of an injury in case of an accidental ignition. Also wear safety glasses and cotton clothing (long sleeves, long pants). Once again, don't use the PVC tube-support when hand-ramming.
Hand ramming the black powder fuel into a stinger missile rocket motor.
Put the funnel into the mouth of the motor tube, and introduce one increment of the fuel into it. Remove the funnel, and slide the hollow drift into the tube, using the rubber o-ring to minimize dust blow-by.
Ram that increment of fuel with 8 solid whacks of the mallet. After about 4 whacks, you can feel the fuel really getting solid under the rammed drift. After 8 whacks the fuel will feel very solid. We're not looking for bulges in the tube as we were when ramming the clay nozzle.
If the tube bulges or splits, too much force is being used on the mallet. But enough force should be used to really consolidate the fuel into a solid mass. There's a bit of "feel" you need to develop as you get used to the mallet.
Repeat this process for fuel increments 2 and 3, using the hollow rammer. After increment 3 has been rammed, the fuel should be solid right up to about the tip of the spindle.
Clean any excess fuel out of the hollow drift's core using an awl or drill bit. It is very important that no fuel be allowed to build up inside that core. If fuel is allowed to build up in there, sooner or later fuel can be "pinched" between the top of that core and the tip of the spindle, which could cause accidental ignition during the ramming.
Now ram fuel increments 4 and 5 using the solid rammer, keeping an eye on the "do not pass" line to make sure it never goes beyond the top of the tube.
Remember that for this first motor, we're using straight fuel for all the increments. Once we verify that the motors fly well with this fuel, we'll experiment with additions to the delay fuel to make it more interesting.
Straight fuel, using airfloat charcoal, will create a fine-charcoal-spark spray as the rocket ascends, and there will be a cool "whirring" sound if all goes as planned.
Adding Metal or Charcoal Sparks to a Stinger Tail
As I mentioned, the video of the stinger flight at the beginning of this tutorial showed a rocket with titanium sparks in its tail.It is also possible to create charcoal sparks in a rocket's tail during flight, as shown below.
Launch and flight of a stinger missile rocket with a bushy 80-mesh charcoal tail.
To include either metal or charcoal sparks in a stinger missile's tail as it ascends, the metal or charcoal is added to the last two fuel increments. As was mentioned already, the thrust fuel around the spindle (the first three increments) is never modified.
Metal sparks can be created by the addition of titanium, ferro-titanium, or other metals. Charcoal (orange) sparks will be created by adding charcoal which is coarser than the airfloat charcoal already in the fuel--typically 80-mesh or 36-mesh charcoal.
To include these spark-additives in a fuel increment, measure out the flat-teaspoonful of the standard fuel for that increment, and put it in a separate paper cup. Add a "pinch" of the metal or charcoal into the fuel.
Swirl the fuel and the additive together, and then ram that increment into the motor.
Repeat this process for the final increment of the fuel.
Note: Hand-ramming fuels containing metal particles increases the danger of accidental ignition. Some metals are safer than others. For example, spherical titanium has less rough edges to grind against each other than sponge titanium does. Aluminum and magnalium do not spark at all. Granular ferro-titanium has hard, rough, sharp surfaces. So, when you are hand-ramming metal-containing fuels, for your own well-being follow all the safety precautions prescribed above.
Finishing the Stinger Missile
Put a flat 1/2-teasoonful of clay into the motor and ram it with the solid drift. This will form a clay bulkhead that is about 1/8-inch thick.The rocket motor can be flown as-is, without a heading, to test the power of the fuel.
Once the fuel's performance has been verified, a heading can be added to the stinger motor.
To do this, gently hand-twist-drill a passfire hole through the clay bulkhead into the fuel about 1/16-inch, using a 3/16-inch drill bit. Dump the loose clay back into its tub.
Warning: If there is metal in the top increment of fuel, it is especially important to be very careful when hand-twist-drilling the passfire hole through the clay bulkhead. Do the drilling outdoors, with gloved hands and eye protection. Drill slowly by twisting the bit by hand, only penetrating the fuel grain a short distance.
Put two small pinches of the rocket fuel into the empty end of the rocket motor, filling the passfire hole with fuel. Place one large star, or several small stars into that void on top of the loose fuel. Pieces of flying-fish-fuse may be used instead of stars.
Note: Because of the rocket's short length and spin-stabilization, headings on stinger missiles are typically small and lightweight. One large star or a few small ones make nice finishing touches on these rockets, and this is an easy way to test new stars. A small amount of report composition may be used instead of stars to signify the end of the missile's flight.
Cap the end of the motor with four 3-inch strips of masking tape over the end of the motor, rotated at 45-degrees to each other. Press the tape down tightly on the top and sides of the paper tube. Then wrap some masking tape around the motor at its top to cover the strips of tape.
Ramming Increments of Fuel in Stinger Motor
Harry Gilliam at Skylighter likes to put small consumer fireworks festival balls (sometimes called reloadables or artillery shells) on his stingers. He does not use a clay bulkhead. He strips the green fuse out of the shell, and completely removes the lift cup from the bottom of the shell (saving the black powder). Then he simply seats the festival ball time fuse right top of the stinger fuel, and uses masking tape to attach it to the stinger. To make these fly straight, you may actually have to shorten your stinger to less than 3 inches.
The motor is now ready to be removed from the spindle. Twisting it in a clockwise direction, as viewed from the top, will loosen the motor from the spindle without loosening the spindle in the base.
Tap any loose clay from the motor and the spindle, and the missile is ready to launch.
Launching a Stinger Missile
A stinger must be launched off of a solid base and launch pin. This is easily made from a solid block of wood and either a sharp nail or a piece of bamboo skewer, as shown below.The launch pin must have a smaller diameter than the core in the rocket motor and it must be long enough to hold the rocket up off of the wood base by about 1/2-inch.
Make a launch pin and base for launching stinger missile rockets.
The launching base and missile are now ready to take out and fly. Have fun.
Troubleshooting
There are some possible problems which can arise with Stinger rocket motors: the motor can fly weakly, sideways, or not very high, the nozzle can blow out of the tube, or the motor can blow up, "CATO", upon ignition.If the nozzle blows out of the end of the tube, it was not rammed solidly enough, and future models need to have the nozzle rammed harder, resulting in the slight bulge in the tube described in that section.
If the motor flies weakly, then the traditional solution to that problem is to add a percent or two of potassium nitrate, re-granulate and dry the fuel, and try another motor. Or try milling the potassium nitrate to make it into a finer powder. Repeat this until pleasing flights are achieved.
If the motor blows up, then the fuel is too hot, and the traditional solution to that problem is to add a percent or two of airfloat charcoal, re-granulate and dry the fuel, and try another motor. Repeat this until successful flights result.
If your stinger flies off to one side, or rises and then starts to fly in a different direction, it may be top heavy. This is caused by tubes which are too long--long stingers will wobble as they spin and not fly straight up. Or your heading may be too long or too heavy. Reduce tube length accordingly.
Whatever modifications you make to the fuel and/or tube length, keep notes of them and their results so that you can repeat your success in the future.
Everything You Need to Make Stinger Missile Rockets
1 Pound-3/4-Inch Stinger Missile Rocket Kit

Check Out the Kit & Order Here