3-Inch "Hybrid" Plastic Ball Shells:
Reinforcing Plastic Shell Casings
with Paper-Tape
By Ned Gorski
Why reinforce plastic ball shells?
My first fireworks shells were made with ping-pong-balls as the shell casings. Many folks started out using 35mm film-canisters to make shells, or with strapping-tape-reinforced 1.75-inch plastic "festival ball shells." Shells have even been made with plastic Easter eggs for shell casings. These expedient casings served as the foundation for many a beginner's first aerial shells.But there comes a time when we pyros want to move up. We want to make something a little bigger--more like the aerial shells we see in the largest consumer-fireworks devices or in professional fireworks displays. The "Basic Plastic Ball Shell" project gets you started in that process by showing you how to build a simple 3-inch plastic ball shell--slightly larger than anything you can buy at the local fireworks stand.
This project is your invitation to take the next step up in the process. This "hybrid" shell construction technique uses a plastic casing too, but we will reinforce them with layers of paper to achieve a stronger, more symmetrical break.
This is a more traditional method of shell construction. The resulting shells will end up looking and performing like professional 1.3g-class display shells. In addition, we will add a "rising effect", which provides the streak of light and sparks to illuminate the shell's path as it climbs from the mortar up to burst altitude -- just like professional shells.
The construction technique I will describe creates a very strong shell container. There are some significant advantages to this construction technique:
- That strong reinforced plastic container allows us to achieve better shell bursts using a simple black powder burst charge.
- A shell constructed in this manner is better able to withstand the greater lift forces necessary to launch this larger shell from a mortar.
In the future, you will be able to use shells constructed using these techniques as shell-inserts in larger shells. The plastic casings alone would not survive the heat and pressure of the larger shell-burst. But with the added strength of the paper-tape reinforcement they perform successfully.

3-Inch Shells Used as Inserts in a Larger Shell
Once you master the following steps, and if you set up an assembly line for making shells, each shell will only take about a half-hour to complete.
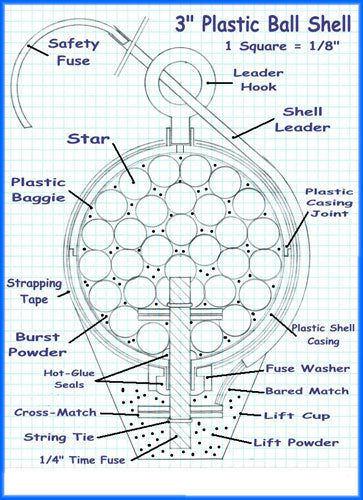
Cross-Section of 3-Inch Plastic/Paper Ball Shell
Materials Used in 3-Inch Ball Shell Construction
3-Inch plastic shell-casing set
PVC plumbing cement
Q-tip applicators for cement

PVC Plumbing-Pipe Cement and Q-Tip Applicators
Warning: This cement produces flammable and obnoxious fumes when used and when drying. Use it in a well ventilated area, and don't breathe more of the fumes than necessary. The use of a fumes-rated respirator is a good idea.
Fuse

Fuses Used in Shell Construction
Note: A 4-inch length of 3/32" Visco safety fuse (not shown) will be used to ignite each shell leader.
Note: Quickmatch is not shippable. Some folks have access to it, and others do not. But, I'll show you how to quickly convert paper-wrapped fast fuse to quickmatch for use as a shell leader.
Note: You need to know beforehand how fast your time fuse burns. This lets you know how much of it to use to get the desired time delay between launch of your shell and its ultimate burst in the sky. Different brands and batches of time fuse burn at different speeds. Use a stop watch and at least 1-inch of your time fuse to test its burn time (a foot-long piece gives you more accuracy).
What you want to find out is the rate of burn in terms of "seconds per inch." You get that by dividing the total burn time by the length of the fuse. For example, if a 12-inch fuse burns for 36 seconds, your fuse burns at (36 divided by 12) 3 seconds per inch.
Label the coil of fuse with a tag showing its burn speed in seconds-per-inch. Time fuse burn-rate can vary from 2 seconds to over 3 seconds per inch. The sample shown in the photo above burned at a rate of 2.3 seconds per inch. In the test shown below, a 1.5-inch piece of fuse was cut, and one end was sliced 1/2-inch deep, and cross-matched for ignition. Only the burn of the remaining 1 inch of time fuse was timed.
String: Strong, thin string made out of a natural fiber such as cotton, flax, jute, or linen will be used. 100% cotton string can be purchased online.
Hot glue: Hot glue and a hot-glue gun will be used during the construction.
Warning: Hot-glue guns have been known to short out and spark during use. It is important to use a quality glue gun, and it is a very good idea to keep the glue gun housed on a stand, or in a container, which keeps the gun upright, and not lying in excess glue. It is also a very good safety precaution to keep the gun plugged into a switched power-strip, so the switch can be turned off when the gun is being used around live pyrotechnic materials. See this Hot Glue Gun Safety tutorial for details on these safety measures. They CAN save your life.
Fold-and-close sandwich baggies (not the heavier zip-lock type).

Fold-and-Close Sandwich Baggies
Single-edge razor blades (available in Home Depot paint department).

Single-Edge Razor Blades
Both masking tape and 1-inch-wide gummed-paper tape (water-activated glue). The gummed-paper tape is available online from McMaster Carr, in single rolls or by the case.

1-Inch Gummed-Paper-Tape and Masking Tape
A sponge and water can be used to wet the gummed-tape. Many pyros end up investing in a gummed-tape dispenser, since this tape is used quite a bit in our hobby. You'll see me using the dispenser shown below, for continuous pull-and-tear tape application. Many folks rig up their own dispenser using a plastic food container/lid and some sponges.

Gummed Paper Tape Dispenser
Kraft paper (paper grocery bag) from which to make lift cups. You can also find a good grade of white butcher paper at Costco which works very well.
Stars: Fireworks stars will be used in this project. You'll need approximately 4 ounces of stars in each shell. Stars that are about 5/16-inch in diameter are recommended for 3-inch shells. For simple, quick, and brilliantly colored stars, see the rubber fireworks stars project.
At the same time you're making stars, you can make an optional rising-comet-tail for the outside of the shell. This tail will display as the shell ascends in the air, prior to the shell's burst.
Granulated black powder for burst and lift powders for aerial shells
Granulated black powder, either commercial or homemade, will be used to lift and burst these shells. If you need to make it, here are two projects to make high quality black powder: Red Gum Black Powder and Ball Milled Black Powder.

Use black powder of a medium granulation such as FFg, Fg, 4FA or Cannon Grade for burst powder, to allow fire transfer within the shell. Approximately 2 ounces of BP will be used for the lift and burst powder in each shell.
Note: Black powder substitutes like 777 or Pyrodex will not work reliably to lift shells.
Some sporting good stores may still stock Goex sporting black powder. My local Bass Pro Shop still does. It can also be ordered online by adults, delivered with Hazmat shipping. One source is Graf and Sons. I hear their Graf-brand black powder is very nice stuff, too.
A pair of scissors, a pair of Sears HandiCuts (for cutting fuse, or use the razor blade), and a short section of PVC pipe, or similar, for burnishing paper tape flat on the shell. Scissors are not recommended for cutting fuse as they may cause friction-ignition.

Scissors, HandiCuts, and PVC-Pipe Section
A 3-inch mortar tube, and a secure support for it, will be required for the safe launching of the shells.
Miscellaneous tools and supplies: nitrile gloves, leather glove, drill and 1/16" drill bit, paper towels, a couple short sections of tube to use as shell stands (one long enough to support the bottom-fused hemisphere), weighing-scale, masking tape to cover time fuse, Sharpie marker, Elmer's glue, etc. See the photo below.
Safety Precautions
- Please read these fireworks safety essays before you start.
- Wear eye protection.
- Wear cotton clothing with long pants and sleeves.
- Always minimize the amount of explosive or flammable material which is open or exposed to possible accidental flame or sparks.
- Keep a bucket of cold water close by in case of burns.
- Make sure you have a fast, easy exit from your work area that you could find blindfolded in case of emergency.
- Study the hot-glue safety essay, and put those precautions into practice.
- Only cut fuse with a razor blade or HandiCuts to prevent accidental ignition. Do not use scissors for fuse cutting.
- Store any flammable compounds, components, and devices that you are not using in a well-sealed storage container well away from your work area.
- Practice safe display practices when firing aerial shells and other devices.
Assembling the Shell
Optional: Drilling vent hole in top shell casing hemisphere
If the shell casing has no way to vent air, when it is glued and closed, it is possible the pressurized trapped air can force its way out through the glued equator. This might cause gaps which allow hot lift gasses to get into the shell when it is launched, causing a "flowerpot" shell failure.To prevent this, drill a small vent hole in the top shell casing hemisphere. The "top" does not have a fuse hole in it.
Cutting time fuse, and cross-matching one end
(Now is a good time to get your hot-glue gun heating up, following the hot-gluing safety tips.)1/4-inch time fuse is used to create a time-delay between the launch of the shell out of the mortar (the "lift") and when it explodes in the air (the "burst"). To maximize the chances of fire being transferred from the lift charge to the time fuse and from the time fuse to the shell contents, the time fuse will be "cross-matched" with pieces of thin black match. Black match can be harvested from flat quickmatch, or from Super-fast paper fuse.
A block of wood with a 1/4-inch hole drilled in it about 1/2-inch deep makes a nice support for the time fuse as it is being sliced and cross-matched.
You want 3 to 3.5 seconds of time delay from lift to burst for these shells. With a razor blade or Handicut shears, cut a length of time fuse which has that amount of delay (based on your time fuse burn-rate test) plus 1-inch extra.
For example, my fuse burns at a rate of 2.3 seconds-per-inch. So, I want 1.5 inches of fuse for the timing (1.5 X 2.3 = 3.45 seconds), plus the extra 1 inch, for a total of 2.5 inches of fuse.
Cross-matching
What cross-matching does is to multiply the number of ignition points for the time fuse. The more ignition points you have, the greater the chance your time fuse will actually give and take fire. Cross-matching on the outside of the shell is there to "take" fire when the lift charge ignites. Cross-matching on the inside of the shell is designed to "give" fire to the burst charge in the shell.Starting at the end, slice down the center of the powder core with a single-edge razor blade 1/2" deep from the end. Wear a leather glove for protection when slicing the fuse with the razor blade.
Slightly spread the fuse open at that split, being as careful as possible not to disturb the powder core. Center two 4-inch-long pieces of the thin black match cross-wise in the bottom of the split. You should have two inches of black match protruding from each side of the time fuse. Tie the split in the time fuse tightly closed just outside the black match with a piece of string. This way the black match will be firmly gripped in place by the time fuse.
Hot-gluing time fuse into shell casing
Using a Sharpie, mark the time fuse 3/4-inch from the un-cross-matched end.Pierce one corner of a plastic baggie with an awl or ball-point pen. From the inside of the baggie, push the un-cross-matched end of the time fuse through the hole. Pull the baggie all the way up the time fuse to the fuse cross-matching.
Observing hot-gluing safety tips, put a ring of hot-glue around the time fuse at the mark you made 3/4-inch from the un-cross-matched end. Quickly push the un-cross-matched end of the fuse from the inside of the bottom shell casing out through the hole in the casing. Push the fuse through the casing until the mark is just visible on the outside of the casing. Allow the glue to stiffen holding the time fuse in place.
Put a ring of hot-glue around the time fuse area on the outside of the casing, and press the fuse washer over the time fuse and into the glue, attaching it to the casing. Fill the depression between the washer and the fuse with more hot-glue. This creates a fireproof seal to prevent lift flames from entering the shell.
After that glue is cool, install a plastic cap or tape on the fuse-end to protect it.
Note: The plastic cap seen in the photos and videos accompanying this project is the ideal way to protect the end of the time fuse from damage during the building process. However, if you don't have one (from CapPlugs.com), a small piece of masking tape wrapped around the end of the fuse and extending beyond its end can be used instead. Pinch the extended end of the tape closed to protect the end of the time fuse. When you remove the masking tape later, be careful not to unravel the fuse's thread-wrapping.
Put a Sharpie stripe on the plastic cap on one side, and an identifying mark on the other side of the plug: "R" for red stars, for example.
Pull the sides of the baggie up straight. Cut off the folded-over excess baggie parts with a pair of scissors as shown in the following video.
Hot-Gluing Time Fuse into Shell Casing
Filling the shell with stars and burst-powder
Push the plastic baggie down to the bottom of the time fuse in the lower casing. Pour enough stars to fill the bottom (fuse side) half of the shell into the baggie and tap the shell gently to settle them into the hemi. Weigh out 1.25 ounces of black powder burst, and add half of it to the stars in the filled hemi. Tap the hemi to settle the BP in between the stars.
Now, first fill the top half of the shell (the hemi without the fuse) almost full of stars. Then dump them into a plastic baggie. Mold the top section of star-filled baggie into a rounded shape so it will fit inside the top hemisphere. Add the rest of the BP burst to the baggie of stars.
While holding the bagged stars and burst powder in a rounded shape, twist the baggie closed on top of its contents. Form as rounded a shape as possible, and put the top hemi in place on top of the twisted-shut baggie.
Tap on the shell casings to settle the contents while pushing any protruding bits of the baggie inward through the equatorial gap with an awl or similar object. Keep tapping and pressing down on the hemi. The combination of these actions will eventually close the shell casing completely. If necessary, several stars may be removed so that the shell can be completely closed.
Gluing shell casing closed
Now, pinch the temporarily closed shell casing gently at the equator to re-open it just a bit. Using a Q-tip, apply PVC pipe cement into the equatorial casing joint. Make sure to get all the surfaces evenly coated.
Twist the shell casing back together nice and tightly until you see glue and softened casing-plastic squeezing out of the joint. While holding the shell firmly closed, wipe any excess glue off with a paper towel. Seal the equator all the way around with overlapping pieces of masking tape. This will prevent the casing from springing back open.
Note: This is where the vent hole drilled in the top casing is handy. It allows air to escape from inside the shell as the casing is closed and glued. Without that hole, the trapped, pressurized air would try to escape out of the equator, potentially leaving air gaps in the glued joint.
Determining the orientation of shell axes before applying gummed tape
In order to create a large, powerful shell burst, we will reinforce the plastic shell with paper tape to make it stronger. To make our bursts symmetrical, the reinforcing tape has to be applied as evenly as possible to the entire surface of the shell. You don't want to have "thicker" and "thinner" spots in the paper layers. This process for even shell-pasting has been used in one form or another for centuries.Sounds simple enough, but in practice, it can be a little tricky to keep track of where you are in the shell-pasting process. So, before we start actually pasting, let me show you how it works, and you'll see how I keep track of where I have applied tape and where I haven't.
You don't have to actually "do" this part--no need for you to add sticks and axis labels. Just read along, and watch the video above again if you need to, so that you understand this clearly. It can be a little tricky to grasp, so make sure you read and watch until you get it. Okay?
First, some definitions: An "axis" is an imaginary straight line which passes through the center of the shell, and out through the opposite side of the shell. "Poles" are the points on the surface of the shell where an axis enters or exits the shell.
I use several axes in my pasting process so that I can keep track of where I am on the shell's surface. So, I name each axis.
As shown in the video above, I call the line between the fuse and lift-ring recess the "X-axis." The north and south poles are the two points where that axis exits the shell. Remember that Sharpie-stripe I told you to make earlier on one side of the plastic cap or the tape covering the fuse? If you follow the direction of that stripe down from the cap to the equator of the shell, you can create a point there (call it the "east pole"), which will be one side of an axis that we'll call the "Y-axis." It runs from one side of the equator through the center of the shell to the opposite side of the equator (the point on the opposite side is the "west pole").
Are you with me so far? Don't worry if it's a little fuzzy. In a minute, you'll see why I do all of this.
Now, keep the shell upright and rotate it 90-degrees from the Y-axis. (Turn it like the Earth turns on its axis--I know, scientists, I know.) Then I create a "Z-axis" that also passes through the center of the shell from one side of the equator to the other to make "front and back poles."
So, what I do is to visualize these axes and poles as I apply the gummed tape reinforcement to the shell. Using them as guides, and alternating the layers as I'm about to show you, I am able to end up with a uniformly even layer of gummed tape when all the taping is done.
Applying layers of gummed tape to shell
Now we actually start to apply the layers of gummed paper tape to the shell casing to reinforce it.
Note: You'll see me applying the tape from the pull-and-tear dispenser. If you don't have one of those, you can make something similar from a plastic food tub and lid, with a sponge in it. Or you can simply tear off dry lengths of the tape, wet them, and apply as you'll see me doing in the video and photos.
The video above demonstrates the taping process in detail.
Begin by working with the X-axis. Apply 4 bands of wet tape to the shell, with the bands crossing each other at the north and south poles, and not overlapping each other at the equator. Tear the tape at the fuse area and lift-ring recess.
Now apply eight 2-inch pieces of tape at the spots around the equator where the bands touch edge to edge. See the video above if this is not clear.
Now you have one "application" of tape, which has a fairly evenly distributed average of two layers of the tape over the complete surface of the shell casing.
Repeat this for the Y and Z axes. Then burnish all the tape down by rubbing it with the short section of PVC pipe.
Now repeat the applications for the X, Y, and Z axes a second time exactly as you did before, and burnish the tape again. The shell casing now has 6 of these tape applications covering it.
Measure around the shell now. The shell's circumference should have grown from its original 8-inches to 9-inches with the applied tape. A finished shell circumference of 3 times the nominal shell diameter is optimal for a good fit in a properly sized mortar.
The taped shell must be dried before the next steps. A couple hours in a drying chamber, or overnight in a warm, dry area with moving air will do the job.
Fun Note: If you'd like to see some innovative shell-taping machines, which take most of the work out of the taping process, especially on larger shells, go to http://ctpyro.com/12.html and check out the WASP machines. Many serious fireworkers have invested in them. When you see it run, the big question is "how do it know?" The answer is that Jeemy Weedmann knows...

WASP "Super-Stinger" Shell Taping Machine
Cross-matching exterior end of time fuse
Remove the plastic cap or tape from the end of the time fuse sticking out of your shell. This time we will use two 1-inch pieces of the thin black match (as opposed to the 4-inch-long pieces we used on the inside of the shell). Just as you did with the interior end of the time fuse, split, cross-match, and tie the exterior end of the time fuse.
Note: Sometimes new shell makers will skip this step at first. Yes it takes a little more time to cross match your shells. But skip it, and you are sure to have dangerous dud shells coming back down with a 'thunk,' perhaps on top of your lazy noggin'. Even if it kills you, it's still a waste of a perfectly good shell!
When the shell is launched, the black/cross-match will be ignited all along its exposed length--not just on its ends.
Making shell leader and lift bag
Weigh out the black powder lift charge. This will be between 3/4 and 1 ounce for a 3-inch shell, depending on the power of your black powder. Put that lift powder into one of the plastic baggies.
Measure and cut 24 inches of your shell-leader material--either quickmatch or paper-wrapped fast fuse. A standard 3-inch mortar is usually 18 inches deep. So a 24-inch leader will be long enough to get the top of the shell leader up and out of the top of the gun.
Bare 1 inch of the black match at one end of the leader. Bend the bare match back on itself, and put that end of the leader securely down into the black powder in the baggie. Ensure that the bare match is in good contact with the black powder.
Twist the baggie around the leader, and use masking tape to tightly hold the baggie closed around the leader at the top of the lift powder. Use your scissors to clip off any excess baggie at the top of the masking-tape wrap. Attach the masking-tape wrap to the leader with more masking tape. The leader should not be easy to pull out of the baggie of lift powder now.
If you're using paper-wrapped fast fuse as leader material, spiral-wrap the fast fuse to cover it with masking tape for its whole length except for the last 1 inch of it.
Tape a 4-inch piece of Visco ignition fuse alongside that last 1 inch of fast fuse, leaving 3 inches of the Visco exposed at the end. If quickmatch has been used for the leader, insert the Visco into the end of the quickmatch leader 1-inch deep, and tape it in place.
Installing leader-hook, lift baggie and leader onto shell
As shown in the above video, install the leader hook in its recess using PVC cement or hot-glue. If you drilled a vent hole, make sure it is now solidly sealed.
Thread the leader through the lift ring. Place the baggie of lift squarely on the end of the cross-matched time fuse, and hot-glue the leader to the side of the shell from the time fuse to the lift ring.
Constructing and installing a lift cup

Cut a 9-inch diameter circle out of the kraft paper as shown in the above video. Make a cut from the edge to the center of the circle.
From one of the cut corners on the edge of the circle, use a ruler to measure over to a spot on the circumference of the circle 4 inches from the cut corner. Make a mark on the edge of the paper at this point.
Make a sharp crease in the paper from the mark you just made to the center of the circle. This will result in a "pie shaped" flap of paper with the fold you just made as one side of it and the cut line you made earlier as the other side of it. Fold this piece along the crease you just made and lay it down on the circle, being sure that the rounded edges of the flap and the rest of the circle are aligned.
Fold the pie shaped piece over again in the same direction along the cut edge, keeping the outer edges aligned, and making another crease from center to circumference. Continue in similar fashion around the circle until the whole circle is folded into a pie shaped wedge. Glue the loose edge of the outside flap along the cut line to the wedge using a bead of hot glue.
Open the wedge into a cone by separating the layers of paper along the curved edge. Using a small amount of hot-glue, tack the layers on each side of the top of the cone to one another so that they will not separate and that you keep the cone shape.
Finally, put a bead of hot-glue around the inside lip of the cone and glue the cone over the lift bag and onto the shell. Fold the excess bottom "tip" of the cone over and hot-glue it to itself.
Installing an optional rising tail comet on the shell
Optional rising tail: Using hot-glue on its bottom and sides, attach a heavily primed pumped star or comet to the shell as shown in the video above.
Verify the shell fits in the mortar
The last thing to do now is to make sure the shell will drop freely into the mortar from which it is to be fired. If the shell is too snug, you can roll the leader side of the shell on a flat surface to reduce its thickness.
The mortar will, of course, have to be firmly supported by a stake or rack prior to loading and firing the shell.
Ok! Load it up and fire away!