Fireworks Shell Making Using 4-Inch Plastic Balls
Making Ball Shells Using Plastic Parts
In this article I am going to describe a way that I make 4" plastic ball shells. I want to emphasize the "One Way" part of this article's title, though.In Volume 2 of Bill Ofca's Technique in Fire series, Design and Quick Assembly of 3, 4, and 5 Inch Plastic Ball Shells, some interesting and useful methods are described, and it was this booklet that I followed when I first started building plastic ball shells years ago.
Lloyd Sponenburgh has another way of building these shells, as described in his Passfire.com article, 4" Plastic Ball Shell. I've played with Lloyd's methods a bit as well. At regional club events, he has taught probably hundreds of folks how to build these shells his way.
One thing that I've discovered over the years is that there are many ways to skin the cat in fireworking, and that there is much we can learn from each other. Usually each of us adopts a hybrid, personal way of doing things. And, each person's way can change and evolve over the years.
I do think my methods include some unique ways of approaching the subject, and I hope the information in here can be useful to both the beginning fireworker and the seasoned pyro who is curious about how someone else does things. Suffice it to say, I am very pleased with how these shells perform using my method.
So, this article is simply a description of my current, personal, hybrid way of building these shells. But my way will probably evolve to be a little different in a year or two. Beyond just discussing how to build one of these shells, though, I'd like to ponder how to think about some of the various aspects of the shell's construction.
Parts of a 4" Plastic Ball Shell
First, look at the basic design of a 4" plastic ball shell in the diagram below.
4" Plastic Ball Shell Construction Diagram
Recommended Prerequisite Reading
Next, you may want to review the following articles. Parts of this project depend on the referenced articles below.- Red Gum Black Powder
- How to Make Cut Stars in an hour or less
- Wonderful Zinc Stars
- Making Blackmatch
- How to Make Quickmatch
- The shell construction details in Nice Shells in 2 1/2 Days, Part 3.
What Size Stars Should be Used?
In Fireworks, the Art, Science and Technique (FAST), Dr. Shimizu includes a table on page 252 which lists shell sizes, and the corresponding recommendations for star size, number of stars, and amount of bursting charge. Based on that star sizing information, I've developed the following little graph:
Star Sizing Graph
This graph, of course, only shows a starting point when sizing stars for a shell. How fast does the star burn? Some burn much faster than others. Do I want a dense burst of smaller stars, or a Palm Tree burst of very large stars? The individual fireworker must experiment and develop their own personal preferences.
The chart shows that a good starting point would be 7/16" stars for this 4" ball shell. The FAST chart also indicates that approximately 170 round stars of this size would be used in the shell. But I'll be using cut stars in this particular shell, so that number will probably vary.
The weight of the stars in the shell will vary considerably with the type of star. It might take only 8-10 oz. of a lightweight star such as Willow, or up to almost a pound of a dense star like a zinc star.
What Kind of Break Charge, and How Much is Used?
In the booklets cited above Ofca and Sponenburgh employ variations of a flash-powder bursting charge, with Lloyd combining his hot-flash charge with some black powder.In Shimizu's FAST, pages 207-214, there is an extensive discussion of potassium chlorate bursting charge (H3), potassium perchlorate bursting charges (KP), and black powder bursting charge (BP). Various considerations are discussed, and possible cores for coating the charges on are explored, as well as coating ratios.
For shells smaller than 4", Shimizu recommends the H3 burst charge, and for larger shells he specifies either the KP or BP burst powders.
I personally like to stick with black powder burst charges, sometimes augmented with a slow-flash-powder burst additive, which I'll describe later.
An interesting subject is the density of various burst charges. These can be useful to know when choosing a burst powder for a particular shell.
Burst Charge Densities (Amount of Black Powder per Cubic Inch)
|
(0.70 ounces/cubic inch) |
|
(0.35 ounces/cubic inch) |
|
(0.26 ounces/cubic inch) |
|
(quite a bit less dense than even the BP on rice hulls) |
So, for our 4" shell, our granulated BP with red-gum/alcohol and having a density of 0.35 oz./cubic inch is just about perfect.
How Much Time Fuse Should be Used?
I have 1/4" time fuses that burn anywhere from 2.2 to 3.1 seconds per inch. I want a 2 second delay from my time fuse in this 4" shell. I'll typically use a time fuse delay (in seconds) of half the shell's diameter. So, I need an actual time fuse length, between cross-matches, of between 5/8" and 7/8." I could just split the difference and use 3/4," but I like to be more precise in my fireworking.I have a new roll of time fuse and I don't know how fast it burns. So, I cut 10" of it, lay that piece on the ground in a safe location away from any flammables, light one end of it with my torch at the same time that I start my stopwatch, and I stop the stopwatch when flame spurts out the other end of the fuse.
 |
 |
This 10" piece of fuse burned for 21.65 seconds, which is close enough to 22 seconds for me. Dividing that 22 seconds by the 10 inches gives me a fuse burn rate of 2.2 seconds per inch. I put a masking tape flag label on one end of my roll of fuse indicating its burn rate for future reference.
I'm a bit on the particular side. My wife would say that I'm a bit compulsive and anal, but I know she's just kidding. I hope. Anyway, I actually cut 10" from each end of the roll of this fuse and time each of those pieces. Each one burned for about 22 seconds, so I know that figure is accurate for this roll of fuse. Heck, how do I know for sure that the machine and operator making this fuse stayed consistent the whole way through?
Using this fuse then, I'll make sure that I have my desired delay of 2 seconds, divided by the 2.2 seconds/inch, equaling 0.9 inches of time fuse between cross-matches. This is almost exactly 7/8."
Constructing the 4" Ball Shell
Well, I think we can start to actually build this baby now.I heat the hot-glue gun up. I have had good luck with Arrow glue guns and glue sticks from Home Depot. A gun and a bag of sticks for under $25.

Glue Gun and Glue Sticks
Note: See hot-glue-gun safety tips.
I want 7/8" of actual time fuse delay, and I'm gonna split each end 1/2" with my razor blade for cross-matching. So I cut a 1-7/8" piece of the time fuse with the razor blade. I put marks with a Sharpie in 1/2" from each end of the fuse.
Warning: Fuse is never cut with scissors because it can be ignited by the friction of that kind of cutting. Fuse is always cut with a razor blade, or with an anvil cutter that uses a razor blade for the cutting.
Then I carefully split one end of the fuse down 1/2" (the actual blade on my razor is 1/2" wide), insert three 4" pieces of the cross-match, and tie the split ends of the fuse back together with string and a clove hitch knot and an overhand knot to secure the clove hitch. I split the fuse right down its center, disturbing the black powder core as little as possible.
 |
 |
I hot-glue the fuse-washer onto the correct hemisphere.

Fuse-Washer Hot-Glued onto Correct Hemisphere
I then give the fuse a trial fit in the hemisphere fuse hole to make sure it inserts easily. If it does not, it is OK to slightly enlarge the hole with a correct diameter drill bit and drill.
When I know the fuse will fit in the hole easily, I apply a bead of hot-glue around the middle of the fuse. Then, with the cross-matched end inside the casing, the fuse is quickly inserted into the casing while the glue is still hot. (When the fuse is inserted into the hemi, the hot glue becomes a seal between the fuse and the hemi, being dragged with the fuse into the casing and forming the fillet on the inside.) I push the fuse through until the fuse's outside Sharpie mark is about 1/4" beyond the outside edge of the fuse-washer.
Then, I apply hot-glue around the fuse outside of the shell, filling the recess in the fuse washer, and building up another fillet of glue around the fuse.
Note: These hot-glue fillets, inside and outside the shell casing, are very important. They keep the lift gasses out of the shell when it is launched skyward. For this reason, the glue seals must be solid and secure, without any gaps.
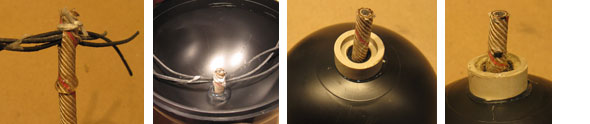
Time Fuse Hot-Glued into Shell Casing, and Sealed Inside and Out
A passfire tube is made of a 1-1/2" x 4-1/2" piece of paper, rolled up on a 3/8" dowel. This tube is inserted over the cross-matched fuse in the shell casing, and embedded in a ring of hot-glue to seal it to the casing. This tube conveys fire to the center of the shell after the time fuse burns through to the cross-match, which improves the symmetry of the shell's burst. It doesn't hurt to insert a few more pieces of blackmatch into the passfire tube at this time to increase fire transfer to the shell's center.

Passfire Tube Hot-Glued into Shell Casing
A 1/8" hole is drilled all the way into the un-fused hemisphere, through the recess where the lift ring will eventually be installed. This vent hole will allow air to escape from the shell when the two halves are glued together. If this hole is not drilled, the air will have to escape from the equator, which may very well leave voids in the equatorial seal. This could, in turn, let lift gasses in and cause a "flowerpot." (A flowerpot is a shell bursting in the mortar and performing like a mine.)

Vent Hole Drilled in Un-Fused Shell Hemisphere
Now, as described in Skylighter Fireworks Tips #93, I put the shell casing hemispheres on sections of PVC pipe which serve as work stands, and I lightly hot-glue rings of stars in the hemis flush with their equators.
Note: It is important in the un-fused hemi, that you glue and position the stars below the equator's recessed edge, so that the halves will mate when the shell is closed.
Then the remaining stars are fitted into the casings without any gluing. The little wedge shaped stars that were created in the star-cutting process come in handy for filling odd-shaped voids.
 |
 |
Now, I line the shell and cover the stars with tissue paper, fill the centers with homemade, granulated black powder burst charge, loosely dump in the optional slow-flash booster powder (see note below), and tap the casings to settle the powder. Then I cover it all with, and glue on, discs of tissue paper after trimming the excess tissue paper off.
Note: I'm very careful when it comes to clipping the excess tissue paper off with scissors. I never cut through any paper that has burst powder on it, and I keep the scissors clear of any area of the paper that does.

Tissue Paper Lining and Filling Shell Casings with Burst Powder
The optional slow-flash burst powder does not have to be used, and typically it would not be used for a softly-breaking shell like a Willow. It can be used in a shell where a hard, symmetrical break is desired.
This powder is a 2/1/1 mixture of potassium nitrate, sulfur, and American-dark or any 325 mesh bright flake aluminum. The individual chemicals are individually screened and are only mixed gently by rolling them together on a piece of paper. This is called the diaper-method of mixing flash powder.
For this 4" shell, I used 0.6 oz. of the slow-flash powder, which was made of 0.3 oz. of the potassium nitrate, 0.15 oz. of sulfur, and 0.15 oz. of the aluminum.

Diaper-Mixing Slow-Flash Booster Powder
Now it's time to close this shell up. I use heavy-duty PVC plumber's glue to glue the shell halves together. Using the glue can's applicator, I apply glue liberally to the mating surfaces of each hemisphere, and close the shell, twisting the hemis together until they won't move any more. I then wipe the excess glue off with a piece of kraft paper, and reinforce the seal/joint with masking tape, pulling the two hemis together as I do so.
Using the same glue, I fasten the leader-hook/lift-ring, which securely seals the vent hole we drilled.
 |
 |
I apply 4 rings of reinforcing, strapping tape, one around the equator, and the other three evenly spaced, striving for a finished shell circumference of 12." Each ring of tape is 3 layers of tape thick.

4 Rings of Strapping Tape 3 Layers Thick
I like to cover the shell at this point with aluminum foil duct tape to flame-proof the strapping tape, and to make the shell look a bit more presentable. I also split, cross-match, and tie the outside of the time fuse in the same way that I did the inside of the fuse.
 |
 |
I have found that Skylighter Super Fast Paper Fuse can be wrapped in foil tape, which has been cut down the middle to form 1" wide tape, in order to create very nice quickmatch if one cannot buy or does not want to make their own.

Foil-Tape-Wrapped Fast Fuse to Make Quickmatch
I cut a piece of quickmatch 30" long and make sure bare black match is sticking out 1" from the end that will be in the shell's lift powder. I weigh out 1.5 oz. of commercial 2FA black powder, or about two ounces of homemade black powder lift, put it in a thin plastic baggie, insert the bare match end of the quickmatch leader and tape the baggie closed. I cut the excess plastic off, and tape the baggie securely to the leader.
Then the baggie of lift powder is centered on the shell's time fuse, then covered with a lift cup which is hot-glued in place, and the leader is routed as shown. For a lift cup, a cone-shaped drinking cup can be used as shown. A flat bottom paper cup or a homemade, funnel-shaped paper lift bag can also be used.
I like to hot-glue the leader to the side of the shell to further secure it, and then I tape some visco safety fuse into its end.

Shell Leader, Lift Powder in Baggie, Lift Cup, and Finished Shell
At this point a label can be affixed to the shell to identify it, if so desired.
This is how this 4" zinc star-shell broke. You can see that it is a nice, big, round, symmetrical break. Just what I was looking for.

4" Zinc Star-Shell Burst
Have fun and Stay Green,
Ned
Materials Needed
- Ball Shells, 4 inch (PL2060)
- Zinc Stars (KT1010)
- Break/Burst Powder
- Slow Flash Burst Additive, Optional
- Quickmatch (GN3001)
- Fast Fuse, if not using quickmatch (GN1205)
- Visco Fuse (GN1000)
- Time Fuse (GN2000)
- Cross Match (GN1010)
- Printer Paper
- PVC Cement
- Lift Cup
- Hot Glue Gun and Glue Sticks
- Tissue Paper (MS1110)
- Scale (TL5020, TL5030)
- String, Thin
- Mortar Tube, 4 Inch (PL3184)
- Shell Support Tubes
- Razor Blade, Single-Edge
- Aluminum Foil Duct Tape
- Rice Hulls, optional (CH8236)