The Electric Match: To Ignite Your Fireworks Remotely
Introduction
This project shows you how to make an electric match.
The electric match gives you more control over how your fireworks appear in a display. And having invested a significant amount of money and time in a fireworks display, you might just want to enjoy watching it yourself.
That's when electrical firing starts to look like a really tasty alternative to matches, lighters, torches, and fusees.
Today, there is a wonderful proliferation of electrical firing systems. From the very simple, $15 manual-switch, single shot devices from China to highly complex software-driven systems that can be tightly synched with music to created musically choreographed fireworks extravaganzas that move you to tears...now, even some first-timers can create artfully designed fireworks shows that are simply stunning.
We've come a long way in electrical firing. And even more advances are looming. But a lot goes into an electrically fired show. It takes careful planning, higher costs, and more work than a manually-fired show.
Even so, I personally find the results to be a lot more pleasing. And, for me, the epitome of fireworks art can be found in today's wonderful and emotionally moving musically choreographed shows.
Whatever level of electrical firing you're embarking upon, the one common denominator in all electrical shows is electric matching your fireworks.
Ematches as they are most commonly called, or "squibs" by old timers, are simply a little pyrotechnic composition on the end of a chip that is ignited by an electrical current. The little pyrotechnic pop from the ematch ignites either a fuse or a firework directly.
So, when you peel all the tech stuff away from an electrically fireworks show, it's just a bunch of ematches, wired up to a circuit, ready to be fired.
An ematch can be used one time only. After doing their job once, they are thrown away.
Currently in the US, you will not find an electric match for sale to you, unless you have a Federal license. If you have months of lead time to go through the process, this is certainly a viable option.
But you can legally make your own ematches without a Federal license. In fact the US BATF will sometimes refer you to Skylighter to buy your own ematch-making components, if you don't have time to wait for an ATF license.
So, even though you cannot buy electric matches without a license, a homemade electric match is completely legal. You do not need an ATF license to make, own or use them.
So, if electrical firing is going to be a part of your future, take a look at this article, very well-written as usual by Ned Gorski. If you decide you want to make ematches, you can order everything you need at the end of this project. Skylighter also has electric match kits for making ematches, as well as firing systems, wire, extra fuse, and other components that make up a complete electrical firing system.
Skylighter's latest second generation electric match dip kit, designed by a long-time commercial ematch manufacturer, makes the whole process quick, easy, and fairly foolproof.
Harry Gilliam
HOW TO MAKE ELECTRIC MATCHES
By Ned Gorski
You may be familiar with small firing panels and electric matches from experimenting with model rockets. Small versions of electric matches (called "igniters" in the model rocketry community) are used to remotely fire those motors.
Why would one want to fire some or all of a fireworks display electrically?
- First, it's safer to fire a device electrically from a distance than it is to light it by hand. This is especially true if the item is in the middle of a field full of similar fireworks.
- Precision timing is enhanced by shooting with an electrical firing system.
- Electric firing also enables the display operator to sit back and enjoy the show along with the rest of the crowd.
What is an Electric Match?
From Wikipedia:Quite a long time ago I made some electric matches (or "ematches") using a kit which instructed me to just dip the bare ends of some wire into a liquid composition, followed later (after drying) by a second dip into a finish coating. I was disappointed in the performance of these electric matches, and ended up having to fire them with a high-voltage system just to get them to ignite.
Reliable, commercially made electric matches are a regulated explosive and require an ATF license to purchase. I later obtained an ATF license, and now have access to commercial electric matches.

Commercial Electric Matches (One with Shroud Pushed Back to Expose the Match Head)
But what if you don't have a license and don't wish to obtain one? Fortunately, making electric matches yourself is legal and does not require an ATF license. Also, since those early days of my experimentation, improved materials and techniques have become available. These permit do-it-yourself manufacture of electric matches that rival commercial products in performance and reliability.
In this paper I will discuss two basic methods of producing high quality home-made electric matches, and one additional variation.
Parts of an Electric Match
The electric matches I'll be discussing have five basic parts:Insulated, two-conductor wires called "leads" connected to the electric match head. The insulation is stripped back for about an inch at the opposite ends of the wires from the match head. These bare wire-ends are twisted together (shunted). This prevents a current from passing from one end of the wire, through the match head, and out the other end, which could accidentally fire the match.
The match head consists of a small chip of circuit board, which has a metallic conducting surface on both sides, separated by an insulating material.
An extremely thin (48-51 gauge) strand of nickel-chromium (nichrome) bridge wire is soldered to the chip, with one end soldered to each side, and with the exposed wire spanning the end of the chip and crossing over the insulated core.
The tip of the chip containing the nichrome wire will be coated with a pyrotechnic composition, or pyrogen, in one or more coats. In some cases it will then receive an outer coating creating a hard, smooth finish layer.
Finally, a plastic protective-shroud covers the match head to prevent friction or mechanical shock from accidentally igniting the sensitive pyrogen.
Functioning of an Electric Match
When enough current is passed through the match leads, the nichrome wire heats up. The heat ignites the pyrogen, producing a flame. This flame, in turn, ignites the flammable materials that the electric match head is in contact with. This happens in milliseconds. The nichrome wire burns through and is consumed, which (usually) breaks the electric circuit.Home-Made Electric Match Materials
Skylighter sells pre-assembled electric match blanks. Each blank consists of the wire "leads" already soldered onto match heads. The match heads have bridge wires and protective shrouds already in place. In other words, most of the hard part of electric match assembly has been done. All that remains to turn these blanks into fully functional electric matches is the application of the pyrogens (combustible compositions).
Electric Match Blank, with Nichrome Wire Pre-Installed across the Tip of the Head
We will be using these blanks in all of the projects described below.
Testing the Electric Match Blanks
After I purchase new pre-soldered electric match blanks, and before going any further, I like to test each blank electronically to ensure it is properly assembled and operating correctly. I do that in two ways. I use Skylighter's Ematch Tester (GN5005) and make sure it lights up when the untwisted bare wires of the electric match are pressed to each side of the tester. This ensures that the nichrome bridge wire is properly attached to the tip of the blank.
GN5005 Electric Match Tester Lighting Up when Testing an Electric Match Blank
I also use a Radio Shack digital multimeter to check the resistance of the match blank. All of the blanks I've been working with have a resistance of 1.1 to 1.5 ohms. If the reading is significantly different, I discard the blank. This test ensures that there is no excess solder or other material causing a short, or "bridge," between the conductive surfaces on the match blank chip or between the lead wires.
Note: It is important to use a digital meter to check electric matches. Test your meter on a finished electric match first in a safe location to ensure it uses a test current small enough that it does NOT fire the match. The test current in analog meters with needle-readouts is most often high enough to accidentally fire electric matches if that type of meter is used to test them.

Testing Electric Match Blanks with a Digital Meter
Coating the Tip of the Match Head with Pyrogen
Now, with the tested match blanks, we have assemblies that are ready to have their ends coated with pyrotechnic compositions.I am going to try two different approaches to doing this, with one additional variation to the second method.
Coating Electric Matches Blanks with Skylighter Dip Kit
For the first method, we'll be using the Skylighter Electric Match Dip Kit, which comes with all the necessary chemicals, materials, and tools to create the pyrogen. It also includes detailed and important instructions on how to use the pyrogen to coat the electric match blanks.Note: This dip kit will coat hundreds of match blanks, so it's a good idea to prepare all the blanks you want to coat before starting the coating process.
These instructions, which include very complete safety precautions, are reproduced here for convenience. I have found that if I follow them precisely, I get very good results. (I've added some additional photos and notes.):
Making electric matches is a dangerous activity. If you do it wrong, you could hurt yourself very badly or start a fire. Before you start read the instructions completely. They can save your life.
- First and foremost, think safety. The attitude to have is that there could be an accident. Vs. thinking and acting as if there won't be an accident. Think about what could go wrong. Think about what you could do to prevent that from happening and what you would do if you something did go wrong. For instance, if there were a fire, where would you go? What would you put it out with? Etc.
- You should only mix these chemicals in a well-ventilated area away from any heat source or sparks.
- Your kit comes with several jars of chemicals. To maintain a good seal on the jars keep their lids screwed on tightly. Keep the inside of the lids and the lips of the jars clean and free from any unused pyrogen.
- Wear a long sleeve cotton shirt, and long cotton pants. In the event of a flash fire, cotton garments will protect your skin. Do NOT wear synthetics. In a flash fire, they will melt to your skin.
- Use eye protection. Glasses or slip-on plastic goggles will protect your eyes in the event of a flash fire.
- Do not allow small children near these chemicals.
- Never stare directly at a burning electric match without the aid of welding goggles.
- Do not store any mixed chemicals or finished electric matches in an inhabited building.
- Store this product in an environment that will be maintained at a temperature between -20 to 140 degrees F.
- Wash hands thoroughly after each use.
- Dispose of any leftover or unwanted pyrogen in accordance with all applicable laws. We recommend that you burn it. Storage life of unused pyrogen has not been determined at this time.
How to Make Electric Matches Using Skylighter Electric Match Dip Kit
This kit should contain:1-Bottle "B" Oxidizer (dry)
1-Bottle "C" Solvent (wet) 1-Plastic Pipette
5-Wooden Flat Toothpicks
2-Wooden "Stir Sticks"
1-Heavy Paper Shop Towel
1 Instructions Sheet
Please check the contents of the package for all seven items, in addition to the instructions.

Contents of Dip Kit
If you are using Skylighter's electric match blanks (#GN5040), first test each one for continuity prior to dipping them into the pyrogen. Discard any, which do not show continuity. We recommend you use only Skylighter's Ematch Tester (#GN5005) for this purpose. Using Skylighter's Ematch Tester, the test light should come on when it is connected to the two electric match blank lead wires. If it does not, discard your electric match blank assembly or replace the match head.
Note: The next thing I do, BEFORE mixing the pyrogen, is to either remove the plastic shrouds from the match heads on the pre-soldered blanks. Or slide the shrouds 2 or 3 inches up the wire away from the match heads. It's much easier to move or remove all the shrouds before the pyrogen-coating process is begun. Once the pyrogen dip is dry on the match heads, I reinstall the shrouds on the electric matches.
Mixing the Pyrogen
Critical: Mix all of the contents of Bottle "A" and bottle "B" at one time. The contents of these bottles are pre-measured to yield exactly the right proportions necessary for your ematches to function correctly. If you try to mix only a portion of each bottle's contents, your ematches will probably not function correctly. If you're trying to economize, the best way is to mix all the contents at one time, the tightly seal the mixed pyrogen. After tightly twisting the cap on, seal it with electrician's tape to further prevent its drying out.Place Bottle "A" Fuel on a stable flat surface in a safe place for working, away from any source of flame or anything flammable. Remove the cap from the bottle and stir the wet fuel with one of the wooden stir sticks until it is smooth and uniform. Make sure to get all of the fuel from the bottom of the bottle included in the mixture. Never use anything metallic to stir the fuel.

Stirring the Contents of Bottle "A"
Shake Bottle "B" Oxidizer vigorously and transfer all of the contents into Bottle "A." Be sure to completely empty Bottle "B" into Bottle "A." The mixture of the oxidizer and fuel is now a sensitive pyrogen. Using the stir stick blend the pyrogen mixture until it is smooth and uniform.

Adding the Contents of Bottle "B" to Bottle "A"
The pyrogen will be rather thick until it is completely mixed. It should end up being the consistency of Hershey's Chocolate Syrup. If necessary, add 20 drops from Bottle "C" Solvent to adjust the viscosity. Repeat as needed until the pyrogen drips very slowly and smoothly from the stirring stick as it is withdrawn from the bottle. Do not use anything but Bottle "C" Solvent for thinning. If any pyrogen gets on the top of the glass bottle, gently push it back into the bottle, and wipe it clean. Do not allow any of the pyrogen to remain on the rim or threads of the bottle or to be caught under the cap. The mixed pyrogen is friction sensitive.

Adjusting the Pyrogen Viscosity by Adding Solvent from Bottle "C"
The viscosity of the pyrogen must be adjusted to produce a coating that is approximately the same thickness as the match head chip--1/10-inch (2.5 mm).

Optimum Thickness of Pyrogen
Before beginning to dip your match blanks, dip a flat toothpick into the pyrogen to check the thickness of the coating. The pyrogen should coat smoothly and produce a rounded shape. If a "tail" or point is produced, the viscosity is too high/thick. Add 20 drops of Solvent and stir until smooth. Repeat if necessary to further reduce the viscosity. If the viscosity is too low the coating will be too thin. There are two ways to correct this problem: either leave the cap off the pyrogen for a while, stirring occasionally to evaporate some of the solvent, or dip each match repeatedly until the coating looks like the match in the center of the photo above. Dispose of the dipped toothpicks by carefully burning them in a safe place.
Dipping the Match Blanks
When you are certain that the pyrogen is uniformly mixed and smooth, and has the proper viscosity, take an Ematch Blank (#GN5040) and make sure the plastic shroud is not covering the ignition chip. Kink the wire to hold the shroud back while dipping. Then, dip the narrow end of the chip (the end without wires) into the pyrogen about 1/8 to 3/16 of an inch (3 to 4.5mm). The coating on your match should look like the center "Optimum" match in the photo below.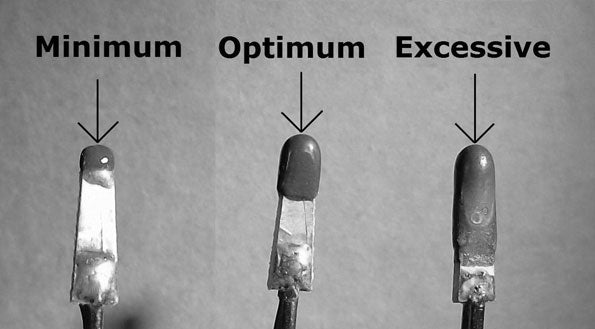
Optimum Length of Pyrogen
Note: Having a light directly overhead as you dip the matches into the pyrogen will help you see exactly how far the match head has been inserted into the slurry.
Note: As you are working with the wet pyrogen, don't allow any dry "crusties" to form on the edge of the bottle top. Push them back with your finger and stir them into the wet mix.

Dipping an Electric Match into the Pyrogen Slurry
While this may not seem to be much pyrogen, no more is necessary. This small amount of pyrogen will produce a 1.5-inch fireball from the end of the plastic shroud. The best way to get the correct coating is to dip the match blank into the pyrogen slowly and withdraw it very slowly (taking 2-3 seconds) from the pyrogen to allow the excess to flow from the match without leaving a "tail." Hang the match, head down, to dry for at least 15 minutes before firing.
Note: I found the recommendation to remove the dipped match from the slurry very slowly to be very helpful. Counting to 2-3 seconds while removing the match from the pyrogen produces a nice rounded coating without any "tail" on the head.

Hanging the Dipped Electric Matches Up to Dry
Disposal
The shelf life of the mixed pyrogen, with the cap screwed tightly on, can be more than a year. The mixed pyrogen is an explosive and must be stored in compliance with BATF rules. To dispose of any unused, mixed pyrogen, dilute the pyrogen with lacquer thinner, pour it on a paper shop towel and while still wet, burn carefully outdoors in a safe place.Making Electric Matches without the Dip Kit
Note: Although this pyrogen has a potentially long shelf life, once mixed, it is uncertain how long it will last. Meantime you have an explosive slowly setting up in a glass bottle. I recommend mixing it, using all of it relatively quickly, and then disposing of any leftovers. This is best accomplished by thinning any excess with more thinner, then pouring it on some newspaper or a shop towel and burning it.Following the above instructions carefully, I decided to test-coat a dozen of the blanks first, re-seal the pyrogen jar tightly, and let the matches dry for 15 minutes. I would then test fire them in a safe location to make sure the process is working before committing to producing the rest of my ematches.
The test matches worked perfectly, throwing out a nice fireball when a battery was applied to the match leads. I then coated the rest of my electric match blanks with confidence. Once these matches were dry, I reinstalled the plastic shrouds over the match heads.
Brian Paonessa, one of the Skylighter's primary pyro experts, has experimented extensively with homemade electric matches. He says that the most common causes of failure when using this dip kit are applying the pyrogen too thickly or too far up the match head. Make sure the mix is thinned as per the instructions, and that the heads are only dipped about 3/16" into the pyrogen-- about one third of the way up the chip. It's also very important to thoroughly mix the components, and then mix them a bit more. Under-mixing of the ingredients is another common cause of match failure.
Coating Electric Matches with Home-Made Pyrogens
For the next method, I wanted to try the dip coating process described in the instructions for making electric matches using Skylighter's electric match blanks. This process details the mixing and sequential application of two home-made pyrogen coatings. These are followed by a final application of a nitrocellulose lacquer finish coating.Note: This process uses two sensitive compositions--dark flash and H3. The directions must be followed precisely to avoid accidents. These compositions are mixed in a wet state. I can't emphasize enough that these comps become very powerful and sensitive when they dry out. Work with these compositions only while they are wet. Thin and dispose of any excess (as described above) while it is still wet.
Note: Mixing these compositions in HDPE photo-film canisters using a Popsicle or coffee-mixing stir-stick (free at every 7-11), works well.
The first ("primer") coat is 50/50 composition of potassium chlorate and antimony sulfide. To make this composition, screen five grams of potassium chlorate through a 100-mesh screen. Add a little 5% nitrocellulose (NC) lacquer at a time to the potassium chlorate and mix until a syrup is formed. Next weigh out and mix in 5 grams of -325 mesh, dark-pyro antimony sulfide. Add more NC lacquer to thin the mix until it can be used as in the directions for the dip kit cited above. Then dip some electric match blanks into this comp and allowed them to dry completely.
Note: Skylighter sells NC lacquer, which is a 10% solution of nitrocellulose in solvent. To make a 5% solution, weigh out some of the 10% lacquer into an empty, clean, one-quart paint can (from Home Depot or similar), filling it about one-eighth full. Then add the same amount of acetone (by volume) to the can, close it, and shake to mix thoroughly.
The primer layer on the ematch is then coated with the H3 composition. To make the H3 composition, screen 7.5 grams of potassium chlorate as above and dampen with 5% NC lacquer. Then add 2.5 grams of airfloat charcoal to that mix and stir thoroughly. Add more lacquer as needed until the thin chocolate syrup consistency is achieved.
Dip the electric matches into this second-coat composition and allow to dry once again.
Finally, dip the dry match heads into 5% NC lacquer, completely coating all the pyrogen layers. Coat the matches about half way up the match heads with NC lacquer to create a protective final paint job on each match. Once again, allow the matches to dry completely (anywhere from a couple of hours if it is warm to overnight).
One More Experiment
I've recently heard about a fellow pyro using regular PVC plumbing cement rather than nitrocellulose lacquer to dampen compositions. I decided to repeat the above process using the PVC cement in place of the NC lacquer.Using this cement produced easy-to-use compositions and nice, hard, shiny, black match-heads when they were dry.

Regular PVC Cement for Plumbing
Testing the Finished Electric Matches
All three production methods produced nice, very hard, durable match heads.
Finished Electric Matches
The photo above shows the finished electric match heads made with (left to right) Dip Kit (with red lacquer final coating -- but not needed), home-made pyrogens/NC lacquer, and home-made pyrogens/PVC cement.
I wanted to see how much electric current it takes to fire these three types of home-made electric matches. I also wanted to see how effective they are at igniting a quick match fuse. I first installed the plastic safety shrouds on all the matches.
Using a little testing apparatus, I determined that the matches will begin to fire once 0.5 - 0.7 amps of electrical current is passing through them. This specification is similar to commercial electric matches and a good rule of thumb out in the field is to maintain at least one amp of firing current in your firing circuits.
Note: The above info can be used to derive a few additional rules of thumb for use out in the field when setting up the wiring for fireworks cues. Using a Skylighter 12 cue wireless firing system, which puts out about 4.5 volts with each cue, you'd want a maximum of 100 feet of the double-stranded yellow copper shooting wire (also called "scab" wire) between the panel and a single match. If you use a 12-volt firing system, the maximum length of these scab wires would be 300 feet and 180 feet respectively for use with a single match. Using a Skylighter GN6010 Electric Firing Box, which generates 300 volts, you can use a virtually unlimited length of firing cable.
I fired each type of match several times. The matches made with the dip kit really pop and throw out a fast flame, similar to commercial electric matches. The matches made with NC lacquer and homemade pyrogens burn less violently and a bit longer and throw out quite a few orange sparks. The similar matches, made with the PVC cement, burned nicely and even a bit longer. They throw out a nice flame for about a half second, like a regular kitchen match would.
I figured that any of these matches would effectively ignite quick match if they were installed in contact with the internal black match. I wanted to experiment with one additional step, which I hoped would reliably ignite the visco safety fuse on any cake or device out in the field.
I cut 1" lengths of the super-fast fuse, which is similar to quick match, but which (unlike quick match) can be shipped. I then used 2" long pieces of one-inch wide masking tape to secure the fast fuse into the ends of the electric match plastic shrouds. Then I installed a piece of visco fuse with the freshly-cut end of the visco in contact with the outer end of the fast fuse. I then secured this joint with another length of masking tape.

Installing Fast Fuse and Visco Fuse into End of Electric Match
Electric matches made using all of the above methods performed flawlessly and ignited the visco fuse easily. I was very pleased with their performance and with the opportunity to learn more about how reliable electric matches can be home made for one's own personal use.