How to Make Sky Lanterns
Can mere mortals make sky lanterns?
I gotta admit, I've seen sky lanterns around for several years. I've seen 'em advertised right here by Skylighter. Have seen them at displays and club events. But, honestly I never gave them much thought, and I wasn't much tempted to buy any.But, then I saw the latest Skylighter ad for them, and I thought, "I wonder how sky lanterns are made." Ya see, one of the things I enjoy most is learning how something is made. I watch This Old House and The New Yankee Workshop, just to see how they do stuff, even though I've been doing that kind of work myself for a living for 30 years.
So, I had Harry send some of the flying lanterns to me. By the time they arrived on my doorstep, I was excited to see them. I opened the package up, looked at the treetops to make sure there wasn't too much wind blowing, and I hustled my wife and granddaughter outside to fire the first one up.
I enjoyed finding out how to light the paper lantern, and how to let it inflate and launch it. And, the three of us really did have fun watching it lift off, and then gazing at it for minutes until it flew out of sight and we couldn't see it any more. Then I quickly got another one out and launched it as well.
My son and his family came over last Sunday, and I knew I just had to demonstrate these new toys for my grandsons. The photos below say it all.

The Next Generation of Gorskis with Paper Hot Air Balloons
So, now, back to my original quest: How to make sky lanterns.
Note: I'm gonna tell you how I ended up successfully making these homemade paper hot-air balloons. But, as with any pyro project, I learned some lessons the hard way, and I had some significant failures. I'll note these as I go along in this hot paper tale.
Sky Lantern Autopsy
| A little reverse engineering revealed: | |
| Weight of a flying lantern | 2.7 ounces |
| Thin bamboo hoop at bottom | 45.75" circumference, 14.56" diameter |
| Weight of hoop | 0.3 ounces (with a little paper and glue still hanging onto it) |
Bamboo is about 1/16" x 1/8"
X of thin wire tied to hoop
X of wire is "woven" through waxed cloth and paper "burner"
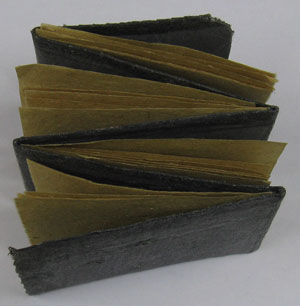
Original Sky Lantern Burner, Which Weighs 0.9 Ounce, Including Wire
The burner is composed of a 2.5" x 17" piece of wax-impregnated cloth, folded in Z-fashion back on itself 5 times.
In between each Z-fold of the waxed cloth are five 2.25" x 3" pieces of thin, coarse-fiber paper, about the weight of 40# kraft paper.
(The cloth/paper burner smells "nice," sort of like the scent of roses. Maybe the young Chinese lady who made this one was wearing some fragrant perfume.)
Note: I have also seen sky lantern burners, which resemble fiber-reinforced blocks of wax. I don't know how they are made and have not tried to duplicate them.
The "bag" of the balloon is made up of white tissue paper. This paper has been treated with a fire retardant; it does not catch fire when touched by a flame. It just scorches a bit.
The tissue paper bag weighs 1.5 ounces.
There are four panels (called gores in the ballooning world) that make up the balloon, and they are glued together and to the bamboo hoop.
Here's a sketch of one of the gores, with a bit added to the edges to allow for gluing.

Sketch of a Sky Lantern Paper Panel
(One square = 1")
I flew one of these fire-lanterns in my high-tech, windless wind-tunnel (actually my garage, emptied of any gas cans or other combustibles). I tethered the Chinese lantern to a weight with some very thin, light string as it burned. The fuel pack burned for 4.5 minutes.
I added 0.05-ounce pieces of wire, one at a time, to the bottom wire "X" of the balloon as it "flew," and found it would carry 0.25 ounce of payload before starting to sag toward the ground garage floor. That 0.25 ounce, added to the paper-lantern's original weight of 2.7 ounces, added up to a maximum flying weight of 2.95 ounces for a lantern with this internal volume.
It is the internal volume of a paper hot-air balloon, and the heated air it can contain as well as how much that air is heated, which determines its maximum carrying capacity.

Skylighter Sky Lantern Carrying 0.25-Ounce Payload
Note: The information above is important. These flying lanterns are delicately balanced for flight, and they are just light enough to allow them to fly. If they were much heavier, they would not leave the ground. Due to some circumstances, which I describe below, my first balloon ended up weighing 3.9 ounces, and obviously would not have flown.
So, let's make a paper sky lantern
I went up to my local Hallmark store and bought some nice tissue paper in different colors.Some checking online produced some leads on products designed to flameproof paper. One company, Universal Fire-Shield (www.firechemicals.com), sells a product, Universal Paper Shield P-3000, designed to fireproof paper products. I ordered some. They sell a quart spray bottle for about $30, including shipping. This would be enough to treat about a dozen paper hot-air balloons.

Tissue Paper, and Fireproofing Product
I hung 4 pieces of the red tissue paper on a clothesline, and sprayed them with the Paper Shield until they were saturated. After they were dry, I tried to burn a little piece of the paper, and it only scorched like the original fire-lantern paper, but it would not burn.

Fireproofing the "Laundry"
Note: On my third attempt to make one of these paper lanterns, I decided to try to spray the untreated bottom half of the balloon after it was assembled, in order to skip the step described above. I hung it up, slightly inflated it with my heat-gun, and started spraying it. The tissue paper soon started to weaken, sag, and tear, ruining the balloon. Crud! Another lesson learned.
I decided that the process of hanging the panels like laundry works best. The upper corners of the sheets will be cut off when the gores are cut out, so I don't spray those areas because they get weak when they are wet, and allow the clothespins to tear through the paper and sometimes that has the paper to tear loose from the string.
Warning: Paper Shield has an acid in it, and it will damage a concrete garage floor slightly. It's best to have a plastic drop cloth under the clothesline to protect the floor. Don't breathe its fumes or get it on your skin.
The red tissue will be the bottom of the paper hot-air balloon, which will be the only part that gets exposed to the flame. The top of the balloon will be blue paper, and it does not need to be treated.
I glued a piece of the red paper to a piece of the blue with thin stripes of Elmer's, and I did that four times for the four panels, and let the panels dry.
Note: The Elmer's glue tends to wet the tissue paper, bleeds through, and tries to stick to the other stuff around it. In an attempt to avoid this problem, I used hot glue when building my first balloon. This worked nicely during construction, but when I fired that baby up, the hot-glued seams at the top of the balloon let go completely. I did not think the internal temperature would get high enough to cause this problem. I was wrong. (My wife, Molly, told me later on that she wondered about me using the hot glue, and that she thought it would melt when the burner was lit. Oh, well.) The hot glue, which is significantly heavier than the dried Elmer's, also contributed to the excess weight of the first model.
After gluing the red and blue sheets together and letting them dry, I cut the four panels out with scissors, using a kraft paper template that I made based on the sketch above. Folding the kraft paper in half lengthwise, and then every 6" made the pattern transfer easy.

Tissue Papers Glued Up and Cut to Form Balloon Panels
Then it was time to glue the lantern gores together to form the Thai-lantern's "bag." I laid one of the gores, unfolded and open, on the worktable with the inside up. (The outside of the gore is simply the side that I think looks best.) Then I laid a gore, outside up, on top of the first gore, weighed the two down, and glued the right sides together with a thin stripe of Elmer's. The table had waxed paper on it so that any glue that seeps through wouldn't stick to it.
I then folded the top gore's loose side over on itself, so that half's inside was facing up, inserted some waxed paper between the glued side and this loose side, and laid the third gore on top of that one. I glued those two loose edges together, inserted more waxed paper, folded the loose half of the third gore over, laid the fourth and final panel on top, and glued those loose edges.
Then the last step was to fold the loose half of the top, fourth gore, over on itself, and fold the loose half of the bottom, first gore over onto it, and glue the loose halves together. (This all sounds much more complicated than it actually is. Once you try it, it'll all make sense.)
Then I pulled the glued edges up and off all the waxed papers, propped the panels apart from each other and from the table, and allowed the seams to dry.

Gluing Sky Lantern Gores Together to Form Balloon's Air Bag
Another Failure Note: On my first attempt to build one of these, I tried gluing the bag together with the panels inside out. I let the seams dry, and then I tried to turn the bag right side out, so that the seams would be hidden. This probably would have worked OK, but the fireproofed red tissue paper was somewhat brittle because of the fire-treatment, and as I tried to turn it inside out, it started to tear and crack at the bends and creases. I had to try to repair these tears with clear packing tape, which increased the lantern's weight, and made it ugly, and not something to be proud of. I decided to simply allow the seams to be on the outside of the bag in future models, and avoid the "turning inside-out" step.
Making the sky lantern's bamboo hoop
Home Depot had some 1" diameter bamboo poles in their lawn and garden department. I bought one and carefully split it into thin strips. I took one of the strips and smoothed it with sandpaper and a razor knife until it was about the dimension of the original lantern's bamboo. I only sanded the "interior" side of the bamboo because I did not want to weaken the smooth, exterior side of it. Then I glued it into a hoop with the same circumference of the original.
Tiki-Torch for Bamboo Strips & Sky Lantern Bamboo Hoop
Another source of good bamboo strips is from a "Tiki-Torch" pole. These are often split to obtain bamboo strips for girandola frames, wheel frames, and the like. (Or you can steal some green bamboo from Harry Gilliam's bamboo-infested front yard.)
Making the Sky Lantern Burner
I had some blue, industrial paper-towels, and I decided to melt some grocery-store canning-wax, and impregnate the towels with the wax in an attempt to duplicate the waxed fabric that I found in the original fire-lantern's burner.Warning: Canning (paraffin) wax is very flammable, and should only be melted over low heat in a double boiler. It should never be exposed to open flames or high heat.

Coating a Paper Towel With Wax to Make Sky-Lantern Burner
I took a strip of this waxed paper towel, and burned it alongside a strip of the waxed material from the original lantern's burner. Both samples burned identically and for the same amount of time.
I had some coarse, recycled kraft paper, and cut it into rectangles to match the original burner's paper layers. Then I cut some strips of the waxed paper towel to match the original burner, and sandwiched 5 pieces of the kraft paper in between each layer of the waxed paper-towel.
Then I stacked the layers of the burner together, punched 4 holes through all the layers with an awl, and threaded two pieces of wire through the holes.
The ends of the wire were then wrapped around the bamboo hoop and twisted tightly to secure the ends. The hoop was then carefully glued into the end of the lantern's tissue paper bag, and the glue was allowed to dry.

Assembling Paper-Lantern's Burner & Attaching It to Bamboo Hoop
A simple alternative burner can be made by simply installing a plain X of wire on the bamboo hoop. Then strips of cotton-ball like material can be saturated with rubbing alcohol, draped over the center of the wire X, and ignited when launching the balloon. But keep in mind, you have to use this method right away; the alcohol fuel evaporates, and these have no "shelf life."

Materials Needed For a Rubbing-Alcohol, Cotton-Swab Balloon-Burner
All that remained, then, was the installation of the "FAA" aircraft identification numbers, and a flight in the "test chamber."

Test Flying Homemade Sky Lantern
This paper hot-air balloon's final weight was 3.0 ounces. At about 50-degrees F in my garage, it was able to carry a payload of .55 ounces of the wire pieces before it started to sag toward the ground.
After this testing, some soot and moisture condensed on the inside of the lantern. I was able to allow it to dry out, attach a new burner, and fly it outdoors for real. It was about 40-degrees F outside on the evening that we flew it, and it really took off for the heavens very quickly.

My Lovely Assistant Molly Launching a Homemade Sky Lantern
Note: The flying lantern in on the right, Molly is on the left. The fact that Molly's attire matched the balloon she was launching was entirely coincidental. That's my story and I'm sticking to it.
Conclusions
This was a fun and educational project. I learned a lot about what to do and what not to do, when making one of these little hot-air balloons. This project was not as easy as it might look.Based on my experience with flying the paper lanterns tethered in my garage, I think it would be fun to fly one outdoors in windless conditions, tethered by a short wire leader and a roll of light thread. It could be flown like a kite, reeled back in when the burner burns out, reloaded and flown again.
This project resulted in me having a high amount of respect for the folks overseas who turn these things out by the thousands, which fly successfully every time. I'm continually amazed by the low cost of a device like this, sold by Skylighter, compared with the time and materials I invested in producing a successful one.
It was fun to make these lanterns, and I enjoy knowing how to do it. If I had to come up with a bunch of 'em for an event like a wedding, holiday, or memorial service, I sure wouldn't be making them, though.
Happy Flying, and Stay Green,
Ned
Materials Needed
- Awl
- Bamboo, 1-inch diameter
- Elmer's Glue
- Kraft Paper
- Paper Fireproofer
- Paper Towels
- Paraffin Wax
- Scissors
- Tissue Paper
- Wire