Cutting, Treating, and Making Your Own Paper Tubes
Introduction
To understand the difference between parallel and spiral wound fireworks tubes read the heading above the tube section on the Skylighter website.There are lots of different diameter and length tubes listed in that section. Why would we need to know how to cut and treat those tubes?
If you look at product number TU1065, you'll see a typical one-pound, 3/4-inch ID, 1/2-inch wall tube that is 30-inches long. Those tubes currently cost $54.59 for 25 of them, or $2.18 each. Four 7-1/2-inch tubes can be cut out of each of them, and each of those typical length rocket tubes would end up costing you $0.55 each.
Now, if you look at product number TU1068, you'll see those same tubes, but 7-1/2-inches long, selling for $40.71 for 50 of them, or $0.81 each.

TU1068 and TU1065 One Pound, 3/4-Inch ID Fireworks Tubes
That's a pretty big difference. If we know how to cut our own tubes out of the 30-inch long ones, we can save some money.
Additionally, some devices like short-duration fountains, stinger rockets, and other types of rockets require tubes of lengths that are different than 7-1/2 inches. Knowing how to accurately cut various lengths of tubes will be necessary when making those items.
Also, if these tubes are treated with a hardener, they will have a higher burst strength and will be more resistant to the flame burning through the tube side-wall while the device is functioning. So, it's nice to know how to treat the tubes to accomplish this.
Cutting Fireworks Tubes
You might be saying, "Ned, why don't you just use a hacksaw or coping saw to cut the tubes by eyeballing the crosscut?"I have two main goals when cutting tubes: I want a very square cut which runs at exactly 90 degrees across the tube, and I want a straight, smooth cut.
I have used a, power miter, wood working saw to cut many tubes. This is a quick way to accomplish those goals. But it has some disadvantages. I don't use such power tools in my fireworking shop, so to use that tool I have to go to the shop where it is located. It is also a bulky, heavy tool, which is not conducive to taking to pyro events where I might be cutting tubes and making various devices. Power tools are also dangerous, and can "grab" tubes when they are being cut unless one is very careful.
In the past year or so I've settled on a tube-cutting method which accomplishes my goals but which does not have the disadvantages I've listed above.
I found a plastic, Stanley, hand-sawing miter box at Home Depot, which has black plastic cams for locking a work-piece in place during sawing. Unless I'm just making one quick cut, I screw the miter box to my workbench to hold it securely in place during cuts.

Stanley Miter Box with Locking Cams
I also found a nice, sharp, clean-cutting pull-saw at the same store. This saw cuts the tubes easily, quickly, and with very straight, smooth cuts.

Marples Pull Saw

Cutting a Tube, Held in Place with Cams, Using the Miter Box and Pull-Saw
Once the miter box is screwed down to my workbench, and the tube is locked in place with the cams, all it takes is smooth, gentle, pulling strokes on the saw to produce a nice, quick cut.
I like to cut about 1/4 inch off of the end of one of the long tubes so that I'm starting with a nice, square end, and then I'll start measuring and cutting my tubes.

End of a Freshly Square-Cut Tube
One of the really interesting things in pyro circles is how many different ways folks have to "skin the cat." There are quite a few variations that folks employ to cut their tubes, and many of them work well. This is just one way that I've found which produces the kinds of results that I'm looking for.
Treating Tubes
For many devices, treating the tubes to increase burst strength and decrease side-wall burn-through is not necessary. For others, this process can really increase the performance of the tubes.The most well-known product for treating paper tubes is Minwax Wood Hardener, available at Home Depot and other hardware and paint stores.

Minwax Wood Hardener for Treating Paper Tubes
Warning: This stuff contains some pretty nasty ingredients. The solvent evaporates very quickly, putting highly toxic and flammable vapors into the air. Read the warning label, and only use it outdoors in a well ventilated area. Seriously!
I use two methods to soak the tubes in the wood hardener. If I'm only treating a few tubes, I'll put them in a plastic, Ziploc freezer bag, and pour the hardener into the bag until the tubes are submerged. Then I'll zip that bag closed while expelling most of the air. I'll then put that closed bag into another one and zip it closed as well.
I like to soak the tubes for 15-30 minutes, and I'll tumble the bag occasionally to make sure all of the tubes' surfaces are being soaked.
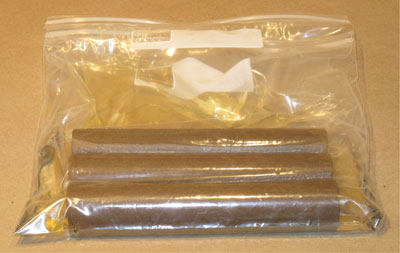
Paper Tubes in Plastic Bags, Soaking in Wood Hardener
Once the tubes have soaked for the allotted time, I'll open the baggies and pour the excess hardener back into the cans using a funnel.
An alternative that I'll use if I'm treating quite a few tubes is to put the tubes into a one-gallon paint can that is about half full of the hardener. I'll insert as many tubes as I can, and then top the can off with the hardener. Occasionally I'll pull the tubes out one at a time and rotate them so that both ends get evenly treated.
While the tubes are soaking, I cover the can with a plastic bag to minimize evaporation.

Soaking Tubes in a Gallon Paint Can Filled With Wood Hardener
Then, with either method, I'll remove the treated tubes and stand them on end on waxed paper to dry, once again in a well-ventilated outdoor area. The tubes can take 1-3 days to dry completely, depending on the climatic conditions.
The way I tell if they are completely dry is to put a few of them into a plastic bag and seal it. Then I'll open the bag in an hour or so and see if I can smell any more of the evaporating hardener solvent. I'll allow the tubes to dry until I can no longer smell it.

Drying Treated Paper Tubes on Waxed Paper
Testing the Treated Tubes
There is a nifty way to tell if the treatment is actually increasing the tubes' burst strength. I'll cut some 2-inch long sections of both treated and untreated tubes, and close off one end of each tube with masking tape.Then I introduce 20 grams (0.7 ounce) of powdered clay, either bentonite or hawthorne-bond-fireclay, into the tubes.
Using a flat rammer, my rocket press, and a pressure gauge, I'll slowly increase the pressure on the clay in the tube until the tube splits. I'll make a note of the pressure at which the tube fails, and repeat the test several times to insure that the results are reliable.

Testing the Burst Strength of Paper Tubes
Performing this test with treated and untreated one-pound, 3/4-inch ID, 1/4-inch wall, Skylighter tubes, I got the following results:
| Untreated tubes failed at | 4550 psi on the clay |
| Treated tubes failed at | 5450 psi on the clay |
That is an improvement of about 20% in the burst strength of the tubes.
Skylighter has also started to stock high-quality tubes in the 3/4-inch ID, 1/8-inch wall size.
I tested these tubes as well:
| Untreated High Quality tubes failed at | 6800 psi on the clay |
| Treated High Quality tubes failed at | 6800 psi on the clay |
Rolling Handmade Tubes
"But can't we make our own tubes?"I have made some homemade tubes, with some success, but in the end I think it's hard to beat store-bought ones.
If I had to roll my own though, I'd use one particular method that a well-known rocket expert, Terry McCreary, has popularized.
This method uses a metal former (mandrel) around which a release paper is wound, followed by rolled on layers of polyethylene-coated kraft paper. This paper is available at http://www.centralpack.com (in Protective Wraps) and a 24-inch by 600-foot roll of it currently costs $27.08 plus shipping. The paper is also available in 18, 36 and 48-inch widths.
This 600-foot long roll would make over one hundred and thirty 3/4-inch ID tubes, 1/8-inch wall, and 18 inches long. You can see that this results in some pretty inexpensive tubes, if you don't count the cost of your labor.
For the mandrel which will form the tube, I purchased a 3/4-inch OD, 1/16-inch wall, steel tube, 36 inches long, at Home Depot in the nuts-and-bolts aisle. I cut the tube in half with a plumbing tubing cutter and filed the ends smooth. This produced two 18-inch formers. A hacksaw could also be used to cut the tube.
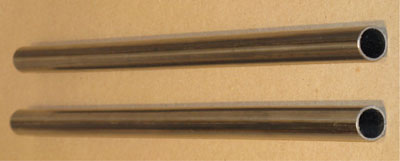
Steel Tube Formers on Which to Roll Paper Tubes
The release paper is parchment paper which is used for baking, and is available in grocery stores. I tear off a 20-inch long piece of it for each former and then I wrap the paper around the formers.
It is important to get the paper wound on the mandrels very tightly to eliminate any loose or weak spots in the final tube. It helps to roll the paper-wrapped-tube on a flat, hard surface, pressing down with the palms of your hands, until the paper is tightly wound onto it.
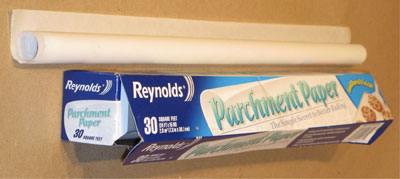
Parchment Paper Tightly Wrapped on Steel Tube
For each tube, I cut three 18-inch long pieces of poly-kraft paper off my 24-inch roll. I cut these using a large framing square and a razor knife to get very straight, square cuts.
Then I roll these three pieces on the tube former over the parchment paper, poly-coated side in, which results in a total of 72 inches of kraft paper rolled on. The resulting wall thickness is 1/8 inch, and the final tube OD is just a little over one inch. Once again I roll each piece of paper on very snugly.

Poly-Kraft Paper Rolled onto Former, Over Parchment Paper
The edge of the kraft paper is secured down with 3-inch lengths of 2-inch wide, clear packing tape.
Then the tubes are put in a 275 degree oven for an hour. This melts the polyethylene coating on the kraft paper and glues each lamination to the next one, resulting in a solidly glued-together tube.

Cooking the Tubes in a 275 Degree Oven for One Hour
The tubes are then removed from the oven and allowed to cool for several hours until they reach room temperature. The steel mandrels are then pushed out of the center of the tubes with a 1/2-inch diameter wood dowel, and the parchment paper is unwound and removed from the inside of the kraft tubes.
These 1/8-inch wall, handmade tubes were tested and have a burst strength of 4100 psi on the clay.
Conclusions
I have a simple, accurate method of cutting tubes to the lengths that I need.Treating the standard tubes increases the burst strength by 20%.
Untreated high quality tubes have a 50% higher burst strength than untreated standard tubes.
Treating the high quality tubes does not increase burst strength in the tubes that I tested.
I have a method that I can use to make my own handmade tubes if I choose to.
There are some devices that would work fine with the untreated standard tubes, some that would work better with treated standard tubes, and others (like end-burning rocket and girandola motors) that will require the high quality tubes.
Stay Green,
Ned
Materials Needed
- Clear Packing Tape
- Hand-Sawing Miter Box
- Metal Mandrel
- Minwax Wood Hardener
- Oven
- Parchment Paper
- Plastic Ziplock Bag or One-Gallon Paint Can
- Polyethylene-Coated Kraft Paper
- Pull Saw
- Waxed Paper