Plasma Cutter Torch Fountain
Introduction
If that title doesn't grab your attention, maybe this video will:Plasma Cutter Torch Fountain in Action
This 1/2-inch-ID, brilliant-red torch is a variety of fireworks fountain. A fireworks fountain is also called a "gerb" (pronounced like "gerbil" without the "il"). A second variation of this torch, including bright silver sparks, will also be described.
I've nicknamed this one the "plasma cutter torch" fountain due to the incredibly bright flame produced by this device when it is fired. It is truly similar to the dazzling brilliance of a real plasma cutter, which is a device for cutting steel using an electric arc and a high speed stream of gas. For illustration, here's a photo of a real plasma cutter in operation.
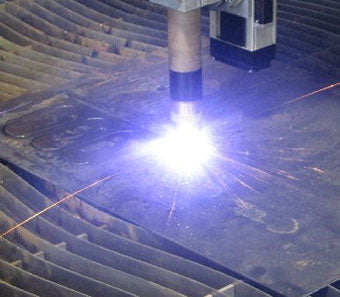
Plasma Cutter Slicing Steel Plate
Fountains
A fireworks fountain produces a flame, often accompanied by a spray of sparks. The fountain consists of a thick-walled paper tube filled with pyrotechnic composition. One end of the tube is plugged with a solid clay bulkhead, and the other end has a nozzle with a hole in it. The flame and sparks spray from that nozzle hole as the composition burns.Here's a cross-section drawing showing what is inside of a plasma cutter fireworks fountain.

Parts of a Fountain
Once the fountain has been made, it is securely attached to a support. A fuse is inserted into the nozzle opening, and the fountain is ignited.
As you study that sketch, a question might arise in your mind: "Hey, why not move the clay bulkhead and nozzle out to the tube ends in order to get even more display effect out of it?" Good question. Here's the answer.
There's an optimimum length for the fuel in a fountain. This "plasma torch" fuel burns with an extremely hot, fierce flame. The fountain shown in the sketch above will burn for about 15 seconds. If more fuel is rammed in the torch it will burn longer. But more fuel, longer burn time, more heat, and it can burn through the wall of the paper tube. And when the exhaust gasses blow out the side of the tube, the fountain's effect is ruined.
There is also another advantage to having the nozzle recessed in from the end of the tube. You'll notice in the drawing that both the bulkhead and nozzle bulge slightly into the inside wall of the tube as they are rammed. Those bulges help lock them in place, helping them to withstand the internal pressure of the fountain as it burns. The un-bulged end of the tube above the nozzle helps hold the nozzle in place. Without that un-bulged section, the nozzle is more likely to be ejected by the pressure in the tube as the fuel burns.
Also, the hollow bulkhead-end of the tube will serve a purpose, too, as you'll see near the end of this project.
Fountain Tooling
Some simple, easily made tooling is required for this project. Of course, if you already have 1/2-inch fountain tooling, just go ahead and use that.
Homemade 1/2-Inch Fountain Tooling
The tooling is made from a 1/2-inch-diameter wood dowel and a square piece of 2x4 lumber. A hardwood dowel such as oak is preferable, and will hold up better to ramming. Any lumber department sells such dowels.
First, verify that your wood dowel slides into the paper tubes you'll be using. It should slide in fairly easily, but a relatively snug fit is ideal. If the dowel is too tight, use sandpaper to reduce its diameter a little for about 13 inches of its length. Sand it down until it just slides into the tube snugly.
Drill a 1/2-inch-diameter hole about three-quarters of an inch deep in the center of the face of the piece of 2x4.
Cut a piece of the wood dowel long enough that it will go to the bottom of the drilled hole, and still have 1/2-inch projecting out of the 2x4. Sand the 2x4 and dowel edges smooth, and glue the dowel into the 2x4.
The rammers are made from 5-1/2-inch and 5-5/8-inch lengths of the dowel. After cutting them to length, sand their ends smooth. Using coarse and then fine sandpaper, bevel one end of the 5-5/8-inch-long nozzle-forming rammer at the 45-degree angle shown, until only a 3/16-inch-diameter flat spot remains on its end.
Note: This beveled end of the rammer will create the "funnel shaped" inside end of the nozzle. This funnel helps the torch's burning gasses flow smoothly out of the nozzle, reducing the tendency of the tube wall to burn through quickly.
Give all the parts of the tooling a nice coat of fast-drying spray lacquer or polyurethane. This will help the tooling last longer, and stay cleaner.
Measure 1-1/2-inches down from a flat end of each rammer and make a ring-mark on the rammers at that point using a Sharpie® or similar marker. Put several wraps of masking tape on the flat-ended rammer, with the bottom edge of the tape aligned with the Sharpie® mark.
The mark on the beveled rammer will indicate when a nozzle of the proper height has been rammed in the paper tube, which is 5-inches long. The tape edge will prevent the flat-ended rammer from being driven into the tube too far, which would damage the beveled top of the nozzle.
Note: There is a distinction between the "ramming" of devices such as these torches, and "pressing" them. Ramming--the process we will use here--involves the use of a mallet to hammer on the ends of the rammers to consolidate the contents of the device. Pressing involves the use of a mechanical press such as an arbor press or hydraulic press to push on the rammers in order to achieve the same objective.
Obviously this homemade wood tooling will not be as durable as metal tooling. The life of the rammers can be extended, however, by fitting their top ends with 3/8-inch copper-pipe plumbing caps, which are 1/2-inch ID. These metal caps will prevent the tops of the rammers from "mushrooming" or splitting during use. Round off the edges of the top ends of the rammers so that they will slide all the way into the plumbing caps. Glue the caps on the rammers with a little super-glue.

Installing 3/8-Inch Copper Pipe Caps on Rammers
In some of the videos that follow, you'll see that at times the rammers can be a little difficult to remove from the tube after clay or fuel has been rammed. Their removal can be made easier if 3/16-inch holes are drilled cross-wise through the copper caps. Use sandpaper or a file to smooth the edges of the holes. An awl can then be put through the rammer to twist it and make its removal easier.

Holes in Rammers to Make Pulling Them Easier
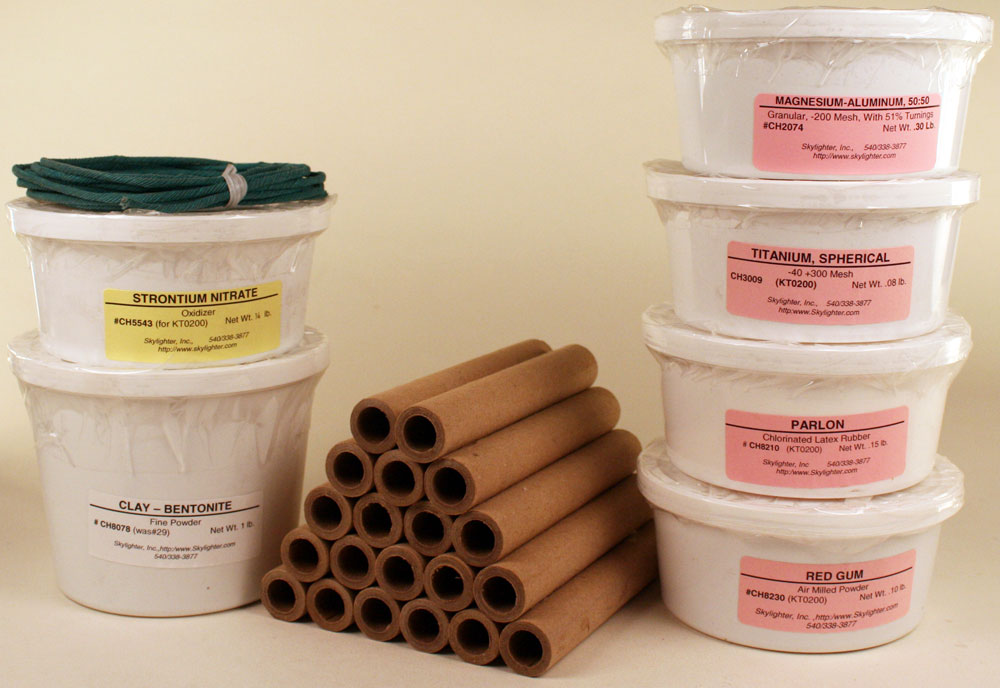
Tools and Supplies for Mixing Fountain Fuel
For mixing the fountain fuel, we'll need:- Solid ramming post that goes all the way to the floor
- Non-sparking mallet
- Leather glove for the hand that holds the fountain tube
- 1/2-inch ID paper tubes, 5-inches long (Skylighter TU1028)
- Nozzle clay (Skylighter CH8078)
- Torch fuel
- Tooling
- Funnel which fits into paper tubes
- 1/4-teaspoon and 1/2-teaspoon measuring spoons, shown in fuel-supplies photo
- Visco safety fuse
- Razor blade to cut visco
- Sharp scratch-awl
- 1-inch-wide masking tape
- 1/8-inch and 7/32-inch drill bits
- Paper towel or Kleenex tissue
Brilliant-Red Plasma-Cutter Torch Fuel
This is the formula for the fuel we will be using in these fountains:| Component | Percent | Factor | 3.5 oz | 100 g |
| Strontium nitrate | 50% | 0.50 | 1.75 oz | 50 g |
| Magnalium, 200-mesh | 20% | 0.20 | 0.7 oz | 20 g |
| Parlon | 20% | 0.20 | 0.7 oz | 20 g |
| Red gum | 10% | 0.10 | 0.35 oz | 10 g |
Each torch will use 0.35-ounce (10 grams) of the fuel, so the batch above will make 10 torches.
Safety Precautions
Before you embark on mixing the fountain fuel, or ramming these torches, please familiarize yourself with this fireworks safety information.Specifically, as you perform the steps that follow, please be sure to:
- Work outdoors as much as possible to reduce any dust in your workshop.
- Wear cotton clothing. Synthetics will melt into your skin in a fire.
- Wear safety glasses.
- Wear rubber or nitrile gloves, and a dust mask, as needed.
- Wear a leather glove when ramming fountains.
- Ensure that you can quickly and easily get out of your work area.
- Keep a 5-gallon bucket of cold water nearby, into which a burn can immediately be immersed.
- Minimize exposed fuel and devices to only what you are currently working with.
- Keep any completed devices or extra fuel away from your work area in safe storage.
Mixing the Fuel
First, ensure that each chemical is dry, and will pass easily through the 40-mesh screen.If a chemical cannot pass through the screen, it may be milled, individually, in a small, blade-type coffee mill. Eventually, you will find it very handy to have small ball mill jars and milling media dedicated to each type of chemical (oxidizer, fuel, etc.) that needs to be finely milled.
If there are particles of the parlon that are larger than the 40-mesh screen openings, they can be screened out and set aside for future projects.
With the formula sheet on the workbench in front of you, weigh the required amount of each chemical into its own paper cup.
Put the small mixing tub on the scale and tare the scale to 0.
Pour the previously-weighed chemicals into that tub and verify that the total batch weight comes up to what the total weight should be. This step verifies that all the chemicals were weighed correctly individually, and can save a lot of headaches in the future.
Pour the combined chemicals into the 40-mesh colander, which is sitting in the larger plastic tub.
Wearing rubber gloves and a dust mask, gently rub the chemical mixture through the screen.
Pour the screened mixture into the smaller mixing tub, install its lid, and, while holding the lid on securely, shake the tub to mix the contents.
Open the tub, pour the composition back into the screen, sitting in it's large tub, and repeat the screening and mixing steps two more times.
Put the mixed composition back into the small tub, put its lid on, and give the contents one final shake while holding the lid securely in place.
Mark the type of fuel on the container's lid to avoid future confusion. Keep the tub of fuel securely closed until some of it is removed for use in making a torch.
Ramming a Clay Nozzle
Tool Tip: Sometimes the inside layers of a paper tube are crimped in just a little from the tube-cutting process. To make it easier to put the tube onto the ramming base, and to put a rammer into the tube, it's nice to flare these inner paper layers out a little. An inexpensive brass plumb-bob from the hardware store, which has been rubbed with a little wax, does this job nicely. Just twist the plumb-bob into each end of the tube.
Flaring the Inside Layers of a Paper Tube with a Plumb-Bob
Or you could use a Plumb-Barbara (I personally think it feels a little
nicer in the hand....)

Powdered clay, like bentonite, has the interesting characteristic of consolidating into a solid mass when it is rammed or pressed dry. No water needs to be added to the clay. We'll be ramming the clay nozzle solid, and drilling the nozzle opening later.
Put a paper tube straight up and down on the dowel of the tooling ramming-base.
Insert the funnel into the open end of the tube.
Measure out a rounded 1/2-teaspoonful of the clay, and dump it into the funnel. Tap the funnel with the spoon to get all the clay to fall down into the tube.
Put the tapered-end nozzle-forming rammer into the tube, and push it all the way down into the tube as far as it will go.
With 8 solid whacks of the mallet, ram the clay nozzle until it is solid. You can tell that you've rammed it enough if the paper tube just slightly bulges (but does not split) in the area where the nozzle has been rammed. If the tube is not bulging yet, you can give the rammer some more mallet-whacks until it is.
You can tell if you used enough clay if the Sharpie® mark on the rammer is just about even with the top of the paper tube.
Once the nozzle has been rammed solidly, remove the rammer from the tube, and tap any excess clay out of the tube back into the container of clay.
Ramming the Fuel in the Tube
Weigh 0.35 ounce (10 grams) of the fuel into a paper cup, and close the lid on the remaining fuel. This is important to minimize the amount of flammable composition exposed at all times.Introduce a rounded 1/4-teaspoonful of the fuel into the paper tube through the funnel, as was done with the nozzle clay.
Wear the leather glove on whichever hand will be holding the tube as the fuel is rammed. Make sure you have safety glasses on, and have observed the other safety precautions.
Insert the flat-ended rammer into the tube, and ram this increment of fuel with 4 medium whacks with the mallet. The fuel does not need to be as heavily compacted as the clay nozzle was.
Pay close attention so that the rammer is never rammed into the tube past the bottom edge of the tape wraps. This prevents the rammer from damaging the top, beveled edge of the clay nozzle.
One increment of the fuel should compact so that it ends up between 1/4-inch and 3/8-inch thick (1/2 to 3/4 of a tube-ID tall). Repeat these steps for additional increments of fuel until all the fuel has been used.
Ramming a Clay Bulkhead
Once the fuel has been rammed in the tube, put a rounded 1/4-teaspoonful of the clay in the tube. Ram the clay bulkhead with 4-6 good whacks of the mallet.Tap any excess clay out of the tube back into its container, and remove the torch from the tooling base.
Fusing and Finishing the Torch
After the bulkhead has been rammed, and the tube has been removed from the tooling base, flip it over and put the bulkhead-end of the tube on the ramming base's nipple.Using the sharp awl, make a slight indentation dead-center in the flat face of the rammed nozzle.
Warning: Don't use a power drill for the following operations. You really don't want the torch igniting in your hand during these processes.
Hand twist-drill the sharp 1/8-inch drill bit into the nozzle, keeping it dead center and going straight into the clay. Occasionally dump the loose clay into its tub. Keep twist-drilling until the drill just penetrates the fuel grain and brownish-red fuel starts coming out of the nozzle hole.
Now, switch to the 7/32-inch drill bit, and enlarge the hole in the nozzle, hand twist-drilling until the tip of the bit is into the fuel grain by about 1/16-inch.
There is now a nice, straight, smooth 7/32-inch nozzle opening through the nozzle clay and down slightly into the fuel grain.

Nozzle Opening after Hand-Twist Drilling
Cut a 3-inch piece of visco ignition fuse with a razor blade. Straighten the fuse out and insert it all the way to the bottom of the nozzle aperture.
Dip the end of the 1/8 teaspoon measuring spoon into the fuel, and get just enough to fill the nozzle aperture about half full of loose fuel alongside the fuse. Dump it in the nozzle and tap the tube until the fuel is down in the nozzle hole. That fuel will light easily when the fuse burns into it, and will in-turn ignite the main fuel grain of the torch.
Ball-up a 3/4-inch square piece of paper towel or Kleenex, and, using the tip of the awl, gently force it down into the nozzle hole alongside the fuse. This ball of tissue holds the fuse and loose fuel in place.
Put a band of 1-inch wide masking tape around the nozzle end of the torch, and crimp it over and around the fuse. This tape will moisture-proof and spark-proof the ignition end of the torch.
A good support for the torch, as it is put out in the field for ignition, is the remaining length of 1/2-inch wood dowel. Insert the dowel into the bulkhead end of the torch, and tape the torch to the dowel if desired.
The torch is now ready to stick in the ground and light.
Optional Titanium-Spark Plasma Cutter Torch
But, wait, there's more!The torch we have made so far has the brilliant-red fuel in it, and will produce a very bright, illuminating red flame.
Titanium particles can be added to some of the fuel to produce a variation on that theme, though.
To make this torch variation, follow all of the previously explained steps, right through weighing out 0.35 ounce (10 grams) of the fuel, and ramming the first increment of the fuel.
Ramming this first increment of plain fuel ensures that when the nozzle aperture is drilled, the drill bits do not come into contact with titanium metal particles, which could potentially cause a spark.
Now put 1/8-teaspoonful of spherical titanium powder (Skylighter CH3009) into the fuel that remains in the paper cup. Spherical titanium is made up of very small, smooth metal balls which resemble ball-bearings. Hand ramming such smooth metal powder is relatively risk-free. Do not hand-ram fuel which contains rough-edged metal powders such as titanium sponge powder, though.
Note: The 1/8-teaspoonful of the titanium powder weighs approximately 1.8 grams. It is being added to the 8.5 grams of fuel which remains in the paper cup after fuel for the first increment has been removed and rammed. This amount of titanium metal in the fuel equates to an added 20% metal in the fuel.
Pour that fuel/metal mixture into a small mixing tub, close the tub with its lid, and shake the fuel-metal mixture while holding the lid on tightly. Now pour the composition back into its paper cup.
Ram the rest of the fuel as before, and finish with a clay bulkhead.
The rammed torch is now ready for final fusing and finishing as before.
Here's another video of a plasma cutter torch fountain, this one without the added spherical titanium. It was fired in daylight so you can better see the wood dowel stake supporting it and the dazzling brightness of the flame.
Ok, that's it! You've got enough fuel left there for eight more plasma cutter torch fountains. Have fun and be careful.
Make Your Own Super Bright Red Fountains
Plasma Cutter Fireworks Fountain Kit
Check Out the Kit & Order Here