Make a 4-Ounce Black Powder Rocket
"4-ounce" rockets? What does that mean? How can I make a rocket? Well, if you're interested in the history of the term and some further background information on rockets in general, you can find it in the Introduction to Rockets article. But if you're more interested in getting started, let's go!
Specifically, in this project we are going to make a 4-ounce (1/2-inch ID), nozzled, cored, stick-stabilized, black-powder skyrocket with a bag-shell heading.
Here's a diagram. You'll see references to it throughout this project.

Black Powder Rocket Diagram
Half-inch rockets are small enough that they don't use huge amounts of materials. They can be made quickly, and can be flown in many back yards.
But they are large enough to be really impressive, with that black-powder-rocket "whoosh" as they launch. They can also carry a nice payload of stars or other garnitures into the air. Working with them will provide plenty of experimentation, experience, research and development, and plain old fire-working fun. This is one "Quarter Pounder" you won't have to drive to McDonalds to get!

Rocket Tooling
The rocket tooling consists of a spindle, mounted on a base, and a series of rammers. Rammers are also called "drifts," and the two terms are used interchangeably in this project. The spindle creates the hollow core in the motor's fuel. The rammers are used to consolidate the nozzle clay, the fuel, and the bulkhead clay.
Note: If this is the first time you have worked with rocket tooling similar to the above, it is important that you read the immediately following sections carefully for more background information, instructions on preparing your tooling for use, and important precautions for using your tooling. This material can save you much grief, and can be a useful refresher even if you are a more experienced rocket-builder.
On the other hand, if you
Some of the rammers are hollow to allow them to fit down over the spindle when the nozzle clay and fuel increments are being rammed up around the spindle. There is a solid rammer for ramming the fuel increments above the spindle and for ramming the clay bulkhead.
Some tooling sets come with the rammer seen on the far right in the photo. That is a rammer designed to ram a clay bulkhead in the top of the rocket tube (above the fuel grain) with a pre-formed passfire hole in the center of it. Most folks I know don't use that rammer even if they have it. We will use an alternate method of creating a passfire hole by hand-twisting a drill through a solidly rammed bulkhead.
Even more importantly, impacting metal tooling parts against each other with fuel between them (called "pinching") is an invitation for an accident. Black-powder rocket fuel is relatively insensitive to ignition from impact or friction, especially if it has no metal particles in it. But why tempt fate by ramming a drift against the spindle with fuel in between?
For these reasons it is very important to have clear "no-pass" lines on each tooling rammer. No-pass lines indicate the maximum depth into the motor tube that the rammers should be allowed to go.
Many tool sets come with no-pass lines machined into the rammers. In the photo above, the red lines on the rammers of the tooling set on the left are the visual no-pass marks. To physically prevent the rammers from being rammed too far into the tube, masking-tape layers can also be applied with the bottom edge of the tape aligned with the no-pass marks. The tooling on the right in the photo has thick wraps of masking tape at the no-pass marks.
Note: The no-pass lines marked on rammers by their manufacturers are always based on the assumption that you are using a standard length tube for the size (ID) of the rocket you are building. In the case of our 1/2-inch ID rocket, that standard length is five inches. Standard lengths for other sizes of rocket can be found in the table in the Introduction to Rockets article. If you are using a non-standard-length tube, the factory markings on the tooling will be incorrect.
To identify (or check for) the proper location on your tooling for the no-pass marks, begin by installing a motor tube onto the spindle and seating it firmly against the base. Perform this procedure before applying any masking tape layers (as mentioned above) to your rammers. Gently slide the longest rammer slowly into the tube over the spindle until you feel it come to rest on the base. Now withdraw the rammer 1/2-inch (one tube ID) from its resting place and mark the rammer exactly at the top of the tube (or check to confirm that the manufacturer-provided mark is at the top of the tube). This "no-pass" line will be used later to indicate when you have rammed a nozzle of the ideal size (depth).
Gently slide each of the remaining rammers, including the solid rammer, slowly into the tube over the spindle until you feel it come to rest on the spindle. Withdraw the rammer from the tube by 1/8-inch to 1/4-inch to provide a safety factor, and mark the rammer exactly at the top of the tube (or verify that the manufacturer-provided mark is at the top of the tube).That correct positioning of the no-pass lines ensures the rammers will never contact the spindle as long as they are never rammed into the tube past the no-pass marks. In addition to clearly marking these lines as necessary, I recommend creating physical stops as well. Wrap each rammer with enough masking tape at its no-pass mark that the rammer cannot slide into the tube past the mark, even if you're not paying attention to the rammer's position at the moment.
Some tooling comes with switch-rammer lines already marked on the drifts. The rammers on the left in the photo above have green switch-rammer lines machined into their surface. However, most sets that I've seen don't have switch-rammer lines provided by the manufacturer. It's easy to scratch lines in the surface of the drifts at the proper locations with an awl or razor-knife. A sharpie can then be used to darken the lines.

Each Switch-Rammer Line Corresponds to No-Pass Line
on Next-Smaller Drift
The proper location for the switch-rammer lines can be determined by placing the drifts in size order with the bottoms of the drifts aligned as shown in the photo above. You can see that with the bottom of all the rammers aligned, each rammer's switch-rammer line corresponds to the next shorter rammer's no-pass line. Mark all but the smallest rammer accordingly.
The switch-rammer line on the last drift, the shortest (solid) one, is not there to indicate that it's time to switch to the next rammer--there is no "next" rammer! That line is positioned one tube-ID (in our case, 1/2-inch) above the bottom of the drift. It indicates when it's time to stop ramming fuel increments and ram the clay-bulkhead. Mark this last drift 1/2-inch up from the bottom.
To hand-ram a motor, a solid, a dead-blow mallet such as the rawhide one shown in the following photo is used to ram each clay or fuel increment. Metal hammers are never used. They can cause damage to the tooling, and also create sparks. Rubber hammers are not good for this type of ramming either because they do not adequately transmit their force to the tooling before they bounce off it.
A solid wood ramming post is used as a base upon which to ram the motors.

Dead Blow Mallet and Ramming Post
A funnel, which fits snugly into the end of the motor tube is also required, as well as measuring scoops for the fuel and clay increments, and a drill bit used to create the passfire hole in the clay bulkhead.

Miscellaneous Tools
For this project I recommend obtaining a package of six bamboo poles, 6-feet long and between 1/4 and 3/8 inch in diameter, available in the garden department at Home Depot (or similar). Each pole, cut in half, will yield two rocket sticks. Further information on rocket sticks and alternative sources can be found here.
Black-Powder Rocket Fuel Formula
The potassium nitrate and sulfur need to be fine enough to pass a 40-mesh screen. I've found that this produces a nice, fast fuel using the Skylighter chemicals that I have on hand. They can be milled individually in a blade-type coffee-mill until they will pass the screen.
Note: It is impossible to verify that a chemical will pass a 40-mesh screen without actually having the screen and trying to rub the chemical through it. Simply grinding the chemical in a coffee mill and feeling it to see if it feels fine does not ensure that it is all ground finely enough. Get a 40-mesh screen to use for these operations or you may be able to find a 40-mesh kitchen colander (gravy strainer).
Note: Sulfur powder is typically fine enough to pass a 40-mesh screen when the lumps are broken down. It can be difficult, however, to get it to pass the screen without the pores in the screen clogging up. Test a small amount of your sulfur to verify that it is indeed fine enough to pass the screen. If it is, you don't have to push all of it through the screen at this time. Airfloat charcoal also typically will pass a 40-mesh screen without any additional milling.
Once it has been verified that all the chemicals will individually pass the 40-mesh screen, weigh out the correct amounts of the individual chemicals. Then weigh them together to verify the correct total weight.
Put the chemicals in a tightly closed tub, and shake them together while holding the lid on the tub to prevent it from coming off and making a mess.
Push the chemical mixture through the 40-mesh screen onto a piece of kraft paper.
Put the mixture back into the tub and shake it, then screen it again. Repeat this mixing process 3 times.
Add 3 ounces (90 grams, which is an additional 30%) of very hot water to the composition. Stir the water into the mixture with a paint stir-stick until the water is thoroughly integrated into the powder.
Knead the damp composition in the tub with a rubber-gloved hand until it is evenly dampened. Then dump the damp comp into a large ziplock plastic baggie and consolidate all of the mixture into a stiff ball in one corner of the baggie. Twist the baggie closed around the ball. Really squeeze and consolidate it into one, solid "potato" in the baggie corner.
Remove the "potato" from the baggie and grate it through a 4-mesh screen onto a non-absorbent surface such as aluminum foil or a plastic mat. (An absorbent surface such as kraft paper will leach dissolved potassium nitrate out of the mixture as it absorbs water, which will change the chemistry of the powder.) Spread the granules out evenly and dry them overnight in a safe location with warm, dry, moving air.
When the granules are thoroughly dry, they should weigh about what the original batch of dry powder weighed. If not, let them dry longer.
Finally, push the dry granules, which will be pretty soft, through a 10-mesh to 12-mesh screen or a coarse-mesh kitchen colander.
You will now have 10-mesh granules with some finer powder mixed with them. Store the completed fuel in a tightly sealed tub in a safe location, and with a label indicating what's inside. Many folks include a packet of desiccant with their fuel to keep it completely dry. These packets can be readily found on eBay.
These granules have all three of the chemicals intimately mixed with, and bound to, each other. Since no binder (such as dextrin) was used in this formula, the granules will be soft and easily crushed as they are rammed into a solid fuel grain inside a rocket motor.
The granulation step results in rocket fuel which is not very dusty when it is used. Additionally the burn rate of the fuel is speeded up a little by the potassium nitrate being dissolved by the water and then absorbed by the charcoal. And the three chemicals, now in granules, will not separate from each other as the fuel is being scooped out for use when making rockets.
Note: This final point is an important one. If the fuel is used without the granulation step, there will be grains of the different chemicals in the fuel which differ substantially in size and density. Even though the chemicals have been sifted and mixed through the 40-mesh screen, these particles of differing size and density will separate from each other as the fuel is handled. The result of this "un-mixing" will be inconsistent performance when the separated fuel is rammed into rocket motors.
Further information on black-powder rocket fuel formulations can be found here.
To ram a clay nozzle, slide one of the 1/2-inch ID rocket tubes down over the spindle. Make sure it is sitting straight upright, with its bottom squarely on the base. Looking down into the tube, you should be able to see the tip of the spindle positioned right in the center of the tube. Adjust the tube as necessary.
Put the funnel into the mouth of the tube. Measure out a heaping 1/2-teaspoonful of the bentonite clay and dump it into the tube through the funnel. Tap the funnel and the tube with the nozzle forming rammer to settle all the clay to the bottom of the tube.

Loading Clay into Tube for Nozzle
Note: As you can see in the cross-section drawing above, the final height of the nozzle should equal the inside diameter (ID) of the tube (1/2--inch) once the clay is rammed. The no-pass line on the longest drift corresponds to that height. The scoop of clay that is introduced into the tube for the nozzle should be adjusted to dial this height in for the rest of your rockets. Some folks weigh the amount of clay they use for the nozzle to achieve a high level of consistency in the height of the nozzle.
Put the spindle base on the ramming post. Look down into the tube to verify that the tube is on the spindle straight, and the tip of the spindle is centered in the tube.
Insert the nozzle-forming rammer all the way into the tube, and slide it up and down a couple times to tamp the clay down at the bottom of the tube, and settle any clay which might have crept up between the drift and the inside tube wall.
Now, rap the drift solidly with the mallet, not too hard. The rap should be just hard enough to feel and see the clay consolidating and the drift being driven into the tube. There's a "feel" to doing this. If you hammer too hard with the mallet, the paper tube may split. Not hard enough, and the nozzle will not be consolidated solidly enough.

Ramming Nozzle
After 10-12 whacks with the mallet, the drift should stop going any further into the tube, and the clay should feel solid under the hammered rammer. The no-pass line on the nozzle-forming rammer should be just visible above the top of the tube, indicating that the nozzle is the ideal one tube-ID (1/2-inch) in height.
Once again, looking at the drawing, you can see that the goal is to have the nozzle bulge slightly into the tube's inner layers of paper. This ensures that the nozzle is tightly locked into the tube, and will resist being blown out of the tube under pressure as the fuel burns.
When the nozzle has been rammed correctly as described above, a very slight bulge in the outer tube wall may be felt if you slide your fingers up and down the tube where the nozzle is.

Feeling Up the Tube
Note: During and after using the hollow drifts it is very important to keep their hollow central-core clean and free of any clay or excess fuel which has accumulated in there.
Remove the rammer and clean any excess clay out of its hole with an awl or drill bit. Tap the clay out of that hole back into the tub of clay. Tip the paper tube (still on the spindle-base) over, and tap it with the rammer gently to dump any loose clay back into the clay tub.

Removing Residual Clay from Rammer and Tube
The tube does not need to be removed from the spindle, but it can be if you'd like to see what the rammed nozzle looks like. If you do remove the tube to check it out, it must be replaced on the spindle all the way before you proceed with fuel ramming.
Inspecting Nozzle
A good rule of thumb is that each ramming cycle should create a solid increment about as thick as 1/2 -3/4 of a tube ID. This will ensure the fuel is consolidated solidly, and that the fuel is compacted just as solidly at the bottom of an increment as at the top.
With these 1/2-inch ID motors, a single level 1/2-teaspoonful (or slightly less) of the fuel will ram down into this ideal 1/4 to 3/8-inch thick increment of fuel.
Scoop about 1/2-cup of fuel into a paper cup and close the lid on the main container of fuel. Set the main container aside in a safe place to prevent fire from spreading to it in case of an accident. Minimizing exposure like this is a very important safety precaution.

Separating 1/2 Cup of Fuel from Main Fuel Supply
Put the funnel into the end of the tube, and load a level 1/2-teaspoonful of the fuel into the tube.

Loading Increment of Fuel
Remove the funnel and insert the longest rammer into the tube. Ram that first increment of fuel with 8 solid whacks of the mallet. After 4-6 whacks you should feel the fuel getting very solid, and the drift no longer going much further into the tube with each hammer-blow.
After the fuel is consolidated, if the switch-rammer line on the drift is not visible above the end of the tube, remove the rammer and clean any excess fuel out of the hole in it. Insert the funnel in the tube, load another scoop of the fuel, and repeat the consolidation process. Repeat this until the switch-rammer line on the drift is visible after ramming a fuel increment.
When the switch-rammer line is visible after ramming an increment of fuel, remove the rammer, and clean any excess fuel out of the hole. Set it aside.
Repeat the ramming process with the next longest hollow rammer. Remove and clean the rammer each time. Introduce another increment of fuel into the tube. Ram increments of fuel until the switch-rammer line is visible after a fuel increment has been consolidated. Continue with the next hollow rammer and so on.
Once the switch-rammer line on the last hollow rammer is visible above the tube after an increment of fuel has been consolidated, the fuel will be solidly packed up to the top of the spindle, or slightly past its tip.
Now switch to the solid rammer. Ram the next fuel increment with the solid rammer, being sure to never drive the drift into the tube past the no-pass line.
Now, ram additional fuel increments in the tube with the solid rammer until there is one tube ID, or 1/2-inch, left empty in the top end of the tube. This will be indicated by the appearance of the "switch-rammer" mark on the solid rammer above the end of the tube after an increment of fuel has been consolidated. Dump any remaining fuel back into the main fuel container, close it, and put it in safe storage.
Ramming Fuel
This bulkhead prevents the fuel from prematurely igniting the rocket heading by blowing through the top of the motor as the fuel grain becomes thin at the end of its burn.
Like the nozzle, the bulkhead needs to be rammed very solidly, short of splitting the paper tube, so that it does not get blown out of the tube under pressure.
To create this bulkhead, put the funnel into the end of the motor and load a flat 1/4-teaspoonful of clay into that void. Ram this plug solid with 8 mallet blows. Dump any loose clay back into its tub.
Your rocket motor is now ready for flight preparations and testing. You should first test-fly the motors alone to ensure they are working properly, before you add any shell headings to your rockets.

Motor Mounted on Bamboo Stick (Shown with Bag-Shell Heading)
Sight down the rocket motor and the stick and verify that the stick is straight in line with the motor. The stick can be twisted slightly to adjust its position.

Verifying Stick Alignment with Motor
As shown in the cross-section sketch above, the visco ignition fuse is bent over double at the end, and inserted far enough into the rocket core that the doubled end is in contact with the bottom of the fuel grain. If you're going to use rocket right away, you don't need to tape the fuse; it will stay lodged in the core.
If the rocket launches quickly, and flies 200-300 feet skyward, the fuel is just right. Build yourself another rocket motor just like that one and then continue to the section below entitled "Installing a Simple Bag-Shell Rocket Heading."
If the rocket just sits in the launch tube and burns like an upside-down fountain, or if it lifts out of the tube slowly and then flies downward, the power of the fuel must be increased per the recommendations in the "Dialing-in Fuel" section.
On the other hand, if the motor blows up upon ignition, or if the rocket starts to fly and then the nozzle or top-bulkhead blow out of the motor with a loud pop (and you are sure they were securely rammed in place), the power of the fuel must be decreased per the recommendations in the "Dialing-in Fuel" section.
Make any necessary fuel modifications. Continue with further test flights until successful flights are reliable and repeatable.
At the risk of belaboring what might be obvious, the objective of a successful rocket is for both rocket and heading pyrotechnics to all burn out before hitting the ground.
Now that the rocket motors are flying well and consistently, we will build a simple bag-shell heading which will provide a "dump" break of lit stars.
This will not be a loud, widespread star-shell burst, but a quieter, graceful dump of stars, which is often more aesthetically pleasing as a rocket heading. It is also a type of display more compatible with any setting where noise might be an issue.
The cross-section drawing above shows a simple bag-shell heading installed on a rocket motor. This type of heading consists of several turns of kraft paper, glued and tied onto the top of the rocket motor to form a container. The container is then filled with stars and black powder as a burst charge and tied closed at its top.
First we must create a hole, or "passfire," through the clay bulkhead so that the motor can ignite the heading just as the last of its fuel is burning out.
Using a sharp 3/16-inch drill bit, slowly hand-twist-drill a passfire hole through the center of the bulkhead in the top of the motor and just into the black-powder fuel grain.
Wear eye protection and a leather glove on the hand holding the motor. Do the drilling outdoors, and hand-twist the drill very slowly through the bulkhead.
Hand Twist Drilling the Passfire Hole in the Bulkhead
When the motor's fuel burns through and passes fire through the hole in the bulkhead, the contents of the bag-shell are ignited. The bag will burst open, dumping its burning contents into the sky, and creating a traditional-looking rocket-heading dump-starburst display.
Next, you will need to make a "former" on which to roll the bag-shell casing. This can easily be done by rolling some duct-tape up on a wood dowel. In this case a 1/2-inch dowel is used, and 1/8-inch of it is allowed to project beyond the tape-wraps. This projection serves to center the rolled-up casing on the rocket motor when it is being installed.
Continue wrapping duct tape around the dowel until the former reaches the desired diameter, in this case 1.5-inches as shown below.

Heading Former (Lower End at Left) on Wooden Dowel
Drill a hole up through the core of the dowel, from the projecting end to a point past the other end of the duct tape wrap. Drill a connecting hole in from the side of the dowel above the tape wraps, creating a vent-passage. As you will see below, this vent relieves the vacuum and allows the former to be removed from the installed bag-shell casing easily.
The first step in making the actual bag-shell heading is to roll a 6-inch by 18-inch piece of kraft paper up on the former. Once you have rolled a full turn on the former, apply a stripe of Elmer's glue to the paper every 4-inches or so.

Rolling and Gluing Bag-Shell Heading on Former
Once the paper casing is completely rolled onto the former, slide the former in the casing so that the paper extends only 1.5-inches past the duct tape at the lower end of the former.
Here's how to attach the shell to the rocket motor. Spread some glue onto the top 1-inch of the motor-tube as shown below.
Put the open 1.5-inches of the bag-shell casing (still on the former) down over the glued-end (top) of the rocket tube. Make sure the 1/8-inch long projection of the former's wood-dowel slides into the top of the rocket tube. This will center the shell casing on the rocket motor.
Squeeze the open end of the shell casing paper around the glued section of the motor-tube, gathering the kraft paper together tightly and evenly around the tube.

Installing Bag-Shell Heading on Motor
Tie the bag-shell casing securely in place with one clove-hitch string-tie right at the top of the bunched-together section, and with another tie down toward the bottom of the bunched section.
Gently pull the former upward and out of the casing as shown below. This is where the drilled vent-holes earn their keep, preventing a vacuum from forming as you pull the former out.

Securing Bag-Shell Heading to Motor and Removing Former
The bag-shell is now ready to be filled with alternating layers of black powder burst granules or rice hulls coated with black powder, and stars. Fill the shell until the contents are about as high in the shell as the shell is in diameter--about 1.5-inches in this case.
Once the shell has been filled to the desired level, bunch the paper casing together at the top of the contents, and tie it shut with a clove hitch knot. Cut off the excess paper casing with a pair of scissors, and the bag-shell heading is complete.
Remove the motor from the spindle base and install a stick and a fuse as in the Preparing for Flight section above. Fire her up and enjoy the show!
Removing Motor from Spindle
The rocket in the following video has a long, slow delay so that the bag-shell heading is fired on the way down, creating a waterfall or horse-tail effect.
Bag-Shell Heading
Now that you've successfully built and launched your first few 1/2-inch rockets with bag-shell headings, here are some suggestions for further experimentation. I've included ideas and instructions for some alternative headings, as well as some alternative motor construction techniques to adjust performance, and methods for making the spark trail from the rocket exhaust even more beautiful.
Black Powder Rocket Diagram
Looking at the cross-section drawing of a rocket motor, you can see an imaginary dividing line between the "thrust fuel" and the "delay fuel." This line is approximately as far above the tip of the spindle as the distance between the side of the spindle and the tube's inside wall.
In the initial second or two of the rocket's flight, the fuel surrounding the hollow core burns very rapidly in a hot, pressurized environment, due to the large surface area of the fuel grain which is ignited. The fuel burns outward from the core to the inside wall of the tube, and also upward from the tip of the core for about that same distance. Large amounts of gasses are forced out of the nozzle resulting in maximum thrust and a rapid flight skyward, with the associated "whooshing" sound.
Then, when all the thrust fuel has been consumed, the delay fuel section starts burning only at its concave bottom surface. Much less surface area is burning, the heat and pressure reduce, and the thrust of the motor diminishes significantly. The rocket will begin a phase of flight where it is mostly coasting under the momentum of the thrust phase.
If the delay fuel grain is long enough, or if it is composed of a slower fuel, the rocket can even coast to an apogee, and then slowly arch over and begin flying back downward, with the delay fuel still burning.
The delay portion of the rocket's flight can be adjusted by ramming less or more fuel above the thrust/delay fuel boundary line, or by adjusting the speed of the delay fuel to be slower. Of course, there's only so much delay fuel that can be rammed into the tube before running out of space, so adjusting the speed of the delay fuel may become necessary for a longer flight.
The speed of the delay fuel is slowed in the same way as the thrust fuel, by adding charcoal to it and re-granulating the mix. Adding charcoal in 5% increments, with a total charcoal addition of an additional 5% to 30%, will result in ever more-slowly burning delay fuel. You can dial-in the characteristics of the delay portion of the rocket's flight as desired.
Another way to modify the visual effect of the rocket is to add metal particles to some of the fuel. Aluminum, magnalium, ferro-titanium, or titanium particles will create various metal-spark effects.
The thrust fuel around the spindle should never have metal added to it. Particles of metal, especially hard ones like ferro-titanium or titanium, can damage the spindle or rammers if metal-containing fuel is rammed around the spindle. There is also the risk of a spark igniting the fuel if metal is pinched between the spindle and rammer.
But, if 5-10% powdered metal is added to the delay fuel, when that fuel starts burning, the rocket's tail will change from orange charcoal-sparks to silver metal-sparks. A convenient way to add metal to the fuel is to simply put an increment of the fuel into a paper cup. Add a small pinch of the desired metal, and swirl the two components together before ramming the fuel into the motor tube.
1/2-Inch Rocket with Charcoal-Only Tail
1/2-Inch Rocket with Charcoal Thrust Fuel, and
Slowed-Down Titanium Spark Delay Fuel
And, finally, sometimes you may want the rocket to have a metal-spark tail right out of the launch tube. You shouldn't ram metal-containing fuel around the spindle. But once the rammed fuel reaches the top of the spindle, metal can be added to the thrust-fuel increment just above the tip of the spindle and all remaining increments up to the clay bulkhead.
Since the thrust fuel between the tip of the spindle and the thrust/delay boundary starts burning immediately during the launch and thrust phase of the flight, any metal particles in that fuel will show up as metal sparks in the tail immediately upon the motor's ignition.
1/2-Inch Rocket with All-Titanium-Spark Tail
So, in summary, there are actually three sections of fuel in the rammed fuel grain:
If an aerial shell, such as a festival ball shell, is to be used as a rocket heading, the only thing that needs to be different about the shell's construction is its fuse assembly. Instead of either 1/4-inch time fuse or tape-wrapped visco time-fuse, a section of quick match, either homemade or commercial, is used. This quick match fusing will immediately transfer fire to the heading when the rocket motor's fuel burns through and passes fire through the bulkhead passfire hole.
A couple of short pieces of black match, wrapped loosely in masking tape, will suffice to replace the shell's time-fuse, and will transfer fire quickly to the heading.
Of course, if a rocket is used to lift an aerial-shell heading, there is no need for a shell leader or lift charge. Simply hot-glue and/or tape the shell on top of the rocket motor, making sure the quick match shell-fuse is inserted down into the bulkhead passfire hole.
The combination of a rocket motor and a homemade ball-shell heading is a nice project which combines the two devices, provides a nice way to lift ball-shells, and can be an effective way to test homemade stars up in the air.
A good rule of thumb for black-powder rockets, which accelerate more slowly than some more powerful rockets, is to use a stick that is as thick as 1/2 of the motor ID, and long enough to balance the rocket on a finger between 1/3 and 2/3 of the way up the motor from the nozzle end after it is mounted on the stick.
With these 1/2-inch ID motors, and with a 2-ounce heading installed on the motor, a 1/4-inch-thick stick, 30 to 36 inches long fits that rule of thumb.
My local Home Depot sells 1/4-inch-diameter wood dowels, 48 inches long, for $0.69 each. Not cheap if you're using many of them.
They also sell 1/4-inch-square sticks, 36 inches long, for $0.79. No better.
In their garden department, they sell packages of six bamboo poles, 6-feet long and between 1/4 and 3/8 inch in diameter. Each pole can be cut in half to make 2 rocket sticks. A package sells for $2.46, and since about 10 rocket sticks can be harvested from each package (a couple of sticks are usually too thin or too crooked to use), that brings the price per stick down to about 26 cents, including tax. That's not bad.

Common Types of Rocket Sticks
I have a table saw I use to rip sticks out of solid wood planks. A 36-inch long piece of 1x6 clear poplar (3/4-inch x 5.5-inches) costs $5.97 plus tax. I can rip 30 1/4x1/4-inch rocket sticks from that board. So each of those sticks runs 21 cents (plus the initial investment in the table saw, of course).
Many rocket makers prefer square sticks over round ones, feeling that the square ones resist twisting and bending during flight better than round ones, and guide the rocket straight through the air better, too.
And sometimes a spent rocket can be retrieved, and the stick salvaged to be used another day.
Keeping rocket sticks tightly bundled together with string, wire-ties, or rubber bands keeps the sticks nice and straight.
The ratio of airfloat charcoal to the coarse mesh charcoal is one determinant of the final power of the fuel. Fine airfloat charcoal will burn fast and mostly inside the motor, creating more thrust. The coarser charcoal will burn slower, with a lot of it continuing to burn outside the motor in the rocket's tail, creating a nice orange-spark plume rising into the air.
Other factors which control the fuel's speed are the type and quality of the charcoal, the mesh size of the other chemicals, the fuel formula that is used, and the processing method used to make the fuel.
The actual length and diameter of the tooling's spindle also plays a large role in how powerfully the fuel burns. Those dimensions are fairly standard, but can vary somewhat from one tooling manufacturer to another.
So, obviously, given all those factors, arriving at a fuel which will work in a particular motor, using a specific set of tooling, is not a one-size-fits-all proposition.
There is a range of chemical proportions found in the various rocket-fuel formulas in the pyrotechnic literature. Here's a sampling of them:
Rocket fuels from George Weingart's Pyrotechnics
"If rockets burst before ascending add more coal; if they ascend too slowly add more saltpeter (potassium nitrate). For the smaller sizes use fine coal: for larger ones use coarser coal in proportion to the diameter. In 4 to 8 pound rockets use partly granulated saltpeter."
Note: I've converted Weingart's formula parts to percentages. The 14% sulfur in the 4-8 ounce motor fuel formula seems to be an anomaly not seen in any other formula or literature. When Weingart uses the term "coal" he is referring to charcoal.
Although there is some variation to the pattern, you can see that as the rockets get larger, the mesh of the charcoal also gets larger, the potassium nitrate percentage drops, and the charcoal percentage increases. The sulfur percentage stays approximately 10%. The speed of the fuel is adjusted by changing the ratio of the potassium nitrate to charcoal, and/or the ratio of fine charcoal to coarse charcoal.
Barry Bush, in his fireworks chapter in Hardt's Pyrotechnics, states a simpler formula as "Formula 1:"
"In Formula 1, adjustment for speed is accomplished by varying the proportions of saltpeter [potassium nitrate] to charcoal, keeping the sulfur constant, or by varying the two types of charcoal. Less saltpeter and more charcoal will slow the composition; more saltpeter and less charcoal will speed it."
And, one manufacturer of rocket tooling supplies these formulas for black-powder rockets:
"All black-powder rocket propellants fall very close to the 60/30/10 formula. There will be slight variations of this as the rockets increase in size. The following formulas should get you started. Small adjustments may be needed."
Note: The coarse charcoal is specified as 80-mesh. The potassium nitrate and sulfur are to be fine enough to pass a 100-mesh screen, per these specifications.
Well, I received my pound of bentonite clay, and it was a very fine whitish-gray powder. And somewhere I got the information that it was simply to be rammed dry. Well, then I got to wondering how a dry powder, that looked a bit like bread flour, was going to consolidate into a solid mass, and form a nozzle, by simply being pounded on with a rammer and a mallet.
Trying it once, though, did indeed prove that when the dry clay powder is introduced into the rocket tube and rammed, it does create a hard, dense nozzle. Wonders never cease. As you embark on these basic rocket making techniques, you may have some of these same questions. Hopefully this information, and the experience you are about to have will provide some answers.
With these relatively small rocket motors, pure bentonite clay may be used for the nozzles and bulkheads. As motor size is increased, though, many rocket-makers switch to using "nozzle and bulkhead mixes" instead. These mixes often consist of clay and wax, with an ingredient such as grog or kyanite sometimes added.
Wax is added to the clay to waterproof it, to make it adhere to itself better during ramming. Wax also prevents the clay from absorbing or releasing moisture, which can cause the rammed nozzle to change dimensions.
Note: Some rocket makers carry a drill bit which is the same dimension as the original nozzle aperture. Since the clay can expand with humidity, and close the nozzle down a little in that process, the drill bit is used just prior to flight to ensure the nozzle hole is still the correct size. If the hole has reduced in size due to absorbed moisture, and is not re-opened up with the drill bit, the motor may blow up upon ignition.
Adding grog or kyanite can allow the clay to "bite" into the tube wall better during ramming, and can also prevent nozzle aperture erosion during a motor's burn, which would cause the nozzle hole to get larger with a resulting reduction in thrust.
Go here for more information on nozzle and bulkhead mixes.
Whether adding more of the potassium nitrate or charcoal, add them in 5% increments. Always keep notes of your modifications so you can repeat them in the future.
If the fuel needs to be modified, weigh the fuel you have left, and multiply that total weight by 0.05 to determine how much of the necessary chemical to add. For example, if 10 ounces of the fuel was made originally, and 0.55 ounce was used for the first test motor, 9.45 ounces of fuel will be left to weigh. 9.45 times 0.05 is 0.4725 ounce. That can be rounded off to 0.45 ounce, which is the amount of the desired chemical to add to fuel.
Make a note of this modification in your notebook, such as "Added 5% potassium nitrate to original 60/30/10 fuel, resulting in 65/30/10, to speed the fuel up. Re-granulated and dried the fuel."
After you re-granulate and dry the fuel, make another test motor with it. If the fuel needs to be further speeded up, or slowed down, modify the fuel with another 5% of the desired chemical, and repeat the whole process and notes.
Remember the reasoning for the granulation step, and don't try the shortcut of simply adding the chemical, shaking the fuel, and trying another test motor. You'll get inconsistent results if you try this. One motor might fly well, and the next one may sit in the launch tube and fail to fly.
Fairly quickly, you'll achieve motors which powerfully fly skyward, without blowing up or ejecting their nozzles or bulkheads.
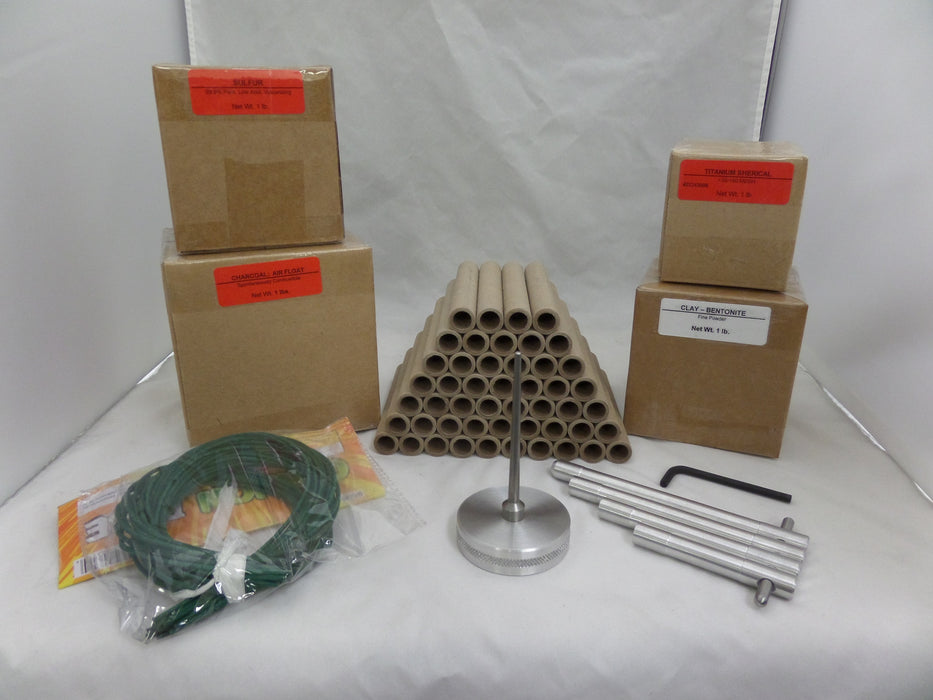
Everything you need to make 50 black powder rockets you can fly night or day.
Specifically, in this project we are going to make a 4-ounce (1/2-inch ID), nozzled, cored, stick-stabilized, black-powder skyrocket with a bag-shell heading.
Here's a diagram. You'll see references to it throughout this project.
Black Powder Rocket Diagram
Half-inch rockets are small enough that they don't use huge amounts of materials. They can be made quickly, and can be flown in many back yards.
But they are large enough to be really impressive, with that black-powder-rocket "whoosh" as they launch. They can also carry a nice payload of stars or other garnitures into the air. Working with them will provide plenty of experimentation, experience, research and development, and plain old fire-working fun. This is one "Quarter Pounder" you won't have to drive to McDonalds to get!
Black Powder Rocket Tooling
Rocket Tooling
The rocket tooling consists of a spindle, mounted on a base, and a series of rammers. Rammers are also called "drifts," and the two terms are used interchangeably in this project. The spindle creates the hollow core in the motor's fuel. The rammers are used to consolidate the nozzle clay, the fuel, and the bulkhead clay.
Note: If this is the first time you have worked with rocket tooling similar to the above, it is important that you read the immediately following sections carefully for more background information, instructions on preparing your tooling for use, and important precautions for using your tooling. This material can save you much grief, and can be a useful refresher even if you are a more experienced rocket-builder.
On the other hand, if you
- have experience with such tooling, and
- have previously measured and marked your drifts with no-pass and switch-rammer lines, and
- understand the precautions necessary to ensure safety and to avoid damaging your tooling while making rockets,
Tool Types
Although it may vary slightly from one tool-maker to another, the length of the actual tapered spindle will be approximately 0.7 of the length of the motor tube.Some of the rammers are hollow to allow them to fit down over the spindle when the nozzle clay and fuel increments are being rammed up around the spindle. There is a solid rammer for ramming the fuel increments above the spindle and for ramming the clay bulkhead.
Some tooling sets come with the rammer seen on the far right in the photo. That is a rammer designed to ram a clay bulkhead in the top of the rocket tube (above the fuel grain) with a pre-formed passfire hole in the center of it. Most folks I know don't use that rammer even if they have it. We will use an alternate method of creating a passfire hole by hand-twisting a drill through a solidly rammed bulkhead.
Tool Preparation: Marking No-Pass Lines on the Rammers
The one sure-fire way to damage or ruin rocket tooling is to drive a hollow drift into the tube so far that it gets locked onto the spindle. And if a solid drift is rammed so far into the tube that it hits the end of the spindle, it can quickly destroy the spindle by bending it.Even more importantly, impacting metal tooling parts against each other with fuel between them (called "pinching") is an invitation for an accident. Black-powder rocket fuel is relatively insensitive to ignition from impact or friction, especially if it has no metal particles in it. But why tempt fate by ramming a drift against the spindle with fuel in between?
For these reasons it is very important to have clear "no-pass" lines on each tooling rammer. No-pass lines indicate the maximum depth into the motor tube that the rammers should be allowed to go.
Many tool sets come with no-pass lines machined into the rammers. In the photo above, the red lines on the rammers of the tooling set on the left are the visual no-pass marks. To physically prevent the rammers from being rammed too far into the tube, masking-tape layers can also be applied with the bottom edge of the tape aligned with the no-pass marks. The tooling on the right in the photo has thick wraps of masking tape at the no-pass marks.
Note: The no-pass lines marked on rammers by their manufacturers are always based on the assumption that you are using a standard length tube for the size (ID) of the rocket you are building. In the case of our 1/2-inch ID rocket, that standard length is five inches. Standard lengths for other sizes of rocket can be found in the table in the Introduction to Rockets article. If you are using a non-standard-length tube, the factory markings on the tooling will be incorrect.
To identify (or check for) the proper location on your tooling for the no-pass marks, begin by installing a motor tube onto the spindle and seating it firmly against the base. Perform this procedure before applying any masking tape layers (as mentioned above) to your rammers. Gently slide the longest rammer slowly into the tube over the spindle until you feel it come to rest on the base. Now withdraw the rammer 1/2-inch (one tube ID) from its resting place and mark the rammer exactly at the top of the tube (or check to confirm that the manufacturer-provided mark is at the top of the tube). This "no-pass" line will be used later to indicate when you have rammed a nozzle of the ideal size (depth).
Gently slide each of the remaining rammers, including the solid rammer, slowly into the tube over the spindle until you feel it come to rest on the spindle. Withdraw the rammer from the tube by 1/8-inch to 1/4-inch to provide a safety factor, and mark the rammer exactly at the top of the tube (or verify that the manufacturer-provided mark is at the top of the tube).That correct positioning of the no-pass lines ensures the rammers will never contact the spindle as long as they are never rammed into the tube past the no-pass marks. In addition to clearly marking these lines as necessary, I recommend creating physical stops as well. Wrap each rammer with enough masking tape at its no-pass mark that the rammer cannot slide into the tube past the mark, even if you're not paying attention to the rammer's position at the moment.
Tool Preparation: Marking "Switch-Rammer" Lines
During the ramming process, at some point it is time to switch to the next rammer. Keeping track of when that switch should be made can be a bit challenging. An additional mark on each rammer, in addition to the no-pass line, can prove to be very useful. These lines are called switch-rammer lines.Some tooling comes with switch-rammer lines already marked on the drifts. The rammers on the left in the photo above have green switch-rammer lines machined into their surface. However, most sets that I've seen don't have switch-rammer lines provided by the manufacturer. It's easy to scratch lines in the surface of the drifts at the proper locations with an awl or razor-knife. A sharpie can then be used to darken the lines.
Each Switch-Rammer Line Corresponds to No-Pass Line
on Next-Smaller Drift
The proper location for the switch-rammer lines can be determined by placing the drifts in size order with the bottoms of the drifts aligned as shown in the photo above. You can see that with the bottom of all the rammers aligned, each rammer's switch-rammer line corresponds to the next shorter rammer's no-pass line. Mark all but the smallest rammer accordingly.
The switch-rammer line on the last drift, the shortest (solid) one, is not there to indicate that it's time to switch to the next rammer--there is no "next" rammer! That line is positioned one tube-ID (in our case, 1/2-inch) above the bottom of the drift. It indicates when it's time to stop ramming fuel increments and ram the clay-bulkhead. Mark this last drift 1/2-inch up from the bottom.
Other Tools Necessary for Ramming a Motor
For these small black-powder rocket motors, the nozzles will be created and the fuel will be consolidated by hand-ramming as opposed to pressing. Further background on both these techniques and their application can be found in the Introduction to Rockets article.To hand-ram a motor, a solid, a dead-blow mallet such as the rawhide one shown in the following photo is used to ram each clay or fuel increment. Metal hammers are never used. They can cause damage to the tooling, and also create sparks. Rubber hammers are not good for this type of ramming either because they do not adequately transmit their force to the tooling before they bounce off it.
A solid wood ramming post is used as a base upon which to ram the motors.
Dead Blow Mallet and Ramming Post
A funnel, which fits snugly into the end of the motor tube is also required, as well as measuring scoops for the fuel and clay increments, and a drill bit used to create the passfire hole in the clay bulkhead.
Miscellaneous Tools
Rocket Motor Tubes
For making rocket motors, a good quality, strong tube is required to withstand the ramming forces and to hold up to the internal heat and pressure as the motor burns. For our 1/2-inch rockets we will need heavy-walled "parallel-wound" (also referred to as "convolute") paper tubes five inches long with an ID of 1/2-inch. Suitable tubes are item number TU1028. A good discussion of parallel and "spiral-wound" fireworks tubes and their characteristics and differences can be found at the top of the page parallel tubes page.Rocket Sticks
The rocket stick keeps the rocket heading in the desired direction as it picks up speed during the launch. It also stabilizes the rocket during flight in much the same way the shaft and feathers keep an arrow flying straight.For this project I recommend obtaining a package of six bamboo poles, 6-feet long and between 1/4 and 3/8 inch in diameter, available in the garden department at Home Depot (or similar). Each pole, cut in half, will yield two rocket sticks. Further information on rocket sticks and alternative sources can be found here.
Safety Precautions
A few simple safety precautions can go a long way toward preventing major accidents.- Keep a neat and clean workspace
- Store any mixed compositions and finished devices in a safe and secure storage location away from where you are working
- Wear eye protection
- Wear cotton clothing (synthetics will melt onto your skin in a fire)
- Absolutely minimize the amount of exposed composition, black powder, stars, and finished devices at all times. Keep any/all of these which are not currently being used in a safe, closed day-box. Only have on the workbench the minimum amount of these items necessary for the current operation.
- Clearly mark the no-pass lines on the rocket tooling, and put thick wraps of masking tape on the drifts to prevent them from being rammed too far into the motor-tube (details here).
- Hold the mallet in your dominant hand as you ram a motor. Use your other hand to grasp the motor tube and/or drift. It is a very good idea to wear a sturdy leather glove on that other hand just in case there is an ignition of the motor during the ramming.
Making Black Powder Rocket Fuel
Each 4-ounce 1/2-inch ID motor will use about 0.55 ounce (16 grams) of fuel. The 10-ounce (about 300 grams) batch of fuel we will prepare will easily make 15-18 motors. Here is the formula and quantities of the three chemicals required for this batch.| Component | Percent | Factor | 10 oz | 300 g |
| Potassium nitrate | 60% | 0.6 | 6 oz | 180 g |
| Airfloat Charcoal | 30% | 0.3 | 3 oz | 90 g |
| Sulfur | 10% | 0.1 | 1 oz | 30 g |
The potassium nitrate and sulfur need to be fine enough to pass a 40-mesh screen. I've found that this produces a nice, fast fuel using the Skylighter chemicals that I have on hand. They can be milled individually in a blade-type coffee-mill until they will pass the screen.
Note: It is impossible to verify that a chemical will pass a 40-mesh screen without actually having the screen and trying to rub the chemical through it. Simply grinding the chemical in a coffee mill and feeling it to see if it feels fine does not ensure that it is all ground finely enough. Get a 40-mesh screen to use for these operations or you may be able to find a 40-mesh kitchen colander (gravy strainer).
Note: Sulfur powder is typically fine enough to pass a 40-mesh screen when the lumps are broken down. It can be difficult, however, to get it to pass the screen without the pores in the screen clogging up. Test a small amount of your sulfur to verify that it is indeed fine enough to pass the screen. If it is, you don't have to push all of it through the screen at this time. Airfloat charcoal also typically will pass a 40-mesh screen without any additional milling.
Once it has been verified that all the chemicals will individually pass the 40-mesh screen, weigh out the correct amounts of the individual chemicals. Then weigh them together to verify the correct total weight.
Put the chemicals in a tightly closed tub, and shake them together while holding the lid on the tub to prevent it from coming off and making a mess.
Push the chemical mixture through the 40-mesh screen onto a piece of kraft paper.
Put the mixture back into the tub and shake it, then screen it again. Repeat this mixing process 3 times.
Add 3 ounces (90 grams, which is an additional 30%) of very hot water to the composition. Stir the water into the mixture with a paint stir-stick until the water is thoroughly integrated into the powder.
Knead the damp composition in the tub with a rubber-gloved hand until it is evenly dampened. Then dump the damp comp into a large ziplock plastic baggie and consolidate all of the mixture into a stiff ball in one corner of the baggie. Twist the baggie closed around the ball. Really squeeze and consolidate it into one, solid "potato" in the baggie corner.
Remove the "potato" from the baggie and grate it through a 4-mesh screen onto a non-absorbent surface such as aluminum foil or a plastic mat. (An absorbent surface such as kraft paper will leach dissolved potassium nitrate out of the mixture as it absorbs water, which will change the chemistry of the powder.) Spread the granules out evenly and dry them overnight in a safe location with warm, dry, moving air.
When the granules are thoroughly dry, they should weigh about what the original batch of dry powder weighed. If not, let them dry longer.
Finally, push the dry granules, which will be pretty soft, through a 10-mesh to 12-mesh screen or a coarse-mesh kitchen colander.
You will now have 10-mesh granules with some finer powder mixed with them. Store the completed fuel in a tightly sealed tub in a safe location, and with a label indicating what's inside. Many folks include a packet of desiccant with their fuel to keep it completely dry. These packets can be readily found on eBay.
These granules have all three of the chemicals intimately mixed with, and bound to, each other. Since no binder (such as dextrin) was used in this formula, the granules will be soft and easily crushed as they are rammed into a solid fuel grain inside a rocket motor.
The granulation step results in rocket fuel which is not very dusty when it is used. Additionally the burn rate of the fuel is speeded up a little by the potassium nitrate being dissolved by the water and then absorbed by the charcoal. And the three chemicals, now in granules, will not separate from each other as the fuel is being scooped out for use when making rockets.
Note: This final point is an important one. If the fuel is used without the granulation step, there will be grains of the different chemicals in the fuel which differ substantially in size and density. Even though the chemicals have been sifted and mixed through the 40-mesh screen, these particles of differing size and density will separate from each other as the fuel is handled. The result of this "un-mixing" will be inconsistent performance when the separated fuel is rammed into rocket motors.
Further information on black-powder rocket fuel formulations can be found here.
Ramming Clay Nozzles
The first step in actually making a rocket motor is ramming a clay nozzle in the paper motor tube. Some background information on clay nozzles can be found here.To ram a clay nozzle, slide one of the 1/2-inch ID rocket tubes down over the spindle. Make sure it is sitting straight upright, with its bottom squarely on the base. Looking down into the tube, you should be able to see the tip of the spindle positioned right in the center of the tube. Adjust the tube as necessary.
Put the funnel into the mouth of the tube. Measure out a heaping 1/2-teaspoonful of the bentonite clay and dump it into the tube through the funnel. Tap the funnel and the tube with the nozzle forming rammer to settle all the clay to the bottom of the tube.
Loading Clay into Tube for Nozzle
Note: As you can see in the cross-section drawing above, the final height of the nozzle should equal the inside diameter (ID) of the tube (1/2--inch) once the clay is rammed. The no-pass line on the longest drift corresponds to that height. The scoop of clay that is introduced into the tube for the nozzle should be adjusted to dial this height in for the rest of your rockets. Some folks weigh the amount of clay they use for the nozzle to achieve a high level of consistency in the height of the nozzle.
Put the spindle base on the ramming post. Look down into the tube to verify that the tube is on the spindle straight, and the tip of the spindle is centered in the tube.
Insert the nozzle-forming rammer all the way into the tube, and slide it up and down a couple times to tamp the clay down at the bottom of the tube, and settle any clay which might have crept up between the drift and the inside tube wall.
Now, rap the drift solidly with the mallet, not too hard. The rap should be just hard enough to feel and see the clay consolidating and the drift being driven into the tube. There's a "feel" to doing this. If you hammer too hard with the mallet, the paper tube may split. Not hard enough, and the nozzle will not be consolidated solidly enough.
Ramming Nozzle
After 10-12 whacks with the mallet, the drift should stop going any further into the tube, and the clay should feel solid under the hammered rammer. The no-pass line on the nozzle-forming rammer should be just visible above the top of the tube, indicating that the nozzle is the ideal one tube-ID (1/2-inch) in height.
Once again, looking at the drawing, you can see that the goal is to have the nozzle bulge slightly into the tube's inner layers of paper. This ensures that the nozzle is tightly locked into the tube, and will resist being blown out of the tube under pressure as the fuel burns.
When the nozzle has been rammed correctly as described above, a very slight bulge in the outer tube wall may be felt if you slide your fingers up and down the tube where the nozzle is.
Feeling Up the Tube
Note: During and after using the hollow drifts it is very important to keep their hollow central-core clean and free of any clay or excess fuel which has accumulated in there.
Remove the rammer and clean any excess clay out of its hole with an awl or drill bit. Tap the clay out of that hole back into the tub of clay. Tip the paper tube (still on the spindle-base) over, and tap it with the rammer gently to dump any loose clay back into the clay tub.
Removing Residual Clay from Rammer and Tube
The tube does not need to be removed from the spindle, but it can be if you'd like to see what the rammed nozzle looks like. If you do remove the tube to check it out, it must be replaced on the spindle all the way before you proceed with fuel ramming.
Inspecting Nozzle
Ramming Fuel Increments in Motor Tube
Now it's time to ram increments of the fuel mixture into the tube.A good rule of thumb is that each ramming cycle should create a solid increment about as thick as 1/2 -3/4 of a tube ID. This will ensure the fuel is consolidated solidly, and that the fuel is compacted just as solidly at the bottom of an increment as at the top.
With these 1/2-inch ID motors, a single level 1/2-teaspoonful (or slightly less) of the fuel will ram down into this ideal 1/4 to 3/8-inch thick increment of fuel.
Scoop about 1/2-cup of fuel into a paper cup and close the lid on the main container of fuel. Set the main container aside in a safe place to prevent fire from spreading to it in case of an accident. Minimizing exposure like this is a very important safety precaution.
Separating 1/2 Cup of Fuel from Main Fuel Supply
Put the funnel into the end of the tube, and load a level 1/2-teaspoonful of the fuel into the tube.
Loading Increment of Fuel
Remove the funnel and insert the longest rammer into the tube. Ram that first increment of fuel with 8 solid whacks of the mallet. After 4-6 whacks you should feel the fuel getting very solid, and the drift no longer going much further into the tube with each hammer-blow.
After the fuel is consolidated, if the switch-rammer line on the drift is not visible above the end of the tube, remove the rammer and clean any excess fuel out of the hole in it. Insert the funnel in the tube, load another scoop of the fuel, and repeat the consolidation process. Repeat this until the switch-rammer line on the drift is visible after ramming a fuel increment.
When the switch-rammer line is visible after ramming an increment of fuel, remove the rammer, and clean any excess fuel out of the hole. Set it aside.
Repeat the ramming process with the next longest hollow rammer. Remove and clean the rammer each time. Introduce another increment of fuel into the tube. Ram increments of fuel until the switch-rammer line is visible after a fuel increment has been consolidated. Continue with the next hollow rammer and so on.
Once the switch-rammer line on the last hollow rammer is visible above the tube after an increment of fuel has been consolidated, the fuel will be solidly packed up to the top of the spindle, or slightly past its tip.
Now switch to the solid rammer. Ram the next fuel increment with the solid rammer, being sure to never drive the drift into the tube past the no-pass line.
Now, ram additional fuel increments in the tube with the solid rammer until there is one tube ID, or 1/2-inch, left empty in the top end of the tube. This will be indicated by the appearance of the "switch-rammer" mark on the solid rammer above the end of the tube after an increment of fuel has been consolidated. Dump any remaining fuel back into the main fuel container, close it, and put it in safe storage.
Ramming Fuel
Ramming a Clay Bulkhead in the Rocket Motor
Looking at the cross-section drawing once again, you can see that a clay bulkhead, with a passfire hole through it, fills about half the empty space left in the motor tube above the rocket fuel.This bulkhead prevents the fuel from prematurely igniting the rocket heading by blowing through the top of the motor as the fuel grain becomes thin at the end of its burn.
Like the nozzle, the bulkhead needs to be rammed very solidly, short of splitting the paper tube, so that it does not get blown out of the tube under pressure.
To create this bulkhead, put the funnel into the end of the motor and load a flat 1/4-teaspoonful of clay into that void. Ram this plug solid with 8 mallet blows. Dump any loose clay back into its tub.
Your rocket motor is now ready for flight preparations and testing. You should first test-fly the motors alone to ensure they are working properly, before you add any shell headings to your rockets.
Preparing for Flight
Using two bands of masking tape, 3 layers thick, install a stick on the motor. The bamboo stick in the photo below is about 3 feet long. The wrap of aluminum-foil duct-tape protects the very thin pole from catching fire from the rocket's exhaust. This tape-wrap is only needed with very thin bamboo-pole sticks.Motor Mounted on Bamboo Stick (Shown with Bag-Shell Heading)
Sight down the rocket motor and the stick and verify that the stick is straight in line with the motor. The stick can be twisted slightly to adjust its position.
Verifying Stick Alignment with Motor
As shown in the cross-section sketch above, the visco ignition fuse is bent over double at the end, and inserted far enough into the rocket core that the doubled end is in contact with the bottom of the fuel grain. If you're going to use rocket right away, you don't need to tape the fuse; it will stay lodged in the core.
Test Flights
If this is your first rocket (or if you're using an untried batch of fuel) some simple test flights will quickly determine if the fuel's speed needs to be adjusted. A piece of PVC pipe stuck in the ground makes a good rocket-launching tube. Put the test rocket in the tube, light the fuse, stand back and observe.If the rocket launches quickly, and flies 200-300 feet skyward, the fuel is just right. Build yourself another rocket motor just like that one and then continue to the section below entitled "Installing a Simple Bag-Shell Rocket Heading."
If the rocket just sits in the launch tube and burns like an upside-down fountain, or if it lifts out of the tube slowly and then flies downward, the power of the fuel must be increased per the recommendations in the "Dialing-in Fuel" section.
On the other hand, if the motor blows up upon ignition, or if the rocket starts to fly and then the nozzle or top-bulkhead blow out of the motor with a loud pop (and you are sure they were securely rammed in place), the power of the fuel must be decreased per the recommendations in the "Dialing-in Fuel" section.
Make any necessary fuel modifications. Continue with further test flights until successful flights are reliable and repeatable.
Installing a Simple Bag-Shell Rocket Heading
A "heading" is a device added to the top of a rocket motor which is designed to create an audible and/or visual aerial effect at the end (usually the top) of the rocket's flight.At the risk of belaboring what might be obvious, the objective of a successful rocket is for both rocket and heading pyrotechnics to all burn out before hitting the ground.
Now that the rocket motors are flying well and consistently, we will build a simple bag-shell heading which will provide a "dump" break of lit stars.
This will not be a loud, widespread star-shell burst, but a quieter, graceful dump of stars, which is often more aesthetically pleasing as a rocket heading. It is also a type of display more compatible with any setting where noise might be an issue.
The cross-section drawing above shows a simple bag-shell heading installed on a rocket motor. This type of heading consists of several turns of kraft paper, glued and tied onto the top of the rocket motor to form a container. The container is then filled with stars and black powder as a burst charge and tied closed at its top.
First we must create a hole, or "passfire," through the clay bulkhead so that the motor can ignite the heading just as the last of its fuel is burning out.
Using a sharp 3/16-inch drill bit, slowly hand-twist-drill a passfire hole through the center of the bulkhead in the top of the motor and just into the black-powder fuel grain.
Wear eye protection and a leather glove on the hand holding the motor. Do the drilling outdoors, and hand-twist the drill very slowly through the bulkhead.
Hand Twist Drilling the Passfire Hole in the Bulkhead
When the motor's fuel burns through and passes fire through the hole in the bulkhead, the contents of the bag-shell are ignited. The bag will burst open, dumping its burning contents into the sky, and creating a traditional-looking rocket-heading dump-starburst display.
Next, you will need to make a "former" on which to roll the bag-shell casing. This can easily be done by rolling some duct-tape up on a wood dowel. In this case a 1/2-inch dowel is used, and 1/8-inch of it is allowed to project beyond the tape-wraps. This projection serves to center the rolled-up casing on the rocket motor when it is being installed.
Continue wrapping duct tape around the dowel until the former reaches the desired diameter, in this case 1.5-inches as shown below.
Heading Former (Lower End at Left) on Wooden Dowel
Drill a hole up through the core of the dowel, from the projecting end to a point past the other end of the duct tape wrap. Drill a connecting hole in from the side of the dowel above the tape wraps, creating a vent-passage. As you will see below, this vent relieves the vacuum and allows the former to be removed from the installed bag-shell casing easily.
The first step in making the actual bag-shell heading is to roll a 6-inch by 18-inch piece of kraft paper up on the former. Once you have rolled a full turn on the former, apply a stripe of Elmer's glue to the paper every 4-inches or so.
Rolling and Gluing Bag-Shell Heading on Former
Once the paper casing is completely rolled onto the former, slide the former in the casing so that the paper extends only 1.5-inches past the duct tape at the lower end of the former.
Here's how to attach the shell to the rocket motor. Spread some glue onto the top 1-inch of the motor-tube as shown below.
Put the open 1.5-inches of the bag-shell casing (still on the former) down over the glued-end (top) of the rocket tube. Make sure the 1/8-inch long projection of the former's wood-dowel slides into the top of the rocket tube. This will center the shell casing on the rocket motor.
Squeeze the open end of the shell casing paper around the glued section of the motor-tube, gathering the kraft paper together tightly and evenly around the tube.
Installing Bag-Shell Heading on Motor
Tie the bag-shell casing securely in place with one clove-hitch string-tie right at the top of the bunched-together section, and with another tie down toward the bottom of the bunched section.
Gently pull the former upward and out of the casing as shown below. This is where the drilled vent-holes earn their keep, preventing a vacuum from forming as you pull the former out.
Securing Bag-Shell Heading to Motor and Removing Former
The bag-shell is now ready to be filled with alternating layers of black powder burst granules or rice hulls coated with black powder, and stars. Fill the shell until the contents are about as high in the shell as the shell is in diameter--about 1.5-inches in this case.
Once the shell has been filled to the desired level, bunch the paper casing together at the top of the contents, and tie it shut with a clove hitch knot. Cut off the excess paper casing with a pair of scissors, and the bag-shell heading is complete.
Remove the motor from the spindle base and install a stick and a fuse as in the Preparing for Flight section above. Fire her up and enjoy the show!
Removing Motor from Spindle
The rocket in the following video has a long, slow delay so that the bag-shell heading is fired on the way down, creating a waterfall or horse-tail effect.
Bag-Shell Heading
Now that you've successfully built and launched your first few 1/2-inch rockets with bag-shell headings, here are some suggestions for further experimentation. I've included ideas and instructions for some alternative headings, as well as some alternative motor construction techniques to adjust performance, and methods for making the spark trail from the rocket exhaust even more beautiful.
Suggestions for Further Experimentation
Modifying the Fuel Display
Black Powder Rocket Diagram
Looking at the cross-section drawing of a rocket motor, you can see an imaginary dividing line between the "thrust fuel" and the "delay fuel." This line is approximately as far above the tip of the spindle as the distance between the side of the spindle and the tube's inside wall.
In the initial second or two of the rocket's flight, the fuel surrounding the hollow core burns very rapidly in a hot, pressurized environment, due to the large surface area of the fuel grain which is ignited. The fuel burns outward from the core to the inside wall of the tube, and also upward from the tip of the core for about that same distance. Large amounts of gasses are forced out of the nozzle resulting in maximum thrust and a rapid flight skyward, with the associated "whooshing" sound.
Then, when all the thrust fuel has been consumed, the delay fuel section starts burning only at its concave bottom surface. Much less surface area is burning, the heat and pressure reduce, and the thrust of the motor diminishes significantly. The rocket will begin a phase of flight where it is mostly coasting under the momentum of the thrust phase.
If the delay fuel grain is long enough, or if it is composed of a slower fuel, the rocket can even coast to an apogee, and then slowly arch over and begin flying back downward, with the delay fuel still burning.
The delay portion of the rocket's flight can be adjusted by ramming less or more fuel above the thrust/delay fuel boundary line, or by adjusting the speed of the delay fuel to be slower. Of course, there's only so much delay fuel that can be rammed into the tube before running out of space, so adjusting the speed of the delay fuel may become necessary for a longer flight.
The speed of the delay fuel is slowed in the same way as the thrust fuel, by adding charcoal to it and re-granulating the mix. Adding charcoal in 5% increments, with a total charcoal addition of an additional 5% to 30%, will result in ever more-slowly burning delay fuel. You can dial-in the characteristics of the delay portion of the rocket's flight as desired.
Another way to modify the visual effect of the rocket is to add metal particles to some of the fuel. Aluminum, magnalium, ferro-titanium, or titanium particles will create various metal-spark effects.
The thrust fuel around the spindle should never have metal added to it. Particles of metal, especially hard ones like ferro-titanium or titanium, can damage the spindle or rammers if metal-containing fuel is rammed around the spindle. There is also the risk of a spark igniting the fuel if metal is pinched between the spindle and rammer.
But, if 5-10% powdered metal is added to the delay fuel, when that fuel starts burning, the rocket's tail will change from orange charcoal-sparks to silver metal-sparks. A convenient way to add metal to the fuel is to simply put an increment of the fuel into a paper cup. Add a small pinch of the desired metal, and swirl the two components together before ramming the fuel into the motor tube.
1/2-Inch Rocket with Charcoal-Only Tail
1/2-Inch Rocket with Charcoal Thrust Fuel, and
Slowed-Down Titanium Spark Delay Fuel
And, finally, sometimes you may want the rocket to have a metal-spark tail right out of the launch tube. You shouldn't ram metal-containing fuel around the spindle. But once the rammed fuel reaches the top of the spindle, metal can be added to the thrust-fuel increment just above the tip of the spindle and all remaining increments up to the clay bulkhead.
Since the thrust fuel between the tip of the spindle and the thrust/delay boundary starts burning immediately during the launch and thrust phase of the flight, any metal particles in that fuel will show up as metal sparks in the tail immediately upon the motor's ignition.
1/2-Inch Rocket with All-Titanium-Spark Tail
So, in summary, there are actually three sections of fuel in the rammed fuel grain:
- The thrust fuel around the spindle which never has metal added to it.
- The thrust fuel between the tip of the spindle and the thrust-delay boundary. This fuel may have metal added to it if metal sparks are desired immediately out of the launch tube.
- The delay fuel between the thrust-delay boundary and the clay bulkhead. This fuel may be as fast as the thrust fuel, or it may be slowed down with the inclusion of more charcoal. It may have metal added to it to create metal sparks during the delay portion of the rocket's flight.
Heading Options
In addition to the simple bag-shell heading described in the main article, other options such as a single large comet, a report, or a full-fledged aerial shell can be used with this 1/2-inch rocket. One of these half-inch rocket motors will lift between one and two ounces of heading payload. Over time and many firings, the maximum payload-carrying capacity of the motors can be determined by gradually increasing the payload weight.If an aerial shell, such as a festival ball shell, is to be used as a rocket heading, the only thing that needs to be different about the shell's construction is its fuse assembly. Instead of either 1/4-inch time fuse or tape-wrapped visco time-fuse, a section of quick match, either homemade or commercial, is used. This quick match fusing will immediately transfer fire to the heading when the rocket motor's fuel burns through and passes fire through the bulkhead passfire hole.
A couple of short pieces of black match, wrapped loosely in masking tape, will suffice to replace the shell's time-fuse, and will transfer fire quickly to the heading.
Of course, if a rocket is used to lift an aerial-shell heading, there is no need for a shell leader or lift charge. Simply hot-glue and/or tape the shell on top of the rocket motor, making sure the quick match shell-fuse is inserted down into the bulkhead passfire hole.
The combination of a rocket motor and a homemade ball-shell heading is a nice project which combines the two devices, provides a nice way to lift ball-shells, and can be an effective way to test homemade stars up in the air.
Background Information on Rocket Sticks
There's a debate among rocketeers about the correct size of a stick for a rocket.A good rule of thumb for black-powder rockets, which accelerate more slowly than some more powerful rockets, is to use a stick that is as thick as 1/2 of the motor ID, and long enough to balance the rocket on a finger between 1/3 and 2/3 of the way up the motor from the nozzle end after it is mounted on the stick.
With these 1/2-inch ID motors, and with a 2-ounce heading installed on the motor, a 1/4-inch-thick stick, 30 to 36 inches long fits that rule of thumb.
My local Home Depot sells 1/4-inch-diameter wood dowels, 48 inches long, for $0.69 each. Not cheap if you're using many of them.
They also sell 1/4-inch-square sticks, 36 inches long, for $0.79. No better.
In their garden department, they sell packages of six bamboo poles, 6-feet long and between 1/4 and 3/8 inch in diameter. Each pole can be cut in half to make 2 rocket sticks. A package sells for $2.46, and since about 10 rocket sticks can be harvested from each package (a couple of sticks are usually too thin or too crooked to use), that brings the price per stick down to about 26 cents, including tax. That's not bad.
Common Types of Rocket Sticks
I have a table saw I use to rip sticks out of solid wood planks. A 36-inch long piece of 1x6 clear poplar (3/4-inch x 5.5-inches) costs $5.97 plus tax. I can rip 30 1/4x1/4-inch rocket sticks from that board. So each of those sticks runs 21 cents (plus the initial investment in the table saw, of course).
Many rocket makers prefer square sticks over round ones, feeling that the square ones resist twisting and bending during flight better than round ones, and guide the rocket straight through the air better, too.
And sometimes a spent rocket can be retrieved, and the stick salvaged to be used another day.
Keeping rocket sticks tightly bundled together with string, wire-ties, or rubber bands keeps the sticks nice and straight.
Background Information on Black-Powder Rocket Fuel
Black-powder rocket fuel is basically comprised of the same three chemicals found in standard black powder: potassium nitrate, charcoal, and sulfur. Often the specified charcoal is a mixture of different mesh sizes: airfloat for speed and power, and coarser grains such as 80 or 36-mesh for sparks.The ratio of airfloat charcoal to the coarse mesh charcoal is one determinant of the final power of the fuel. Fine airfloat charcoal will burn fast and mostly inside the motor, creating more thrust. The coarser charcoal will burn slower, with a lot of it continuing to burn outside the motor in the rocket's tail, creating a nice orange-spark plume rising into the air.
Other factors which control the fuel's speed are the type and quality of the charcoal, the mesh size of the other chemicals, the fuel formula that is used, and the processing method used to make the fuel.
The actual length and diameter of the tooling's spindle also plays a large role in how powerfully the fuel burns. Those dimensions are fairly standard, but can vary somewhat from one tooling manufacturer to another.
So, obviously, given all those factors, arriving at a fuel which will work in a particular motor, using a specific set of tooling, is not a one-size-fits-all proposition.
There is a range of chemical proportions found in the various rocket-fuel formulas in the pyrotechnic literature. Here's a sampling of them:
| Component | 1-3 Oz | 4-8 Oz | 1-3 Lbs | 4-8 Lbs |
| Potassium nitrate | 0.58 | 0.55 | 0.52 | 0.55 |
| Airfloat Charcoal | 0.32 | 0.31 | 0.39 | 0.36 |
| Sulfur | 0.1 | 0.14 | 0.1 | 0.09 |
"If rockets burst before ascending add more coal; if they ascend too slowly add more saltpeter (potassium nitrate). For the smaller sizes use fine coal: for larger ones use coarser coal in proportion to the diameter. In 4 to 8 pound rockets use partly granulated saltpeter."
Note: I've converted Weingart's formula parts to percentages. The 14% sulfur in the 4-8 ounce motor fuel formula seems to be an anomaly not seen in any other formula or literature. When Weingart uses the term "coal" he is referring to charcoal.
Although there is some variation to the pattern, you can see that as the rockets get larger, the mesh of the charcoal also gets larger, the potassium nitrate percentage drops, and the charcoal percentage increases. The sulfur percentage stays approximately 10%. The speed of the fuel is adjusted by changing the ratio of the potassium nitrate to charcoal, and/or the ratio of fine charcoal to coarse charcoal.
Barry Bush, in his fireworks chapter in Hardt's Pyrotechnics, states a simpler formula as "Formula 1:"
| Component | Factor |
| Potassium nitrate | 0.6 |
| Charcoal, airfloat | 0.2 |
| Charcoal, 36-mesh | 0.1 |
| Sulfur | 0.1 |
"In Formula 1, adjustment for speed is accomplished by varying the proportions of saltpeter [potassium nitrate] to charcoal, keeping the sulfur constant, or by varying the two types of charcoal. Less saltpeter and more charcoal will slow the composition; more saltpeter and less charcoal will speed it."
And, one manufacturer of rocket tooling supplies these formulas for black-powder rockets:
"All black-powder rocket propellants fall very close to the 60/30/10 formula. There will be slight variations of this as the rockets increase in size. The following formulas should get you started. Small adjustments may be needed."
| Component | 2-4 Oz | 8 Oz | 1-2 Lb | 3 Lb | 4-6 Lb |
| Potassium nitrate | 0.6 | 0.6 | 0.6 | 0.6 | 0.6 |
| Coarse charcoal | 0 | 0.1 | 0.2 | 0.22 | 0.25 |
| Airfloat charcoal | 0.3 | 0.2 | 0.1 | 0.08 | 0.05 |
| Sulfur | 0.1 | 0.1 | 0.1 | 0.1 | 0.1 |
Note: The coarse charcoal is specified as 80-mesh. The potassium nitrate and sulfur are to be fine enough to pass a 100-mesh screen, per these specifications.
Background on Clay and Nozzles
I remember the first time I read that an increment of clay was to be rammed to create a solid nozzle. I wondered if the clay would come from the supplier looking like Play-Doh, or if it would arrive on my doorstep dry and I'd have to add water to it. In my mind "clay" meant something that would look like Play-Doh.Well, I received my pound of bentonite clay, and it was a very fine whitish-gray powder. And somewhere I got the information that it was simply to be rammed dry. Well, then I got to wondering how a dry powder, that looked a bit like bread flour, was going to consolidate into a solid mass, and form a nozzle, by simply being pounded on with a rammer and a mallet.
Trying it once, though, did indeed prove that when the dry clay powder is introduced into the rocket tube and rammed, it does create a hard, dense nozzle. Wonders never cease. As you embark on these basic rocket making techniques, you may have some of these same questions. Hopefully this information, and the experience you are about to have will provide some answers.
With these relatively small rocket motors, pure bentonite clay may be used for the nozzles and bulkheads. As motor size is increased, though, many rocket-makers switch to using "nozzle and bulkhead mixes" instead. These mixes often consist of clay and wax, with an ingredient such as grog or kyanite sometimes added.
Wax is added to the clay to waterproof it, to make it adhere to itself better during ramming. Wax also prevents the clay from absorbing or releasing moisture, which can cause the rammed nozzle to change dimensions.
Note: Some rocket makers carry a drill bit which is the same dimension as the original nozzle aperture. Since the clay can expand with humidity, and close the nozzle down a little in that process, the drill bit is used just prior to flight to ensure the nozzle hole is still the correct size. If the hole has reduced in size due to absorbed moisture, and is not re-opened up with the drill bit, the motor may blow up upon ignition.
Adding grog or kyanite can allow the clay to "bite" into the tube wall better during ramming, and can also prevent nozzle aperture erosion during a motor's burn, which would cause the nozzle hole to get larger with a resulting reduction in thrust.
Go here for more information on nozzle and bulkhead mixes.
Dialing-in Fuel
You can see from all these formulas and recommendations that the following simple suggestions emerge for adjusting the speed and power of the black-powder rocket fuel:
- To increase the power of the fuel:
For this project, we will use the simplest adjustment technique, and add either
- add more potassium nitrate to the fuel to increase the ratio of potassium nitrate to charcoal, and/or
- increase the ratio of fine charcoal to coarse charcoal, and/or
- use finer-mesh potassium nitrate.
- add more charcoal to the fuel to decrease the ratio of potassium nitrate to charcoal, and/or
- decrease the ratio of fine charcoal to coarse charcoal, and/or
- use coarser-mesh potassium nitrate.
- potassium nitrate to increase the power of our fuel, or
- charcoal to decrease the power of our fuel, as necessary.
- charcoal to decrease the power of our fuel, as necessary.
Whether adding more of the potassium nitrate or charcoal, add them in 5% increments. Always keep notes of your modifications so you can repeat them in the future.
If the fuel needs to be modified, weigh the fuel you have left, and multiply that total weight by 0.05 to determine how much of the necessary chemical to add. For example, if 10 ounces of the fuel was made originally, and 0.55 ounce was used for the first test motor, 9.45 ounces of fuel will be left to weigh. 9.45 times 0.05 is 0.4725 ounce. That can be rounded off to 0.45 ounce, which is the amount of the desired chemical to add to fuel.
Make a note of this modification in your notebook, such as "Added 5% potassium nitrate to original 60/30/10 fuel, resulting in 65/30/10, to speed the fuel up. Re-granulated and dried the fuel."
After you re-granulate and dry the fuel, make another test motor with it. If the fuel needs to be further speeded up, or slowed down, modify the fuel with another 5% of the desired chemical, and repeat the whole process and notes.
Remember the reasoning for the granulation step, and don't try the shortcut of simply adding the chemical, shaking the fuel, and trying another test motor. You'll get inconsistent results if you try this. One motor might fly well, and the next one may sit in the launch tube and fail to fly.
Fairly quickly, you'll achieve motors which powerfully fly skyward, without blowing up or ejecting their nozzles or bulkheads.
Get Everything You Need to Make 4-Ounce Rockets
4 oz. Black Powder Rocket Kit
Check Out the Kit & Order Here