Making Gerbs (Fountains)
Introduction
Homemade fountains, called gerbs by pyro-folks-in-the-know, are very versatile devices. They can be used as stand-alone fountains shooting sprays of sparks skyward, as drivers on wheels, as downward spraying tubes in a homemade waterfall, or as line rockets.I'll be demonstrating those line rockets, sometimes called rats or pigeons, in the newsletter following this one, so stay tuned. I'll also be using these fountains as drivers on a fireworks wheel. I described using commercial cone-fountains to drive one of these unique Chromatrope double-wheels.
Devices very similar to these fountains, employing a slightly faster-burning fuel and a somewhat different nozzle configuration, were what I described in the end-burning rocket motor article. In that article I showed how gerbs can be used to create a design, called a gerb set-piece.

Gerb Set-Piece (Photo by Nancy Stewart)
Gerbs (Fountains)
From Wikipedia: A gerb is a type of firework which produces a jet of sparks, usually from 15 to 60 seconds. It is a thick-walled tube filled with pyrotechnic composition and possessing a choke, which is a narrowing in the tube. Gerbs are often referred to as "fountains."I don't know what the origin of the word "gerb" is, but I learned, while trying to find out, that there is a Star Wars race of the same name. Interesting.
The word is pronounced the same as "germ" but with a "b" instead of the "m." I wouldn't want to saunter up to a group of pyros, trying to appear experienced in the ways of fireworks, and say "gerb" as in "Gerber" baby food, now would I?
Gerbs are one of the most simple of fireworks devices, but they offer the opportunity to learn some basic fireworking skills, and also to get in the habit of practicing basic safety precautions.
Parts of a Gerb

Cross-Section of a Homemade Gerb/Fountain
Paper Fireworks Tube
I'll be using a 1/4-inch wall, 3/4-inch ID, 7-1/2-inch long, paper fireworks tube in this project: Skylighter tube #TU1068, or cut from #TU1065.This size tube, 3/4-inch ID, and the rockets and gerbs that are made with it, are traditionally referred to as "one-pound" tubes and devices.
Clay Nozzles
The nozzle and bulkhead in these fountains uses dry bentonite clay. Do NOT add any water to it. It will compact just fine in dry form.Fuel
In the Skylighter Project Plans article, How to Make Saxon Fireworks Wheels by John Werner, two fuel formulae are included. I have used these compositions for saxons, stars, and gerbs, and they are among my favorites.I have slightly modified the two formulae so that they use only readily available chemicals.
Gold Glitter Gerb/Fountain Fuel
| Component | Ratio | 72-Ounce Batch |
| Potassium Nitrate | 0.49 | 35.3 ounces |
| Airfloat Charcoal | 0.12 | 8.65 ounces |
| Sulfur | 0.06 | 4.3 ounces |
| Sodium Oxalate | 0.08 | 5.75 ounces |
| Antimony Trisulfide | 0.15 | 10.8 ounces |
| 200 mesh Magnalium | 0.10 | 7.2 ounces |
(For the Antimony Trisulfide, either Chinese Needle or Dark Pyro may be used.)
Silver Titanium Gerb/Fountain Fuel
| Component | Ratio | 72-Ounce Batch |
| Potassium Nitrate | 0.51 | 36.7 ounces |
| Sulfur | 0.10 | 7.2 ounces |
| Airfloat Charcoal | 0.09 | 6.5 ounces |
| Spherical Titanium | 0.30 | 21.6 ounces |
(For the Titanium, either fine (CH3010) or coarse (CH3001) metal may be used. Either one will produce its own unique effect. The fine will produce a short, dense spray of small sparks. The coarse will produce a longer spray of fewer, large sparks. In this project I am using the coarse titanium.)
Each gerb will use about 3 ounces of fuel, and I plan on making about 24 of each type of gerb for use in these projects. So I am going to make 72 ounces of each formula.
To make smaller batches, simply multiply the ratio amount of each component by your final batch size to determine how much of each chemical to use. For example, if I want to make a 12-ounce batch of the gold glitter comp, I determine how much potassium nitrate to use by multiplying 0.49 x 12 and get 5.88 ounces (which I'll round off to 5.9 ounces).
Starting Fuel
The two fuels above will be all I need if I am using tooling which forms the nozzle aperture as I ram the gerb. But, if I am using tooling which forms a solid nozzle in which I then make a hole with a twist-drill for the aperture, I want to ram a first increment of fuel which has no metal included in it. This eliminates the possibility of creating sparks with the drill.I only need a small batch of this starting fuel because I'll only be using one increment of it in each gerb.
Starting Gerb/Fountain Fuel
| Component | Ratio | 8-Ounce Batch |
| Potassium Nitrate | 0.73 | 5.85 ounces |
| Sulfur | 0.14 | 1.10 ounces |
| Airfloat Charcoal | 0.13 | 1.05 ounces |
Mixing the Fuels
You'll want to grind the potassium nitrate first. A ball mill will do the job but a $10 blade-type coffee grinder from Walmart is also great for small batches. Be sure to label the grinder you use as "oxidizers only."After weighing out the individual chemicals for one of the fuels, I screen the potassium nitrate, sulfur, and charcoal together through a 40-mesh screen, four times. I never put any chemicals like the antimony sulfide, magnalium, or titanium through my good screens because the metals will clog the holes in my screens, and future compositions that get screened could end up with some of the metals in them.
Then I put the screened composition into a bucket for which I have a lid. I screen the remaining chemicals through a fine-mesh-screen kitchen colander, or other cheap screen, allowing them to fall into the bucket, too.
Then I put the lid on the bucket and shake it for awhile to thoroughly mix the ingredients.
I add enough denatured alcohol (available in the paint department of stores like Home Depot) to form a workable putty with the consistency of bread dough. The glitter batch required 20 ounces of the alcohol by weight. The titanium batch required 16 ounces, and the starting fuel batch took 2.4 ounces. No extra water (there's usually some already mixed with the alcohol) is used when making these dampened compositions.
The putty is then screened through a 1/4-inch mesh screen onto a kraft paper lined tray. I've made a framed screen which fits nicely into some kraft-paper-lined metal cookie sheets.
After granulating the putty through the screen, I spread the granules out evenly with a coarse-toothed comb and allow them to dry thoroughly.

Granulating Fuel through a 4-Mesh Screen onto Kraft Paper
Note: This alcohol-granulation step greatly reduces the dust that gets produced during the following ramming operation. It produces soft, relatively dust-free granules which will crush easily during the ramming to form a densely consolidated fuel grain.
Tooling
Skylighter sells one-pound gerb tooling, #TL1110. I have a set of gerb tools that is very similar to that one.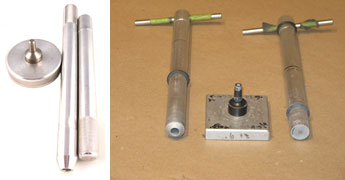
Skylighter One-Pound Gerb Tooling, and My Tooling Set
Note: You can see the rubber o-rings that I keep on my rammers. These keep dust from easily fluffing out of the tube as the rammer is inserted.
It is possible to make your own gerb tooling. I start out with two, 4-inch diameter discs cut out of 3/4-inch plywood (or these can be square). I also cut some lengths out of a piece of 3/4-inch diameter oak wooden dowel.

Paper Fireworks Tube and Homemade Gerb Tooling
I started by drilling a 3/4-inch hole, 1/2-inch deep into one of the plywood discs. Then, using the same centering hole, I drilled a 1-1/4-inch wide, 1/4-inch deep, recess in the disc.
The two plywood discs are glued together, and a 3/4-inch piece of the dowel is glued into the hole of that same size. This assembly is allowed to thoroughly dry.
I've cut two 9-inch lengths of the dowel to make the rammers. I leave the one rammer flat-ended, with the ends sanded smooth. I bevel the end of the other rammer at a 45-degree angle except for the center 1/4 inch, using my belt sander.
The convergent angle that is formed on the top of the nozzle by this beveled former helps direct the hot gasses out of the aperture and reduces burn-through of the tube side-wall.
I use aluminum foil duct-tape to cover the flat top of the base nipple and the end of the flat bottomed rammer so that they don't stick to the clay or fuel as they are being rammed.
It is also possible to make longer-lasting rammers out of aluminum rod.

Finished Homemade Gerb Tooling, With Aluminum and Wood Rammers
The only additional tools I'll need for this project are a solid post on which to pound the gerbs, a rawhide mallet, a funnel, and some measuring spoons. I'll also use a drill bit to hand-twist-drill the nozzle aperture.
I ram devices on a 6x6x36-inch piece of treated pine, which absorbs the shock nicely without bouncing.
A rawhide mallet transfers all of its force to the rammers, whereas a rubber hammer would bounce off and would not be nearly as effective.

Tools for Ramming Gerbs
Let's Make Some Gerbs
The first step in the actual process of making gerbs is to place the paper tube onto the tooling base, and ram the nozzle clay. I place a mark on the nozzle end of the tube because once the completed gerb is rammed it will be difficult to tell the nozzle end from the bulkhead end.As you can see in the sketch of the gerb, I want the actual throat of the nozzle to be about as high as the tube ID, or 3/4 inch in this case.
I mark my nozzle-forming rammer with a Sharpie at the point where the top of the tube will be when the rammer is inserted far enough to be sitting at the top of such a nozzle.

Marking the Nozzle Rammer, and Ramming Clay to Form Nozzle
Then I experiment with introducing and pounding enough clay to form that 3/4-inch tall nozzle. In this case, 0.5 ounce (a flat tablespoonful) of the bulkhead clay created just the right nozzle thickness once it was rammed.
I used 16 moderate blows with the mallet to ram/consolidate the clay. A very slight bulge in the tube where the nozzle is pressed is good; you can see in the sketch that perfection is when you ram the nozzle and bulkhead so that they slightly bulge the tube wall. This locks them into place and helps them withstand the extreme gas pressures of the burning gerb. But obviously I don't want to apply so much force that the tube is damaged or splits.
I've been pounding nails with a hammer just about all my life, so it comes naturally to me. It pays to take some time to practice swinging the mallet smoothly and with consistent blows, and it is an acquired skill which will pay off handsomely once it is mastered.
Now I want to press my fuel grain in the paper tube on top of the formed nozzle. I place a mark on my flat-ended rammer where the top of the tube is when that rammer is inserted all the way to the top of the nozzle's beveled edge. Then I put more marks on the rammer every 1/2 inch below that first mark.
The last mark is 1 inch from the lower end of the rammer. That marks the top of the last fuel increment.

Marking the Flat-Ended Rammer for Increments of Fuel
I want to ram the fuel in half-inch increments so that they are very solidly consolidated. Very slightly rounded half-tablespoons-full of the fuel produces increments of that size in these tubes.
If this is a gerb in which I'm going to have to drill the nozzle aperture, then the first increment of rammed fuel is made with the starter mix which has no metal in it.
Note: I measure out about 3 ounces of the fuel into a paper cup, and this is the only exposed composition in my work area as I work. I keep the rest of my compositions in tightly capped containers. Minimizing this kind of exposure can save my life in case of an accident. I wear safety glasses while I work. I consider it to be safe to hand-ram the fuel with the spherical titanium in it, but I would not do so with a rougher-edged, sponge-type titanium.
After that starter increment, I ram increments of the standard fuel until I reach the last mark, which leaves a 1-inch empty void in the tube. I use 8 moderate blows of the mallet to consolidate each increment of the fuel. Again, I try and repeat these blows with the same force each time in order to produce consistently burning gerbs. If I don't, my gerbs will burn with differing degrees of power-sometimes producing a high spray, then dropping down lower. I want all my gerb's to burn the same.
I now ram one increment of the bulkhead clay, which fills 1/2 inch of that void, and leaves the last 1/2 inch of the tube empty.
Note: One secret to really effective gerbs is to ram about 1/8 inch of black powder, similar to FFg sporting grade powder, in between the final fuel increment and the clay bulkhead. When the gerb burns to that point, the black powder burns almost instantaneously, producing a "bounce" which finishes the gerb off dramatically, leaving no doubt that it's done.
The commercially made gerb tooling that I have automatically forms a 5/16-inch nozzle aperture. If I have pressed a solid nozzle with homemade tooling, I use a 5/16-inch drill bit, gently twisted into the nozzle by hand, to form the hole in the rammed nozzle clay. I let the drilled-out clay fall back into my tub of clay because it's just fine to re-use it. I drill until the bit is just through the clay and into the starter fuel.
As you'll see a bit later in this essay, it is also possible to use different size drill bits to vary the size of the nozzle hole. This also changes the thrust of the gerb, the height of the spray of sparks, and other aspects of the effect.
I then take some Chinese Visco fuse, double over about 1/2 inch of it, making a little "V" on one end of it, and insert that doubled end into the nozzle hole. I like the Chinese Visco, as opposed to the American, for lighting rockets and devices like these gerbs because it throws out a tremendous amount of sparks as it burns. As a result, it lights things very reliably.
The gerb is now ready to be stuck in the ground, taped to a stake, or inserted into a wood base with a drilled recess, ready for ignition.

Drilling the Nozzle Aperture and Fusing
Final Results
These gerbs, made with either fuel, burn for 20-25 seconds. The glitter fuel produces a graceful, soft, golden spray of popping glitter globules. The titanium fuel produces a forceful, bright spray of silver sparks.I have to say that even after almost 20 years making fireworks I still get excited when I make one of these devices, take it out into the field, and light the visco, waiting to see how it performs. I suppose it's the one activity I've never lost interest in.
I won a PGI gerb competition a few years back with a pair of 1-1/2-inch ID gerbs. I carefully weighed out alternating increments of the glitter and titanium fuels, so that the pair burned with simultaneous pulses of the bright titanium sprays alternating with periods of the soft glitter plumes. Then I ended both gerbs with dramatic "bounces." I was very pleased with the fountains and apparently so were the judges.
Experiments
The final resulting pressure at which a gerb burns is determined by the power of the fuel and the size of the nozzle aperture. With a given fuel, the pressure and height of the spray can be adjusted by changing the size of the hole in the nozzle.A large hole, or no nozzle at all, will result in a low pressure, short spray, and the fuel will burn relatively slowly. When these fountains are hung in a line, upside-down, to create a waterfall, this sort of slow, graceful, low pressure burning is desirable.
A smaller aperture will result in high pressure, tall spray, and faster burning of the fuel. Too small a hole will result in the strength of the nozzle or tube being exceeded, and the tube will violently rupture or the nozzle will be blown out of the tube.
So within certain limits the size of the drill used to make the nozzle aperture can be adjusted and the burn of the resulting gerb can be observed and noted.
This is all just part of the fun of fireworking. In my playing around, I found that the glitter gerbs work very well with 1/4-inch to 5/16-inch nozzle apertures, burning for 25 seconds. With a 3/16-inch hole, the gerb burned 3-5 seconds faster with more thrust, and the glitter effect was almost completely lost.
The titanium gerb results were: 5/16-inch aperture - 20 second burn with about an 8-foot tall spray; 1/4-inch aperture - 20 second burn with a 10-12-foot tall spray; 3/16-inch aperture - 16 second burn with an impressive 16-foot tall spray.
A Glitter Gerb, Titanium Gerb and Pulsing Gerb
A 1/4-teaspoon "bounce" increment of FFg sporting black powder produced a very impressive final "thwump" at the end of the gerb's burn.
Stay green and have fun,
Ned