Large Reloadable Glitter Comets
I love a comet. I just love 'em. They are incredibly, visually dramatic. They're graceful, and they are unlike anything else in fireworks.
If you don't know exactly what a comet is, it's a single slug of pyrotechnic composition ignited and fired from the ground up, often at angles. The comet burns from the time it is launched until it burns up. Done right, a comet goes up, and burns up after starting to arc down.
Ironically, although individual comets are a staple of commercial displays, consumer fireworks versions are really hard to find. Sure, you can find multi-shot comet cakes. But you'll have a hell of a time trying to find individual comets that you can use in your own backyard displays.
You can fire them individually more or less straight up into the air or at low angles. They are spectacular when fired electrically, angled low, and crossing each other. Or fired electrically in sequence, or in a fan all at once. Their colors and effects can match or be co-coordinated with colored stars above. The options are endless, and audiences absolutely love them.
They can be gold or silver, or colored, or combinations of the above. They can be "mated," basically a sandwich of two effects, for instance a red and a gold glitter. This would look like a redheaded comet with a long gold tail twinkling behind it.
There's a fairly new effect called "matrix" comets. Basically, you create a base composition (the matrix), such as a gold glitter composition, and then mix colored stars or other effects into that matrix when you press the comet. As the comet rises, these colored stars will look like bright droplets of color. I saw a 6-inch gold/red matrix comet that the late Paul Geremia made, and I thought I had died and gone to heaven.
But, first things first. You first gotta know how to make big comets. And you need to know how to make "reloadable" comets. That is, comets that can be loaded into mortars and mortar racks, positioned however and wherever you want them.
So, if making seriously gorgeous comets is your game, this project has your name on it. Read on, and enjoy.
Have fun.
Harry Gilliam
How to Make Reloadable Glitter Comets
By Ned Gorski
Introduction
In How to Make Gold Glitter Comets I described the process of making relatively small, single-shot gold-glitter comets. These were designed to be fired out of a star gun or a small mortar, with the black powder lift charge preloaded into the bottom of the mortar, and a piece of Visco fuse inserted into the bottom of the gun.In this article I want to take that process one step further, and show how to make reloadable comets, similar in construction to festival-ball and aerial fireworks shells. This construction technique allows the comets to be easily and quickly loaded and fired, and reloaded as desired.
I'll show you how to construct 1.5-inch, 3-inch, and 4-inch comets. The smaller ones can be fired out of a typical 1.75-inch festival-ball shell mortar. The 3-inchers can be fired out of a 3-inch mortar PL3183, and the 4-inchers out of a 4-inch gun PL3184.
Warning: Fireworks devices such as comets and standard aerial shells are only safely fired out of mortars constructed of paper, fiberglass, or HDPE plastic. Never fire these devices out of improvised and unsafe mortars constructed of PVC pipe or materials other than those listed above.
The 3-inch comets actually measure 2.5 inches OD, and the 4-inch ones measure 3.5 inches OD. The 1.5-inch comets do measure 1.5 inches OD, and are to be fired out of a mortar between 1.75 and 2 inches ID.
There is perhaps no simpler a device than a comet, but a beautiful gold-glitter one never fails to catch the crowd's attention and impress them. The smaller ones described here are perfect for that backyard, consumer-type fireworks display, and the larger ones can fill the sky during any large, professional-type show.
There are also simple, fast-burning charcoal compositions, which can be used for this type of comet. They leave a bushy, orange spark trail while ascending into the sky.
Gold Glitter Comet Composition
In this particular project, I'll be using the D1 Gold-Glitter composition that was demonstrated in the article cited above. If you've been following along with the articles this year, the procedure for mixing up a comp like this will sound very familiar.To determine how much of this composition to mix up, I need to plan the comets that I am about to make. Each size comet, if it is pressed with the hydraulic press, uses the following amount of the dampened composition:
| Size of comet | Amount of composition |
| 1.5-inch diameter, 1.5 inches long | 2.75 ounces |
| 2.5-inch diameter, 2.5 inches long | 12 ounces |
| 3.5-inch diameter, 3.5 inches long | 32 ounces |
Note: The 2.5 and 3.5-inch comets have to be pressed with a hydraulic press in order to achieve dense consolidation of the composition. The 1.5-inch comets can be hand rammed using a pounding-post and mallet, or they can be pressed hydraulically.
If they are hand rammed, though, only 2.25 ounces of composition will be able to be consolidated into a 1.5-inch long comet. Hand ramming simply will not achieve quite the density that a press can.
I plan on making four of the 1.5 inchers, and one each of the larger ones. So, I need to make 55 ounces of the damp composition. I will be adding 5% (2.75 ounces) of water to the comp to dampen it, so I'll actually end up with 57.75 ounces of the damp composition. This is 2.75 ounces more than I need for my planned comets, so I think I'll simply press one extra of the 1.5 inchers rather than complicate the math involved. It never hurts to have an extra comet.
In the small glitter comet article, I described starting with a black powder meal base. This time I'll start with the individual raw chemicals, which works just about as well.
| D1 Gold Glitter formula | % | 55 ounce batch |
| Potassium nitrate | 0.53 | 29.15 ounces |
| Sulfur | 0.18 | 9.9 ounces |
| Charcoal, airfloat | 0.11 | 6.05 ounces |
| Aluminum, atomized, 325 mesh | 0.07 | 3.85 ounces |
| Sodium bicarbonate | 0.07 | 3.85 ounces |
| Dextrin | 0.04 | 2.2 ounces |
I weigh each chemical out individually, and make sure each one, except the metal, will pass through the 100-mesh screen. If it won't, I'll grind it in the coffee grinder until it will all pass through the screen. I never put metals through the fine screens.
A coffee grinder is used to mill individual chemicals only, and once it has been used for an oxidizer such as the potassium nitrate, it is never used for a fuel such as the charcoal. A separate grinder is used for fuels.
The chemicals are all added to a plastic tub and shaken to mix them. Then the mix is passed three times through a 20-mesh kitchen colander and mixed once again in the tub.
At this point, I weigh the mixed composition to make sure its weight comes up to the desired 55 ounces. This step ensures that I weighed each component correctly, and that I didn't leave anything out. I can't tell you how many mistakes, and the resulting poorly-performing devices, this step can avoid. In actuality the total composition weight is typically a tenth ounce or so lighter than the total I was shooting for, due to some loss to airborne dust from the lighter components like charcoal.
2.75 ounces of water is added to the mix and it is all shaken in the tub again. Then it is passed through the colander again to completely integrate the water. One final shaking in the pail completes the preparation of the composition.
Pressing Comets
As I said, the 1.5-inch comets can be either hand-rammed or pressed in a small hydraulic press. I weigh out either 2.25 ounces of the composition, for hand-ramming, or 2.75 ounces for pressing. The comp is poured into the comet pump sleeve and the comet is either rammed or pressed.
Hand-Ramming, and Hydraulic Pressing, 1.5-Inch Glitter Comets
The same is done for the 2.5-inch and 3.5-inch comets; comets of these sizes must be pressed hydraulically.

Pressing 2.5-Inch and 3.5-Inch Glitter Comets
When using the press, I apply about 5000 pounds of force on the1.5-inch comet pump, which amounts to about 3000 psi on the composition.
With the larger pumps, I'll apply about 10,000 pounds of force, which applies about 2000 psi on the comp in the 2.5-inch pump, and about 1000 psi on the comp in the 3.5-inch one. This is enough pressure if I allow the press to "dwell" for a minute or two on the pump, slowly compressing the comet, while I regularly pump the pressure back up.
One of the things I really love about this glitter composition is that once it has been pressed, it forms a rock-solid comet. This also makes the comets a bit difficult to extract from the pumps once they have been pressed (no problem extracting a hand-rammed comet, though). A comet extraction-sleeve can make this final process much easier. The sleeve is simply a hollow cylinder that the pump sits in the top of, and into which the comet is pushed with the press.

Using an Extraction-Sleeve to Push a Comet Out of the Pump

1.5-Inch, 2.5-Inch, and 3.5-Inch Gold Glitter Comets
Drying the Comets
Since these comets only contain 5% water, they come out of the pump relatively dry, and pieces of them can actually be lit and tossed even before they are dried.But, because they contain potassium nitrate, fine aluminum, and sodium bicarbonate, there can be unwanted chemical reactions if they are allowed to get too hot before they dry a bit. So, I air dry them in the shade for a few days before they are put into the drying chamber for a few more days to complete the drying process.
You can notice on the tops of the two large comets in the photo above that I've written their weights with a Sharpie marker. I did this immediately after pressing them, and then once a day as they dry. Once their weight equals 0.95 of the original weight, I know all the water is gone and they are completely dry.
Priming the Comets
You can also see in the above photo that the 1.5-inch comets have been primed, per the instructions in "How to Make Gold Glitter Comets". I do prime both ends of these comets, rather than only one end, which I did in the original article because the comets could be used as rising tails on shells. Priming both ends ensures that the flame propagates quickly to the whole comet's surface when it is ignited.
Priming Comets
Finishing the Comets
In "Making Mines", I illustrated a simple "piston" which is used to propel all the mine-stars out of the mortar at one time, and straight up into the sky.I'll use a similar piston under each of these comets.
"Why", you might ask.
Often, when you see a large comet shot out of a mortar, you'll see some small, lit fragments come out of the mouth of the gun with the main comet, or else you might see the whole comet split into two or three pieces, ruining its effect.
I envision these defects to be the result of the impact of the initial blast from the black powder lift hitting the bottom of the comet, possibly chipping the bottom edges off of it, combined with the comet twisting as it is propelled up the mortar. In that case, the comet is wedged in the mortar, and suffers damage due to those stresses. All of this, of course, occurs in a matter of milliseconds.
To prevent such damage, and to get the comet out of the gun in one piece, I employ the piston. This is made out of two cardboard discs, with a hole in the center of each, and a length of cardboard tube glued between them. The discs and tube are the same OD as the comet, and the tube is about that same distance long.
None of these dimensions is extremely critical, though. While I like to have the discs the same diameter as the comet, the tube can be a bit smaller or larger, and the tube can be a bit shorter than the comet's OD. This ain't rocket science. It's comet science!
Unlike the pistons I showed in the article on making mines, with these comet pistons I only put one hole in the center of each disc to allow fire to get to the comet easily. I also only use the one, large tube, instead of the two tubes used in the mine pistons.

Cardboard Pistons Sized to Be Used Under Each Size Comet
I prepare black powder lift bags, and insert quickmatch leaders, once again as described in the mines article. The amount of lift for each comet size is as follows:
| 1.5-inch comet | 0.3 ounce of FFg or FFFg sporting black powder |
| 3-inch comet | 0.75 ounce 2FA black powder |
| 4-inch comet | 1.5 ounces 2FA black powder |

Black Powder Lift Charge, Baggie, and Quickmatch Fuse Leader
For the quickmatch fuse leader, commercial quickmatch, homemade quickmatch, or fast-fuse wrapped with aluminum foil duct tape may be used.
The lift charge and leader, the piston, and the comet are then wrapped up in two turns of kraft paper, which is glued to itself. The ends of this wrapper are then tied closed with clove hitches, and the excess paper is trimmed from the bottom. The size of paper for each size comet is:
| 1.5-inch | 8x11 |
| 3-inch | 11x18 |
| 4-inch | 16x25 |
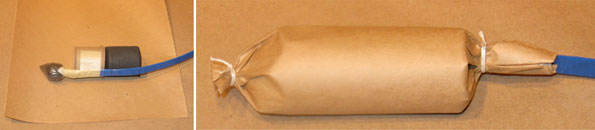
Kraft Paper Wrapping the Comet, Piston, and Lift Charge
Visco fuse is installed into the quickmatch leader and taped in place. The leader is then S-folded and tied to keep it neat until the comet is loaded into a mortar.

Finished 1.5-Inch Gold Glitter Comet
Results
1.5-Inch Gold Glitter Comet Ascending
The second comet in the video is made with a slightly different formula I came up with by modifying and combining a couple of other formulae. It burns a bit more slowly (yes, the comet did burn out before it hit the ground) and the tail is a longer, slightly more delayed glitter, which sparks like a Senko Hanabi sparkler. I've labeled this glitter formula N1.
You can see that one of the advantages of this formula is that with a longer burn time, comets made with it can be pumped about 2/3 as long as their diameter (The comet in the video was 1.5 inches long, which I'd shorten to 1 inch next time). So, it's a bit more economical to make and use.
| N1 Gold Glitter formula | % | 55 ounce batch |
| Potassium nitrate | 0.51 | 28.05 ounces |
| Sulfur | 0.15 | 8.25 ounces |
| Charcoal, airfloat | 0.10 | 5.5 ounces |
| Aluminum, atomized, 325 mesh | 0.08 | 4.4 ounces |
| Sodium bicarbonate | 0.12 | 6.6 ounces |
| Dextrin | 0.04 | 2.2 ounces |
Try both formulas and see what you think. I will say that when one of the two-pound, 4-inch D1 babies is fired, it's hard to take your eyes off of it. Very impressive, indeed!
So, you have your homework. Two formulas to play with, and three different sizes to make.