4-inch Daylight Shells for Beginners
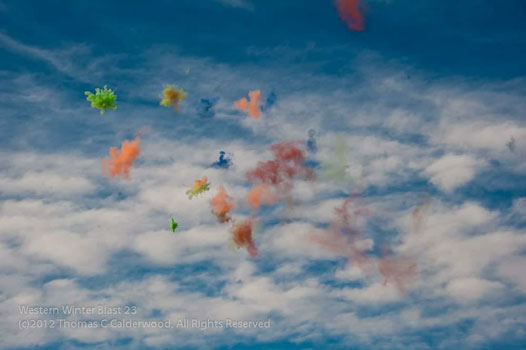
Have you ever wondered how to make a simple daylight effect shell without using sensitive, sometimes toxic, chlorate based smoke star compositions?
Well, you're not alone! Over the years I often wondered how a fireworker could make a simple, safe, yet effective daylight shell quickly with decent results. ...and I think you'll agree I've found a simple method which yields great results without all of the hassles of other methods.
As it turns out, it works fantastic for our purposes, and easily scales up to 4" shells, a perfect size for a backyard. They create a nice colored burst and are simple to produce. These shells can also be particularly useful for those trying to dial in their lift times and amounts without wasting your precious stars you worked so hard to make.
The best thing about these shells is they can be made by the dozen in a very short amount of time, especially when using plastic hemispheres. This fact makes this project particularly useful for those of us who live in a colder climate, and need a quick pyro fix without freezing to death working hours on end in the pyro shop.
As with ANY fireworks project, there is always an inherent risk involved with manufacturing and it is up to YOU to minimize that risk. This involves maintaining a clean workspace void of any excess compositions and working in a well ventilated area preferably outdoors. Never work inside of a residence, attached garage, or any other inhabited building. It is up to you to know the legalities of pursuing this hobby in your area - we are NOT responsible for any misuse of this information.
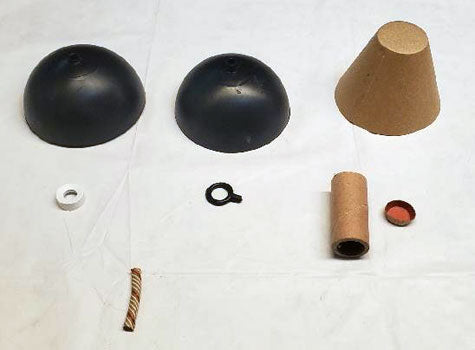
MATERIALS REQUIRED
- 4" plastic shell hemispheres (#PL2060)
- 1/4" time-delay fuse (#GN2010)
- 4" Paper Lift Cups (#PC1185)
- Quick paper fuse (#GN1205)
- 1 pound rocket tube (#TU1068)
- 3/4" or 1" wide strapping tape
- Kraft paper (or 3/4" plug)
- Sandwich size ziplock bags
- Colored line chalk or colored "fun run" powder.
- 2FG Black powder, homemade or commercial.
Recommended Prerequisite Projects
We recommend reading the following material, as this project will require some basic knowledge and materials.
If you would prefer to use commercial black powder for this project, instead of making your own for lift and burst I'd recommend using something similar to Goex (FFG) 2Fg grade black powder. This can usually be found at your local gun shop, available by the pound.
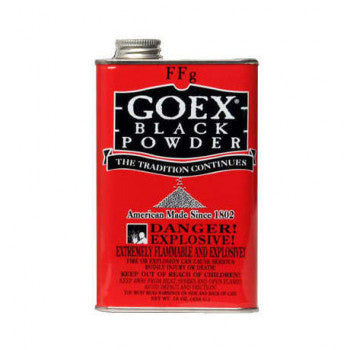
NOTE: Stay away from using Black Powder substitutes like Pyrodex or 777, as these are NOT actual black powder, and will not work reliably as a lift or burst for our shell building purposes.
If you decide to use your own homemade powder - and we recommend you do as learning to make quality black powder is paramount in this hobby. We will be using the following ratio for black powder.
| Ingredient: | Percent | Grams |
| Potassium nitrate: | 75% | 75g |
| Charcoal: | 15% | 15g |
| Sulfur: | 10% | 10g |
| Total: | 100% | 100-gram batch |
We will be using black powder for both lift and burst in this project since it is mainly geared towards hobby aerial shell building. While more energetic compositions such as flash or whistle mix can be used for burst charge, they are not necessary nor recommended for this project.
BUILDING THE SHELL
Now let's get to the fun part and start building our shell!
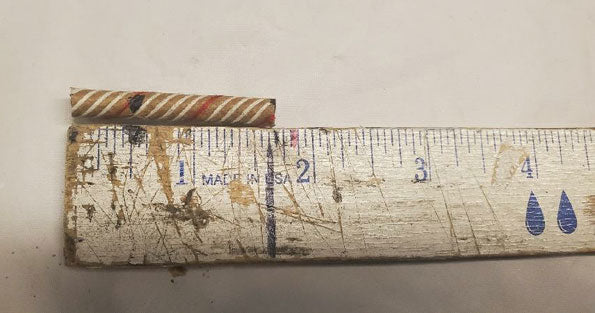
Start off by pre-cutting your time-delay fuse. The length of the fuse will determine the time it takes from lift to burst on your shell, for a 4" shell I typically time them between 3 and 3.5 seconds depending on the effect. Shooting this specific type of shell too high e can diminish the effect, so we will use 3 seconds of time delay.
Since my roll of time fuse burns right at 3 seconds per inch I will cut my time fuse, and add an extra half inch for our crossmatch making our fuse length 1.5" total. Crossmatching our fuse will make sure our shell lights upon lifting out of the mortar, since time fuse burns through its core, rather than from the outside in like traditional visco.
Now that we have our time fuse cut, we can move onto the next step and start prepping the plastic hemispheres.
Using a hot melt glue gun, apply a small amount of glue to the outside of our time fuse and insert it into the shell half with the 1/4" fuse hole by twisting as you insert it to create a nice seal. Please remember to not over insert your fuse, using your 1/2" crossmatch line as a point of reference as shown below, ensuring to only insert the fuse about a 1/4" before we reach our crossmatch line, this will allow room for the glue dam.
Once the glue cools, flip the shell half over and apply a generous amount of glue around your time fuse as shown in the following picture.
Next, we are going to glue our fuse washer over the time fuse on the outside of the shell. You will notice one side of the plastic washer has a cavity, and one side has a slight concave. The concave side will snap onto the outside of the shell casing over the time fuse. Once again apply a generous amount of hot glue to the ring before snapping it on, and fill the cavity with hot glue as shown below.
Note: This step is important because it will help create a nice solid barrier between our lift charge and the inside of our shell, which could pre-ignite without it. This method can also be used when making paper shells by cutting a small 1/2" section of a 3/4" I.D tube placing it over the time fuse, and filling the cavity with glue.
While we wait for the glue to cool, go ahead and hot glue your fuse/leader lowering ring onto the top half. This will help anchor our shell leader fuse for lowering into the mortar later on. It also snaps into the shell, just like our fuse washer did.
Now we can crossmatch our time-delay fuse.
What is crossmatching you ask?
Crossmatching our time fuse will help our time fuse light upon lifting out of the mortar. Time fuse must either be split or punched, with a secondary fuse inserted into it such as blackmatch since it burns through its core. I typically like to crossmatch my fuse before I complete the shell, as I never enjoyed cutting into a live shell for safety purposes. Although it is just a matter of preference.
Crossmatch your fuse by using a very sharp razor, and slowly pressing down without using a sawing motion. Split the fuse until you reach the 1/2" limit mark we made earlier. For our crossmatch, we will be using blackmatch which can be harvested out of the paper quick fuse sold by Skylighter if you do not have access to regular quickmatch.
Insert two pieces of blackmatch into your split fuse down to the 1/2" mark as shown below.
Next, take a piece of dental floss or twine, and tie the top of the split closed to hold your crossmatch in place.
For the next step, we will be gluing our burst tube over the time fuse on the inside of our shell. This will hold our burst charge, helping with containment while also keeping the burst charge separated from our chalk or colored powder. It is important that the two components remain separated since the chalk is an inert substance it would render our black powder inert as well if the two mixed. This would make the shell fail at apogee causing it to return to the ground unexploded, which could be very dangerous for the shooter, and any bystanders inside the fallout area.
For our burst tube, we will be using a 2.5" x 3/4" i.d tube. If you do not already have a tube this size, a 2.5" long section of Skylighter's 1-pound rocket tube, or 1-pound stinger missile tubes work great for this purpose.
Glue the tube over time-delay fuse, making sure it's centered over the fuse. Apply a very generous amount of glue around the seam where the tube meets the plastic hemi. Remember, we do NOT want our chalk to leak into the burst charge under any circumstance.
Once the glue is dried completely, we can move on to our next step and fill the tube with our FFG grade black powder. We are using black powder for this project which works very well for breaking such a "smoke" shell. However, you may certainly use more energetic comps such as flash or whistle ONLY if you are experienced with using them.
Fill the burst tube with black powder until it is filled about a 1/4" from the top of the tube, leaving room for our end disk or plug to cap it off.
If you do not have any 3/4" plugs readily available you can easily make one using a 3/4" dowel and tube, and a ball of kraft paper. (Finally a use for that Skylighter packing material!)
To make one, crumble up a ball of kraft paper so that it is about the same size as a gumball (about 1" diameter), and ram it through a 3/4" i.d 1 pound rocket tube using a mallet and a 3/4" dowel. Once solid, you can remove it from the tube by pushing it through with the dowel. You now have a perfect plug to cap off the burst tube with!

Now that we have a plug to use, insert firmly it into the top of your burst tube on top of the black powder burst charge. Fill the remaining space on top of the plug with hot glue and allow it to dry.
While we wait for our glue to dry, we can start filling the top half of our shell with our colored chalk powder.
First, line the inside of your top hemisphere with a plastic sandwich-sized ziplock. This will make mating our two shell halves and closing our shell MUCH easier later on.

Once you've done this, start filling your shell with line chalk until it is just below the centerline of the shell equator.
Once filled, go ahead and seal your bag up making sure to squeeze out the excess air while doing so.
Next, we will fill our second half, we will not be using a plastic bag for this half. So it is VERY important to check your glue seams for any possible leaks around the burst tube and plug!
Now we can mate our two halves together, for this shell I've found it easiest to take the shell half that is bagged and place it onto the bottom half. This will prevent any spillage of our contents.
Once the two halves are mated, use your fingernail to create a small gap between the two shell casings and apply your MEK, or plastic glue onto the shell seam using a dropper. Make sure to glue the shell all around before snapping the two halves together. Wipe off any excess glue, and allow the shell to dry for a while before moving on to the next step.
Once the glue has been allowed to dry, we can start taping our shell for extra reinforcement. Since we are using black powder for our burst, we will give it more containment to give us a stronger burst to expel our colored chalk. Taping the shell also helps give our shell more structural integrity for firing, as the lift charge could otherwise rupture the shell casing.
Start by applying a ring of 3/4" or 1" wide strapping tape around the equator of the shell.
Next, apply two rings going horizontally, as shown in the next picture.
We are going to repeat this step two more times, so we have a total of 3 layers of tape on each of the 3 axis(s).
Lifting The Shell
Finally, it's time to lift our shell for firing!
For this step we will need:
- Digital Scale
- 2Fg (FFG) Black Powder
- 4" Paper Lift Cup
- Quickmatch or Quickfuse
- Visco fuse
Start by weighing your shell on a digital scale. I weighed mine in grams for ease, you may also find you need to set the shell on a cup before weighing. Make sure to tare or zero your cup on the scale before weighing to get an accurate shell weight.
In this case, our shell weighs 463.5 grams. Typically the rule of thumb for shells of this size is about 10% of the shells weight in lift. However, since this effect is better suited for lower altitudes we will be using 8% of the shells weight, and adjusting as needed.
Some simple math can determine our lift amounts.
463.5 x .08 = 37.08 grams of lift total.
Weigh out 37.8 grams of lift on your scale, put it into a plastic sandwich baggie, and put it aside.
Now we need a shell leader to ignite our lift charge, which will also serve as a lowering mechanism to load the shell into a mortar for firing. For this purpose, I will be using quickmatch since I plan on electronically firing this shell. If you do not have an ATF license and do not otherwise have access to quickmatch you can use Paper Quickfuse available from Skylighter.
A 4" HDPE mortar tube is approximately 24" long, so I will cut a 26" long piece of quick fuse for our shell leader.
Before inserting your fuse into the bag that contains our lift, cut the end of your quick fuse at a 45-degree angle. This will help our leader pass fire and ignite our lift bag more reliability. If using quickmatch, it is especially important to strip off the last inch of paper, exposing the blackmatch strands.
Why is it important you ask? It is important. because quickmatch burns so violently, that it can sometimes be unreliable in lighting things. We remove the paper to slow down the match, giving the powder more time to light, as blackmatch only becomes quickmatch when encased.
Now we can insert the cut, unstrapped end of our shell leader into the bag containing our lift charge. I like to collect all of the powder into the corner of the bag and cut any excess plastic before inserting my fuse.
Once you have inserted your fuse you will need to tie, tape, or otherwise secure your fuse into the bag.
Once you've done this, place your bag of lift inside of your lift cup, apply an amount of hot glue on the inside lip of your cup and glue it onto the shell. Make sure the time fuse is contacting the black powder lift charge. For the final step, we can insert the end of our fuse into the ring on the top of the shell to anchor our shell for loading.
The shell is now ready to be loaded into your mortar and fired! Make sure your mortar is either buried 2/3 of its length in dirt, or in a rack if not secured with a base. Drop your shell in your secured mortar with the fuse extending out of the mortar, light the green visco leader and get away to a safe distance.
Please remember to do so in a large area away from trees and dry brush, and away from any dwellings. The typical rule of thumb is 70' of clearance per inch of shell size, so you should have at least 280 feet of space between the mortar and spectators.
Have fun, and be safe!
Get your 4-inch Daylight Shells
Supplies at Skylighter:
Make 4-inch Daylight Shells from start to finish faster then you ever thought possible!
20 finished 4-inch daylight ball shells.
If you order today you can get all the materials you need to make 20 daylight shells and save 20% off cost of the individual items by ordering the kit!
Each Kit Contains:
- 4-inch Plastic Ball Shells w/rings and washers (20 sets)
- 1/4-Inch Time Fuse (10 ft.)
- Quick Fuse (100 ft.)