How to Make Model Rockets
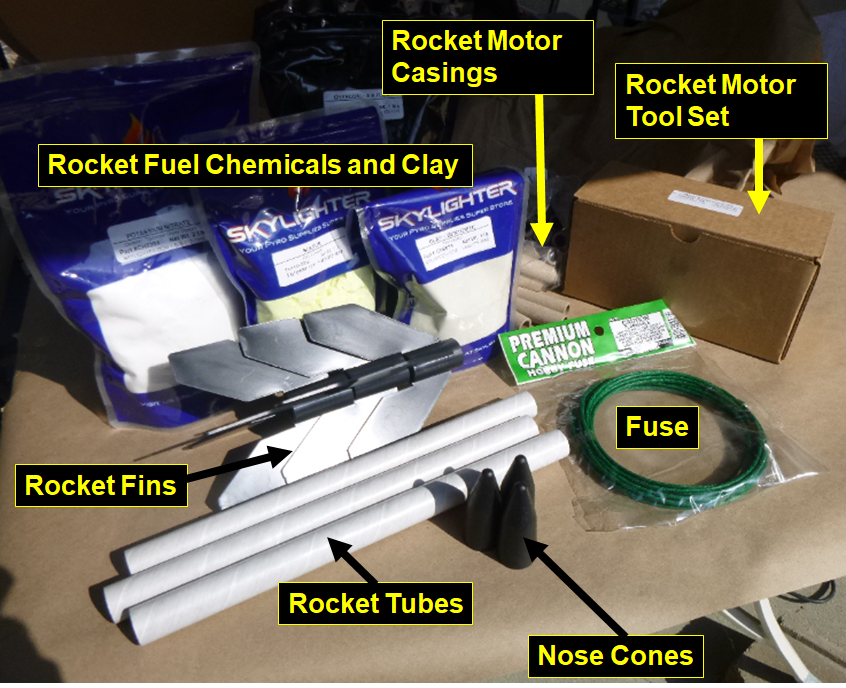
The Skylighter Model Rocket Kit allows you to build your own model rockets from scratch. EVEN THE ROCKET MOTORS. In this article, we will guide you through the process to build and fly model rockets similar to the ones you can buy in hobby shops. The engines you will build have a thrust output similar to a Estes A8-3 rocket motor which is a perfect flight profile for smaller launch fields.
The optional companion kit comes with a rocket tool set for ramming your own rocket nozzles and rocket fuel into the motor tubes, as well as the parts needed to build and fly 3 rockets and construct 50 rocket motors.
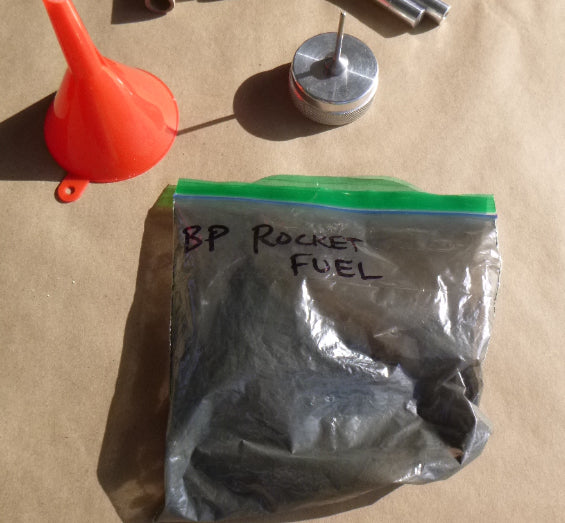
You will need some basic supplies such as glue, dental floss and a little FFg sporting black powder for the ejection charges on the motors. In the next section we will outline your shopping list so you have all the materials needed on-hand and a prepared, safe work space before starting the project.
Workspace:- Sturdy table
- Concrete or brick ledge
(Most of these items can be found at your local Walmart or any home improvement store)
- Scissors
- 7/64" drill bit
- Retractable blade or box cutting blade
- Dead blow hammer
- Leather Gloves
- Small Funnel
- Ruler
- Sharpie
- Hot glue gun and glue sticks
- Cookie cooling wire rack
- Digital scale, good up to 500g or more
- Electric coffee grinder (for potassium nitrate ONLY)
(Most of these items can be found at your local Walmart or grocery store)
- Sandwich size Ziploc baggies
- Popsicle sticks
- Paper or plastic weighing cups (4oz or 5oz work well)
- Garbage bag liner (ie: new, unopened 13 gallon trash bag)
- Dental Floss (low wax or non-wax type, Glide brand works well)
- Computer paper
- Packing Tape
- Glue
- Water spray bottle
- Paper Towels
- Baking Soda
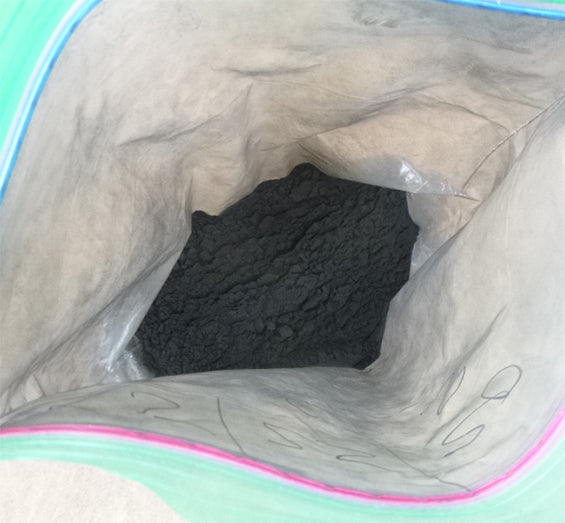
- Goex FFg grade Black Powder (from your local sportings goods store)
-
Skylighter's Model Rocket Kit
(Makes 3 rocket airframes and 48 engines)
https://www.skylighter.com/products/model-rocket-kit
- Optional: Skylighter's Black Powder Kit
(for making the FFg grade black powder used for ejection charges)
https://www.skylighter.com/collections/black-powder-kits
GET YOUR WORKSPACE READY
Go ahead and lay out the supplies from the kit on a sturdy table, outdoors, preferably on a not-too-windy day. An easy-up canopy works great as shade.
MAKING THE ROCKET MOTORS
The coolest thing about this model rocket kit is you get to make your own rocket motors! There is a bit of an art to it, but with a little practice, you can make some powerful motors that launch your rockets high into the sky. With a little practice you will be constructing motors with ease for considerably less then the cost at your local hobby shop. If you need a refill of the rocket motor casings, rocket fuel chemicals, and a few more rockets, check out Skylighter's refill kit for this project.
Setting up the Tooling for the Motors
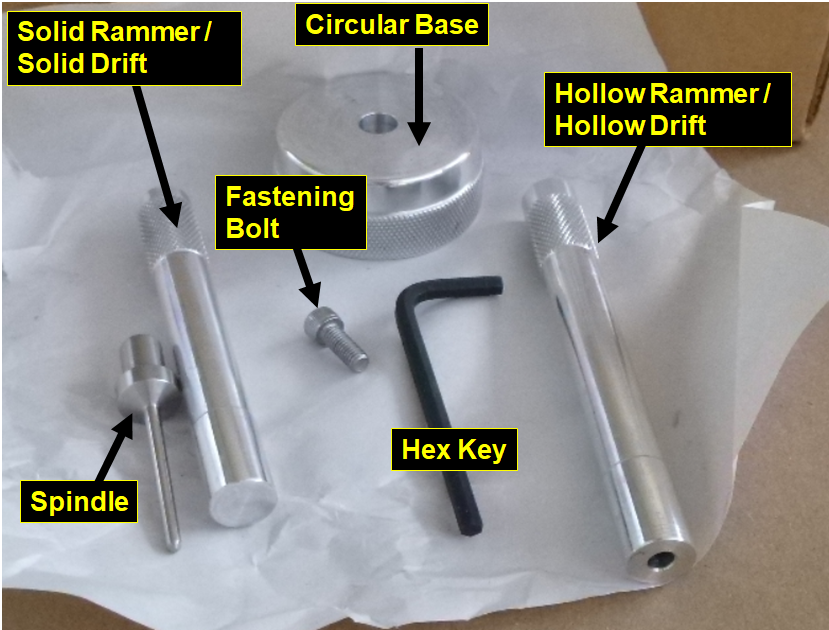
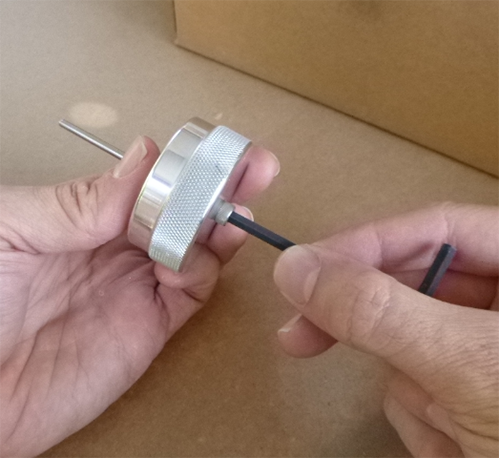
Within your supplies kit you will find a set of tooling used to perfectly form your model rocket engines. This tooling is the heart of the kit and comes disassembled for ease of storage and to keep it from being damaged.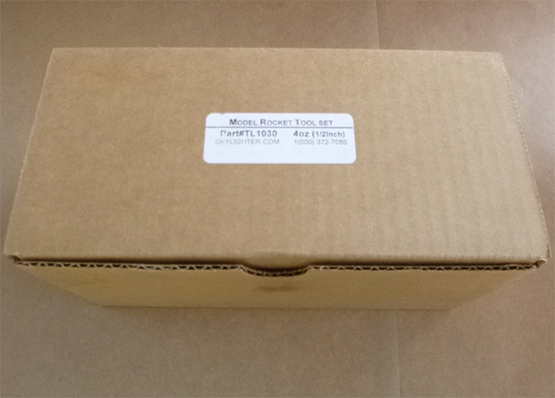

- A Circular Base to keep the tooling stable.
- A Spindle to form the nozzle and cored fuel grain.
- 2 Rammers (frequently called drifts) - One solid and one hollow to consolidate the nozzle and fuel grain.
- And finally a bolt to hold it all together.
Take the spindle, and put the fat base of the spindle into the hole on the large aluminum circular base. Holding these two parts together, flip the circular base over, and thread the fastening bolt into the bottom hole of the circular base. The bolt should engage the threads of the spindle, and bring those two pieces together. Finish tightening the bolt up with the hex key until it is snug and secure (there is no need to over tighten).

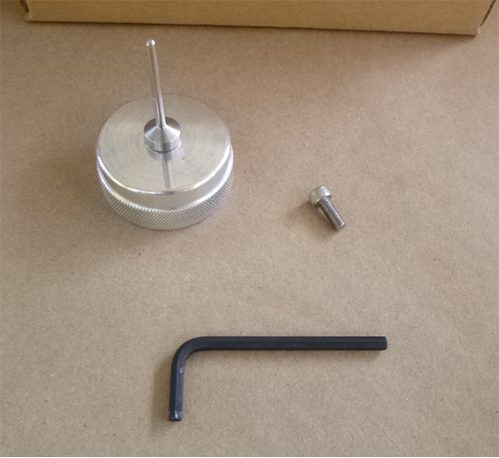
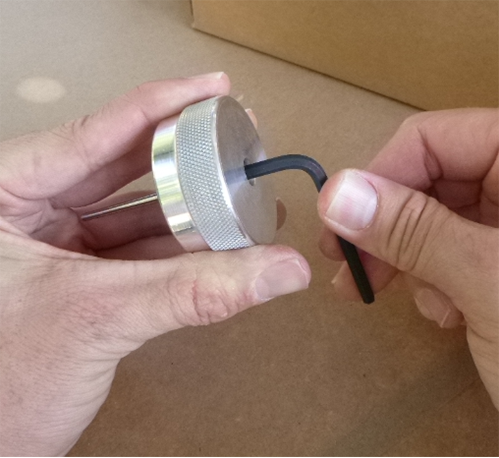
You should end up with a solid circular base securely fixed to your spindle, like this:
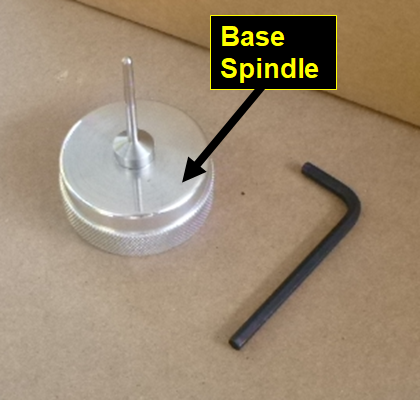
This tooling if treated well will be used to make countless rocket motors for years to come!
Understanding Rocket Fuel and the Motor Design
Here is where you will go from being an interested party to a rocket scientist or at least able to construct a motor capable of flying a model to great heights!
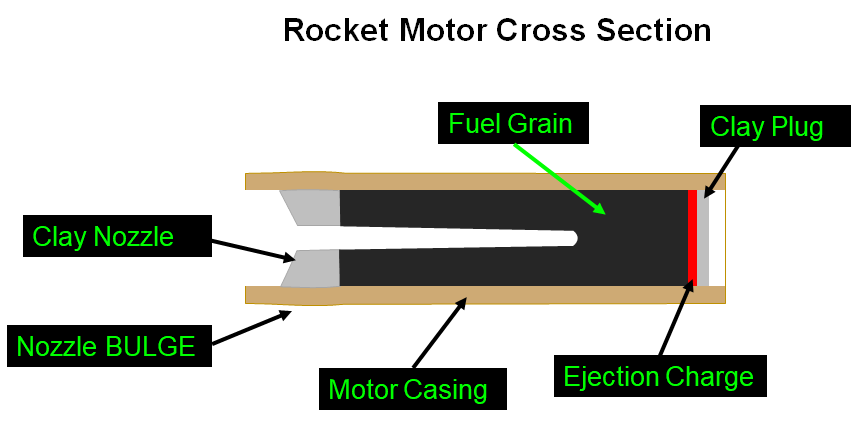
Note: Nozzle BULGE?? This is an important feature and we'll get to that part soon.
The tooling in this kit makes a core-burning fuel grain. A core-burning fuel grain allows us to control the amount of rocket fuel which is burning over the duration of the burn. This is referred to as the burn profile, and in this case we are designing a progressive burn with a delay burn at the end.
If you look at the surface area and imagine the fuel burning away on all exposed surfaces at the same rate you'll see the surface area increasing, then when the cored section is consumed a sudden decrease. This allows the motor to generate a rising thrust profile (pressure) until the rocket is at its maximum speed, then the rocket will coast until the ejection charge is reached.
Let's look at it another way: Most of the rocket fuel grain is consumed quickly in the beginning since there is a hollow core that goes up the middle of the grain. This creates the strong jet that pushes your model rocket quickly up into the sky. The remaining fuel grain portion that is packed solid on top of the core section then burns with less thrust, and acts as a delay fuel, letting the rocket glide for a while before the ejection charge ends the flight. The picture below is a snapshot of the transition from the “thrust” stage to the “delay” stage, where the motor goes from a core-burning type to an end-burning type.
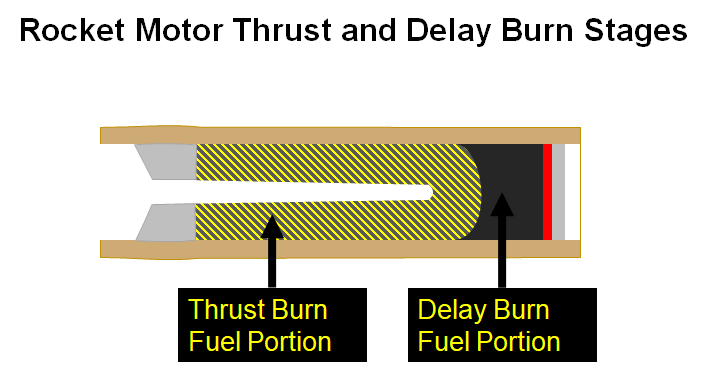
With this design there is no need for a “delay” composition. You can use one rocket fuel formula for both the thrust and the delay. Pretty neat, huh?
Making the Rocket Fuel
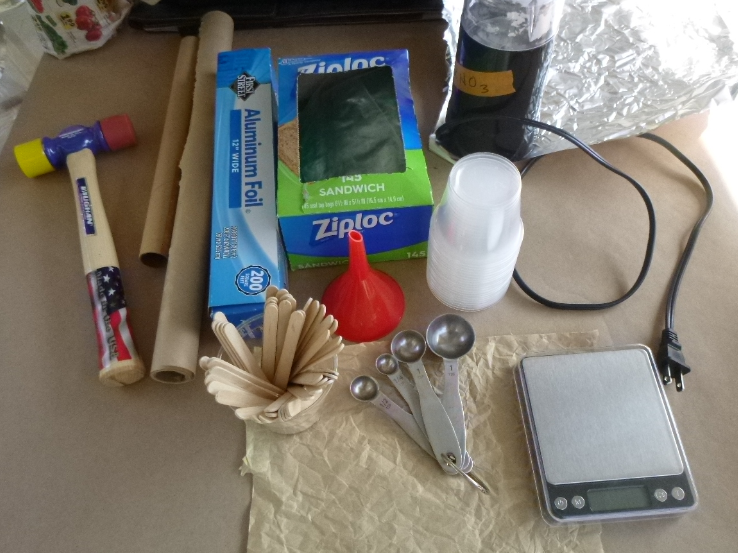
Before you start, get the supplies layed out to make sure you are not missing anything. Rocket fuel by definition burns “explosively” fast. So we want to limit the time this fuel is in loose form outside of the motors.
Pro Tip: As mentioned before we should be performing this step outside on a wind-free day. Our goal is to work mindfully avoiding any sources of accidental ignition. This means no smoking, no sources of flame, static or sparks. Look around your work area and remove any items that are not needed so you have room to work and an uncluttered environment. Lastly smart rocketeers change into cotton clothing which covers exposed skin. This way if there was to be a accidental ignition you have protected your skin from the heat of combustion.
Tools & Supplies:
- Digital scale, good up to 500g or more
- Electric coffee grinder (for potassium nitrate ONLY)
- Drill and 7/64" Drill bit
- Dead blow hammer
- Sharpie (for marking things up)
- Ziploc baggies (Sandwich size are good)
- Popsicle sticks
- Weighing cups (4oz or 5oz work well)
- Small Funnel
- Measuring Spoon (1/4 tsp)
- Safety Goggles
- Potassium Nitrate
- Charcoal powder
- Sulfur powder
These rocket motors work well with the following fuel formulation:
| Chemicals | Percentage | 100g batch | 8oz batch |
| Potassium Nitrate | 55% | 55g | 4.4 |
| Charcoal, AF | 25% | 25g | 2.0 |
| Sulfur | 20% | 20g | 1.6 |
| Total | 100% | 100g | 8.0 |
Making the Rocket Fuel
First, take some of the potassium nitrate from the kit, and scoop it into a coffee grinder and grind it really fine in short 5~10 second bursts, shaking and tapping between each burst. Our goal here is to reduce the potassium nitrate into a flour like fine powder. It's not possible to over grind the potassium nitrate. Take your time on this step. It's critical to the proper function of your motors. Coarse potassium nitrate will not produce the thrust needed for your rockets to fly.
Note: You should NEVER grind a mixture of an oxidiser and a fuel. Only grind the potassium nitrate alone, never mixed with the charcoal or sulfur.
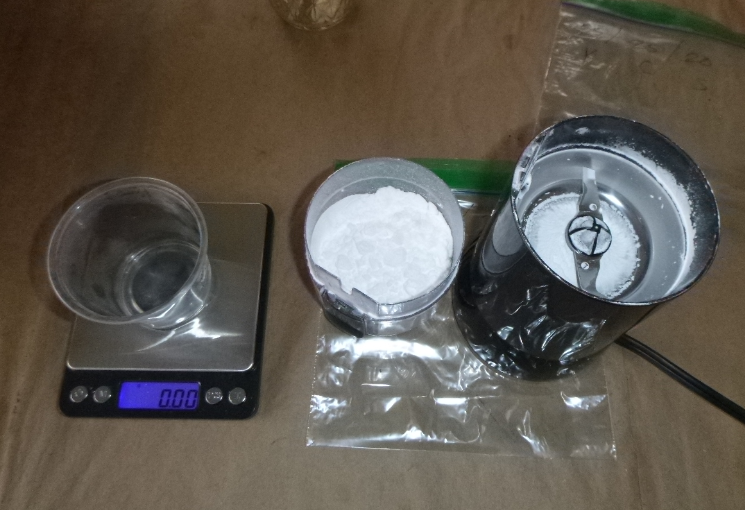
The sulfur and charcoal fuels that come in the kit are already ground fine enough for the rocket fuel, and can be used as is.
Using a popsicle stick, weigh out the ground up potassium nitrate (KNO3) into a weighing cup placed on a digital scale. Add it to a plastic baggie. Use the sharpie to label the bag.
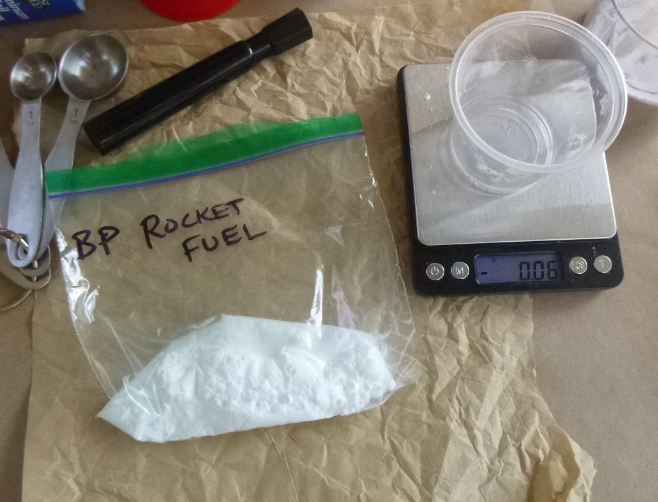
Do the same for the charcoal and sulfur and add it to the rocket fuel baggie. Once you have your nitrate, charcoal, and sulfur added to the baggie, remove any dust that may have found its way into the zipper of the baggie, then seal the baggie really well.
Note: Now that your potassium nitrate is ground, and all chemicals are weighed out we are ready to clear our area of electrical cords, coffee grinder, and the scale. Our goal should be before we have any rocket fuel made to remove any sources of ignition.
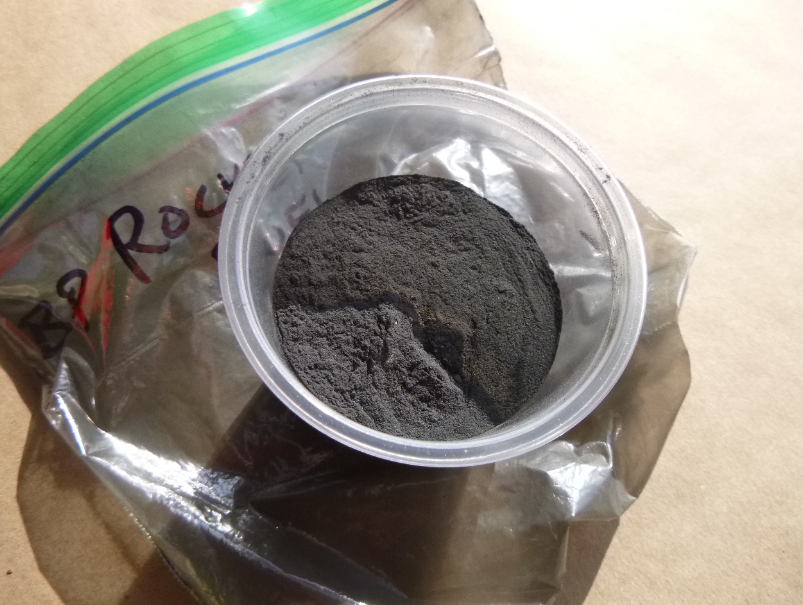
With your chemicals weighed out, and your bag sealed, spend a few minutes really mixing this fuel up, making sure to rub and smear the powders together with your fingers until they are mixed up uniformly. The better the three ingredients are mixed the faster and more effective your rocket fuel will be. Undermixed fuel will burn slowly and not produce enough thrust to fly your rocket.
Pro Tip: Undermixed fuel is the number 1 cause of poor performing rockets! If your rocket engines lack the energy to fly fast and high check back to this step and make sure you have thoroughly mixed the three ingredients.
Before you move on try this simple check. Put some rocket fuel powder into another weighing cup, to check for any clumps. Powder should be smooth and blackish-grey without clumps visible. If you can see any clumps or a non uniform color it's time to go back to mixing until your mixture is completely homogeneous.
You have just made honest to goodness rocket fuel!
As such you should from this point forward treat it with the respect that it deserves. Advoide sources of ignition, static and when handling it wear long sleeve, cotton shirts and safety glasses when appropriate.
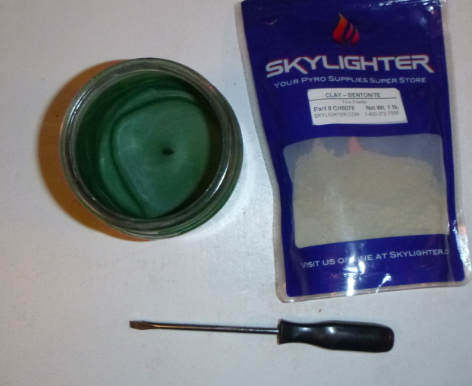
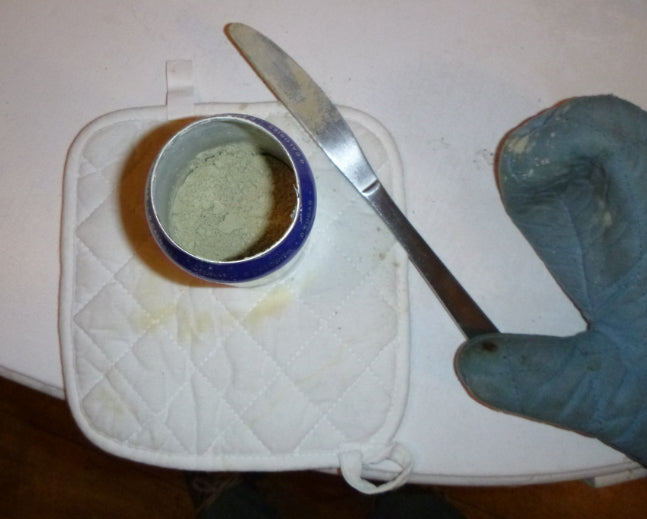
Making the Clay Nozzles
The rockets you are about to create produce a strong thrust of very erosive gasses! We want to channel and restrict these gasses with strong durable nozzles which can hold up to such conditions. We are going to make a nozzle mix which is strong and resistant to changes in humidity.
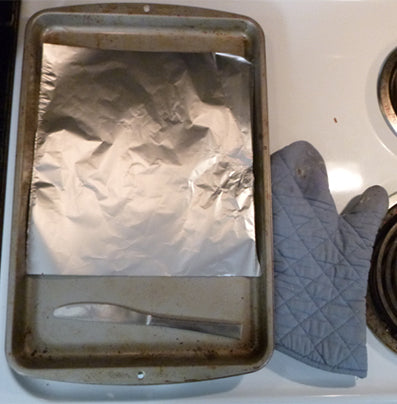
First, the bentonite clay powder in the kit has to be heated and thoroughly mixed hot with wax or petroleum jelly to make it into material suitable to form a strong nozzle. This preparation is conveniently done in a kitchen, as it does not involve any hazardous materials.
Workspace:- Sturdy table
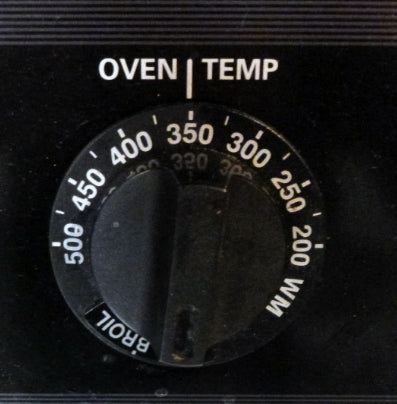
- Kitchen with Oven set at 350F
(Most of these items can be found at your local Walmart or any home improvement store)
- Can opener
- Flat head screwdriver
- Digital scale, good up to 500g / 16 oz or more
- Blunt butter knife for mixing
- Foil-lined cookie baking sheet
- Hot mitts and hot pad
(Most of these items can be found at your local Walmart or any home improvement store)
- Skylighter Bentonite Clay powder
- Wax Candle (made from paraffin wax) or petroleum jelly
- Empty, cleaned out soda pop can (7.5oz or 12oz both work fine)
- Aluminum foil
- Wooden popsicle sticks (for scooping out clay and petroleum jelly)
- Storage container, such as a snap-lid container or a plastic zipper baggie for storing your greased up clay powder
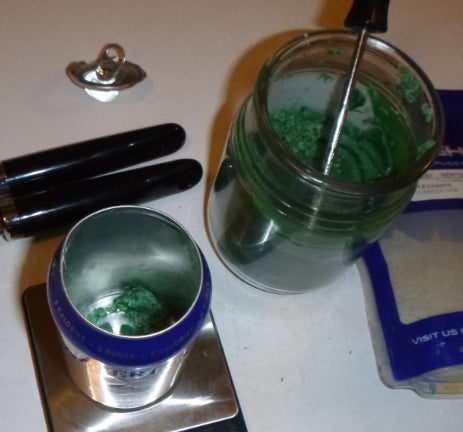
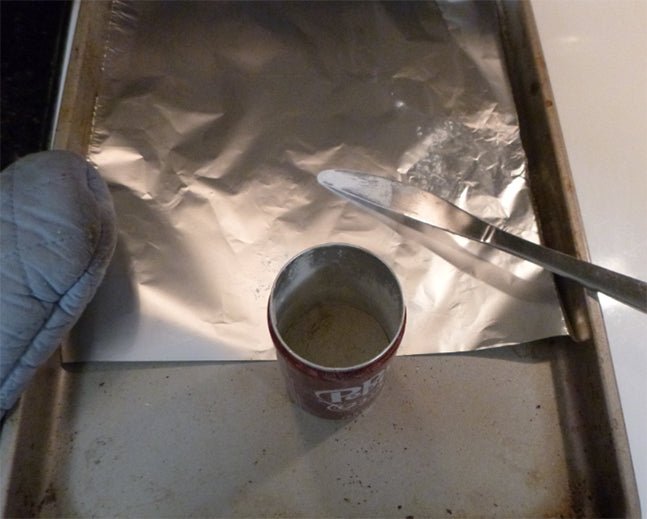
To do this, we start with a soda pop can, and remove the top of the can to form a convenient mixing container.
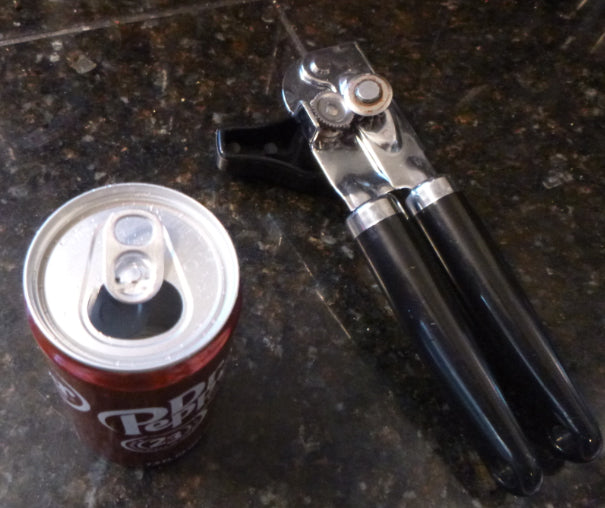
A can opener works to remove the top from a soda pop can. (Careful!! Sharp edges will remain on the lid. Wrap sharp lid in aluminum foil and dispose of lid so no one gets cut)
The process works with either petroleum jelly, or paraffin wax. Both additives will produce a final clay powder that will compact into strong rocket nozzles for your motors.
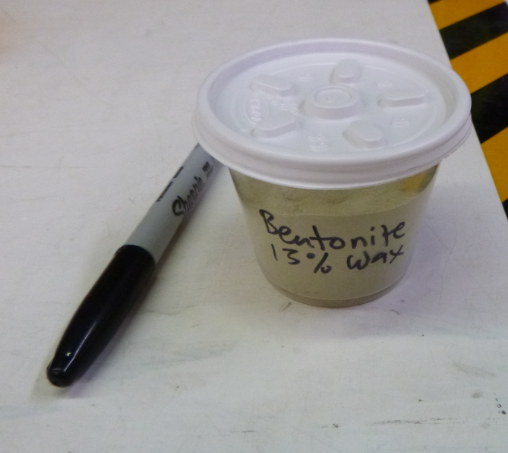
Okay, here’s the breakdown of the composition for the clay/wax or clay/petroleum jelly. You need 13 weight percent of either wax or petroleum jelly in this clay mixture for the nozzles to work properly.
We made a 2 oz batch using petroleum jelly in a 7.5 oz soda pop can, and a 4oz batch using candle wax in a 12 oz soda pop can.
| Chemicals | Wax Clay | Petroleium Jelly Clay |
2 oz batch | 4 oz batch |
| Bentonite Clay | 87% | 87% | 1.74 | 3.48 |
| Petroleum Jelly | - | 13% | 0.26 | - |
| Candle Wax | 13% | - | - | 0.52 |
| Total | 100% | 100% | 2.00 | 4.00 |
| Heating Times >>>>>>>> | 25 mins | 45 mins | ||
You can scale your batch sizes as you deem necessary. You can get at least 14 rocket nozzles made from a 2oz batch. So a 4 oz batch will give you plenty of clay to make at least 25 rocket motors (a whole bag of rocket motor tubes!) The heating times get longer with a larger batch size of clay, so these are just suggestions to get you started.
Start by zeroing out your scale with the opened up can on it.


Candle wax (left) or petroleum jelly (right) are shown as examples. The process is the same whether you choose to use wax or petroleum jelly. Both processes result in nozzles that are suitable for these rocket motors (We are not advertising Dr Pepper, it’s just what we had on hand!)
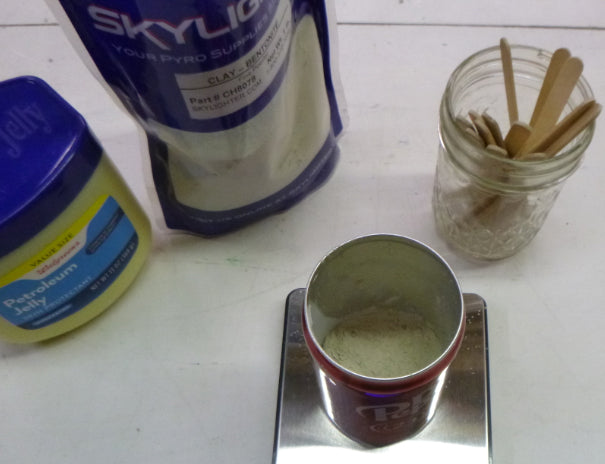

The process using vaseline is easy. Just add your clay powder into the can, then use a wood popsicle stick to scrape some jelly on the inside edge of the can over the clay until you have the right amount.
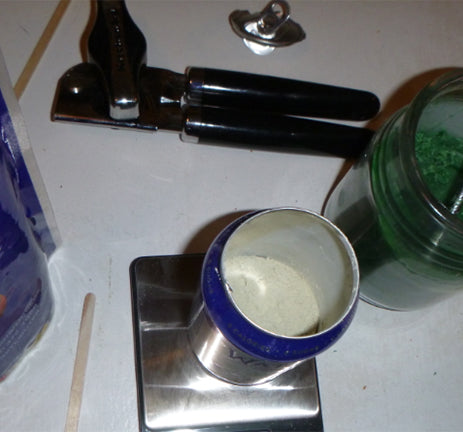
For the candle wax, you can do something similar, but you’ll need to use a screwdriver instead to scoop out the wax in bits and pieces and add it to the clay powder. Start with weighing out the wax pieces first, then add in the clay.
Whether you choose wax or petroleum jelly, heat your can in the oven. If using petroleum jelly, the blob of jelly should melt and fall in, on top of the clay powder. Using wax will result in the same outcome, and you’ll have pieces of wax that melt and dissolve into the clay powder just like the petroleum jelly.
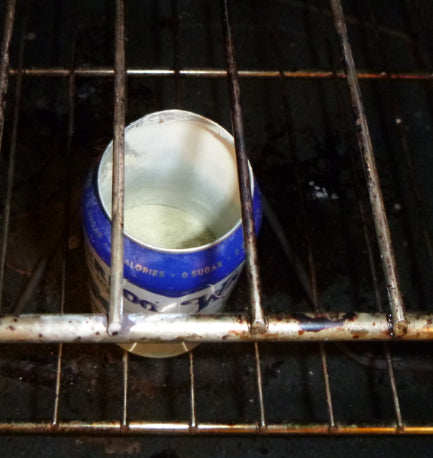

After the can is heated for a long enough time, the wax or petroleum jelly should be completely melted and start dispersing into the hot clay powder, but you’ll need to help it along the way. After the recommended times suggested in the table above, take the can out of the oven (use an oven mitt!). Use a butter knife to mix the clay and wax/jelly together. Put back in the oven for a few minutes if you still see any clumps, then repeat the mixing process until the clay is evenly free-flowing in consistency.
If you heated and mixed it really well, you will notice the clay powder will soak up the wax or petroleum jelly like magic! It will turn back into a powdery consistency. This indicates you have completely incorporated the additive into the clay powder, and you are ready to cool it.
Carefully pour the mixture out onto an aluminum foil lined baking pan. The powder should spread out and appear dry and free-flowing if you mixed it up well enough.

The clay powder with your additive (wax or petroleum jelly) will flow just like the clay powder out of the bag when cooled. After this powder cools down, go ahead and store it in a small storage container and label it as such for making rocket motors (next section!)...
Loading the Rocket Motor Casings
You'll want to ram the rocket motors on a hard surface with a dead-blow hammer. A sturdy brick ledge works well, or a sturdy workbench can also work.
Tools & Supplies:- 7/64" drill bit
- Retractable blade or box cutting blade
- Dead blow hammer
- Leather Gloves
- Small Funnel
- Safety Goggles
- Calipers (optional!)
- Slightly dampened clay powder
- Rocket Fuel
- Goex FFg grade black powder (or homemade FFg equivalent -- see Skylighter's black powder projects for additional details)
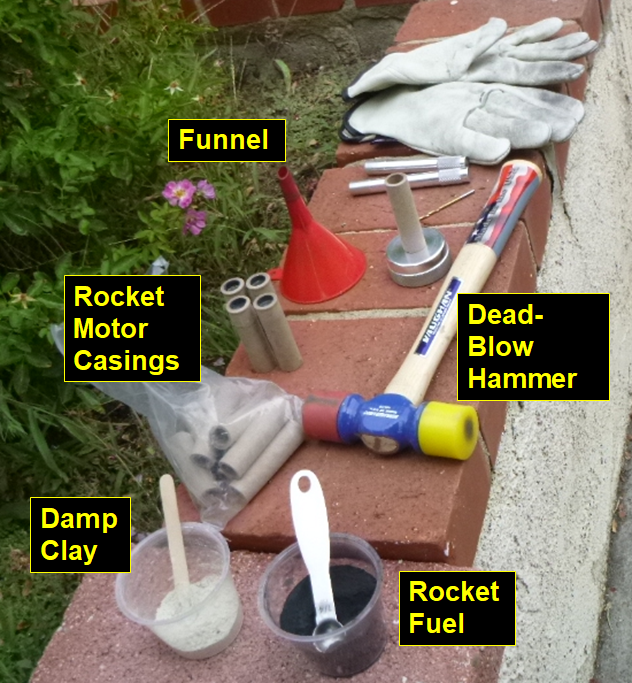
Materials for making rocket motors
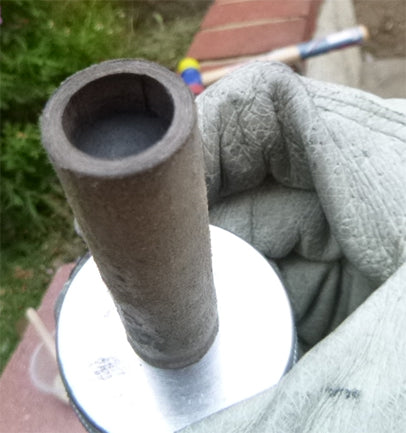
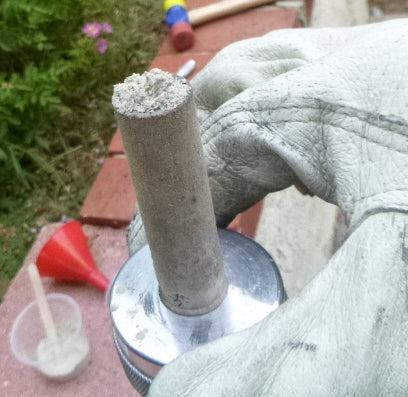
To begin, take a cardboard motor casing and snuggly fit it on the base spindle so it's flush with the bottom.

Motor casing flush with bottom of base spindle, ready for loading in the clay and fuel
A good rocket motor requires small increments of clay and fuel to be added and compacted in stages. You can't add all the fuel at once, as you'll compact air in the fuel grain and the rocket motor may malfunction (cato, aka: blow up).
Here is the order of addition that works on these motors:
2 x 1/4 tsp CLAY, tapped down in 2 increments with the SPINDLE drift
6 x 1/4 tsp ROCKET FUEL, tapped down in 6 increments with SPINDLE drift
2~3 x 1/4 tsp ROCKET FUEL, tapped down in increments with SOLID drift
~1/3 of a 1/4 tsp Black Powder (FF or lift grade), lightly rammed in with SOLID drift
~1/3 of a 1/4 tsp CLAY, lightly rammed in with SOLID drift
To form the rocket nozzle:
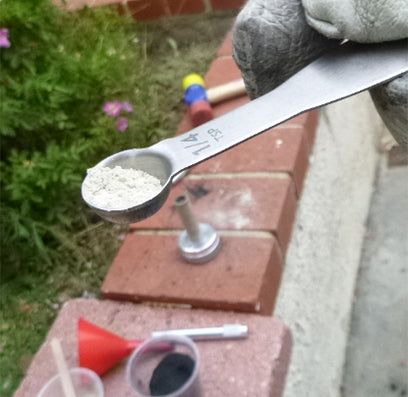
- Insert the funnel into the motor casing and add a ¼ tsp damp clay (shown below)
- Tap funnel, remove it, and then slowly insert the hollow drift into the casing until it hits the clay at the bottom
- Lightly tap the damp clay with the dead-blow hammer to remove air pockets in the clay
- Remove hollow drift, replace funnel, and add another 1/4 tsp damp clay to the funnel
- Use the hollow drift to tap the clay down the funnel into the tube, and remove the funnel
- Repeat compaction with the hollow drift, this time slowly impacting the clay and checking the casing bulge at the bottom of the rocket motor casing.
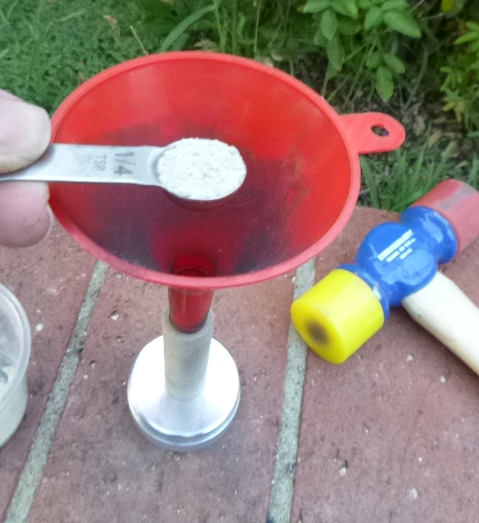
1/4 tsp clay portions being added to a motor casing
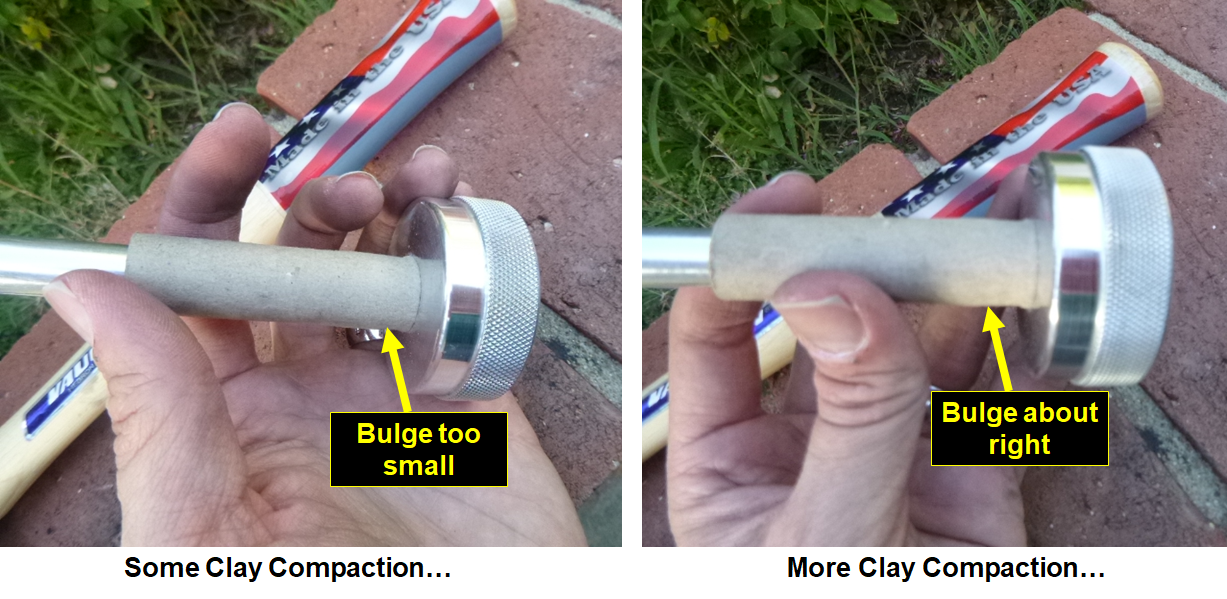
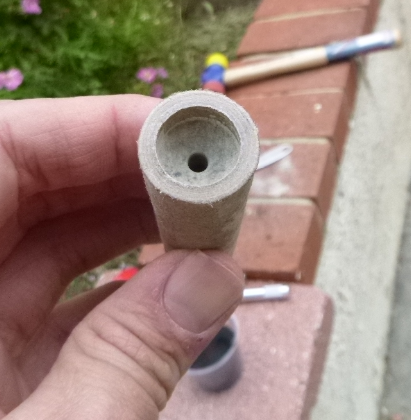
Remember that Nozzle BULGE portion from the rocket motor cross section diagram? This is the key to making these motors work with the Skylighter model rockets. Here it is again:
The idea is to ram the clay nozzle pretty hard on the spindle, making the bottom part of the rocket motor casing bulge out just a little bit. Too hard, and it will expand too much and may split the motor casing open, and the motor will not fit in the model rocket motor casing. If the clay nozzle is tapped too lightly, the rocket motor will pop out of the rocket at the end of its flight without pushing out the parachute. You want to get just a bit of bulge at the nozzle section.
Here's a picture of these variations:
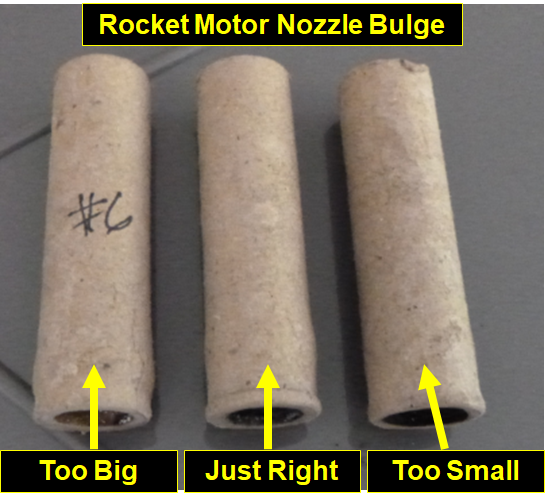
The bulge is formed during the compaction of the clay nozzle. After a few tries, you'll get the hang of it and be able to pound out these motors in a few minutes each. You can use some calipers if you'd like, once you have an idea of a good bulge diameter. That way, you can have more consistency on your nozzles.
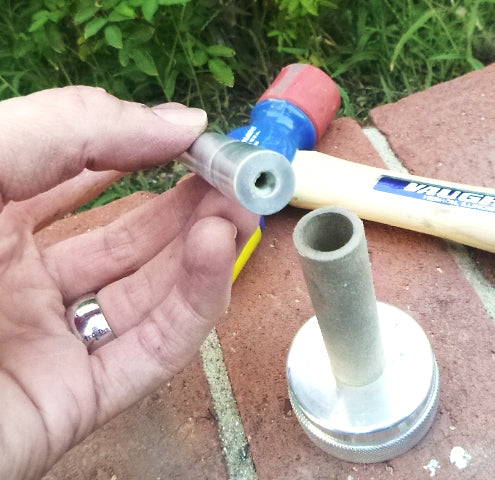
Once the nozzle is in place, remove the hollow drift and then clean out any remaining clay that made its way up the drift hole. Hand twisting a 7/64” diameter drill bit works well for this (no power tools around our finished rocket fuel).
With the clay nozzle formed, switch over to adding rocket fuel just like you did the clay. Same process, and a good compaction force upon each fuel portion addition. This forms the core-burning section of the fuel grain, and is done with:
(~6 x 1/4 tsp ROCKET FUEL, tapped down in 6 increments with SPINDLE drift)
Here is a video of a couple 1/4 tsp scoops of rocket fuel being added with the hollow drift:
Once you have added enough fuel with the hollow drift, you will notice the drift tip won't go past the lip at the end when more fuel is compacted (see next video). This means you have reached the tip of the steel spindle (core section), and it is time to switch over to the solid drift.
(2~3 x 1/4 tsp ROCKET FUEL, tapped down in increments with SOLID drift)
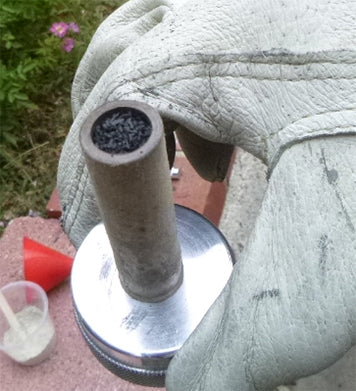
Here is a video of 2 scoops of rocket fuel being added with the solid drift:
Sometimes, it takes an extra 1/4 tsp of fuel with the solid drift to get the fuel grain up near the top edge of the rocket motor casing (this depends on how much you end up compacting each increment). You want to add enough fuel to the grain to allow for a good amount of delay time for the rocket to glide after the thrust portion burns off. About 1/4” inset of compacted fuel from the end of the casing is a good level to stop adding to the fuel grain, like this:
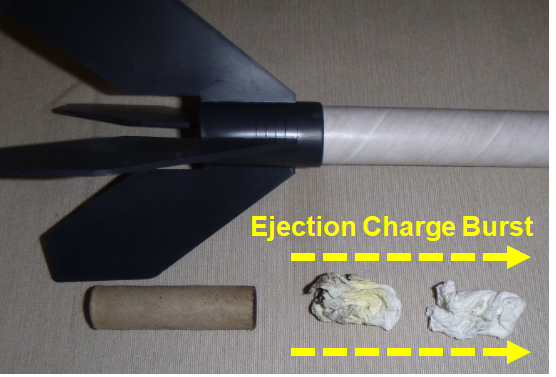
Adding the Ejection Charge and the Clay Plug
In this next step, you'll finish off the rocket motor by adding a small amount of BP to the top of the fuel grain, compact it lightly, then add a clay plug to finish off the motor.

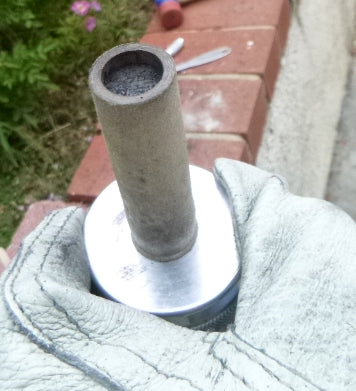
Clay lightly compacted with dead blow hammer
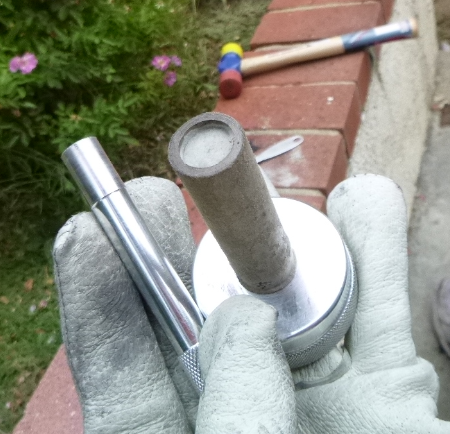
Now that this motor is finished, it can be removed from the base spindle assembly. Grab the rocket motor casing and lightly twist it off the base spindle. The clay nozzle should be intact.
Rocket motor twisted off spindle base, clay nozzle shown
Now test it out and see if it performs well! An easy way to do this is with a static test fire. Invert the motor (nozzle facing up) supported by some heavy wood blocks or dry sand bags or even by placing the motor into a shallow hole in dry, rock free earth. Gently place a small piece of hobby fuse in the core of the fuel grain. Put on your safety goggles, light the fuse, and stand back. You should see the motor perform in 3 distinct stages:
Thrust burst (~1 second)
Delay burn (1~2 seconds)
Ejection charge
For comparison, here is a commercially-available Estes A8-3 rocket motor being tested the same way.
As you can see, the performance of your homemade motor is equal or better than these commercially available motors, and can end up being cheaper, and a lot of fun to make! Now go ahead and make a bunch of these motors for many rocket flights while you're all setup!
Pro Tip: The two biggest issues beginners have to overcome is making fast enough fuel and compacting the fuel grain.
-
Poor Performance: If your rocket burns sluggish compared to the video your fuel is likely to blame. Look carefully at the fuel and make sure it is completely homogenous. If not the fuel needs to be re-mixed until it is uniform.
Rub a small pinch between your fingers; do you feel any texture. If you do the potassium nitrate is too coarse and you will need to start a new batch paying close attention to this step.
YOU CANNOT REGRIND THE MIXED FUEL! Doing so could lead to an explosion.
- Motor explodes\CATO: The surface area of these motors has been calculated to provide an easy to make motor with lots of thrust for the provided airframes. Poorly compacted fuel or cracks in the fuel grain could result in more surface area thus producing more pressure then the casing can support. On your next motor apply more force with your mallet or smaller increments of clay and fuel. Also be mindful when removing the motor to twist and pull straight off. Putting lateral force on the engine when removing the motor from the tooling can, crack the fuel grain if not well compacted.
MAKING THE MODEL ROCKETS
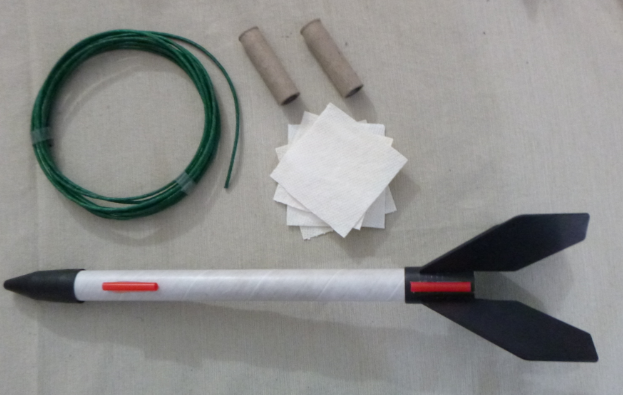
The nice thing about model rockets is the rockets themselves can be made indoors as more of a crafty activity, since the hazardous materials are all contained within the rocket motors. In this section, we put together the rocket body components to help the rocket fly straight, deploy the recovery system, and land gently back to earth so it can be reloaded with more rocket motors several times over.
Workspace:- Sturdy table
- Scissors
- Retractable blade or box cutting blade
- Ruler
- Sharpie
- Pen
- Hot glue gun and glue sticks
- Wooden dowel
- Cookie cooling wire rack
- A plate (like from your kitchen)
- Chop saw (optional)...or hacksaw
- Garbage bag liner (ie: new, unopened 13 gallon trash bag)
- Dental Floss (non-wax type, Glide brand worked well)
- Post-It (3” x 3”) pad or Standard printer paper
- Packing Tape
- Rubber Bands
- Glue
- Paper Towels
- Soda Straw
- Baking Soda
- Water
- Parchment Paper
- A couple of rocket motor casings
- A few small washers (like #6 or #8 size)
- Motor Mount: A little tube that goes into the base of the rocket body, for holding the rocket motor in place
- Flame-Resistance Recovery Wadding: Small pieces of paper towels soaked in baking soda and dried, to catch the ejection charge embers and help push the parachute out of the rocket without burning it
- Rocket Fastening Pads: An adapter made to fasten the recovery system and nose cone to the rocket body
- Parachute: Well, this part is obvious. You don't want your rocket to come back down and whack someone on the head. Or worse, have your rocket break!
- Nose Cone and Linking up the Recovery System: Connecting everything up and putting the rocket together
- Rocket Guide Tubes: Small pieces of soda straws hot-glued to the rocket body to help guide your rockets where you aim them
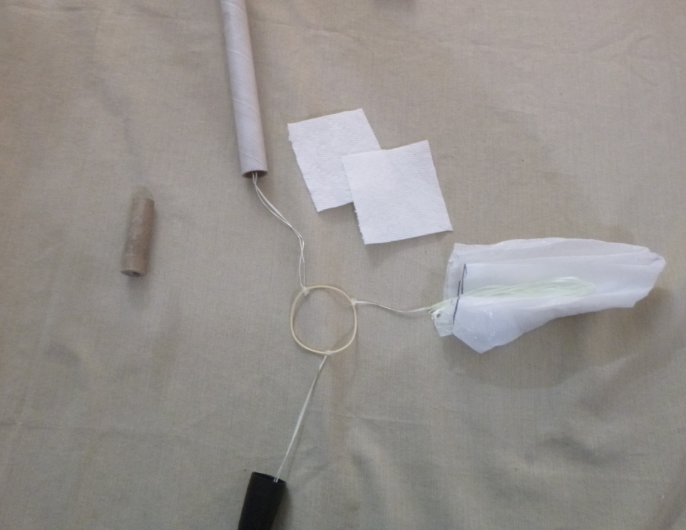
Rocket recovery system with motor, parachute, recovery wadding
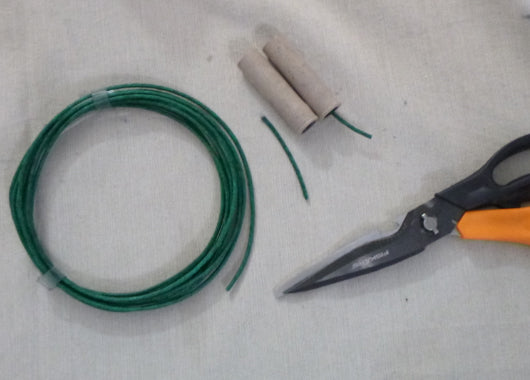
Making the Motor Mount in the Model Rocket Tubes
Take a rocket motor casing that came with the kit, and put a little masking tape around the end of it, 1/2” from the end. This will make a “tool” you can use to position and set the motor mount in each of your rockets. Since the motor casings are 2.5” long, the tape section will only allow 2” of the motor casing to enter into a rocket tube, setting the position of the motor mount properly within the rocket body tube.
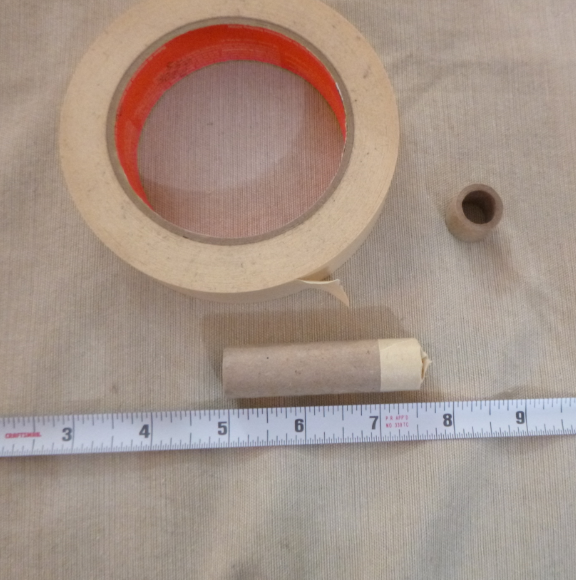
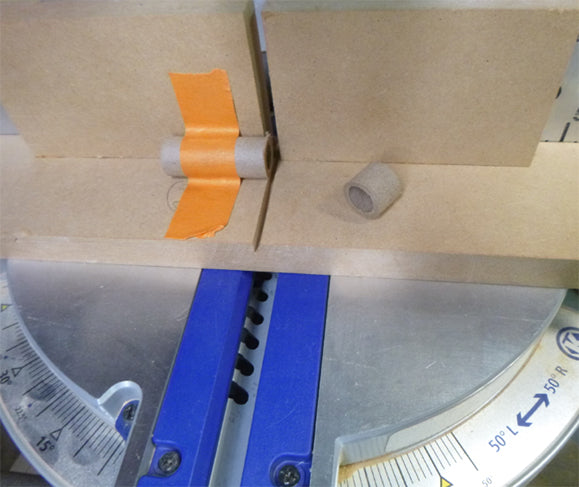
Take another motor casing, and carefully chop off ~1/2” of the tube. A tube-cutting jig and a chop saw came in handy here. You can also use a hacksaw, but do you best to remove burrs from the cuts.
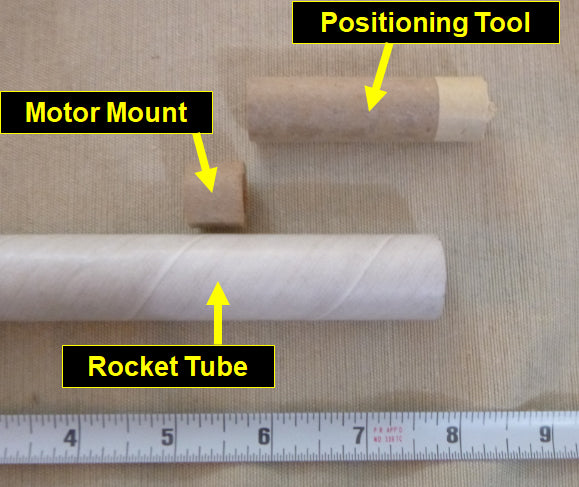
Add some wood glue into one end of the rocket tube, and slide the motor mount (1/2” tube section) into that end of the rocket tube. It should catch the glue blob in there. Slowly insert the positioning tool and push and rotate the positioning tool into the rocket motor tube slowly until the tape mark it reached. Immediately remove the positioning tool, and wipe off any glue with a paper towel. This small tube section is now glued into the base of your rocket tube.


Let it set overnight for the glue to harden.
Making the Flame-Resistance Recovery Wadding
To protect the ejection charge from burning holes in your parachute, recovery wadding needs to be added to the rocket to catch embers. This wadding needs to be coated in a salt solution that, once dry, will not support combustion. This section provides a way to make this wadding with commonly available materials.
Workspace:- Kitchen with Oven set at 250F
(Most of these items can be found at your local Walmart or any home improvement store)
- Measuring Cup
- Measuring Spoons (1 tsp, 1/2 tsp)
- Cookie Cooling Wire Rack
- Hot mitts and hot pad
(Most of these items can be found at your local Walmart or any home improvement store)
- Paper Towels
- Baking Soda
- Epsom Salt
- Water

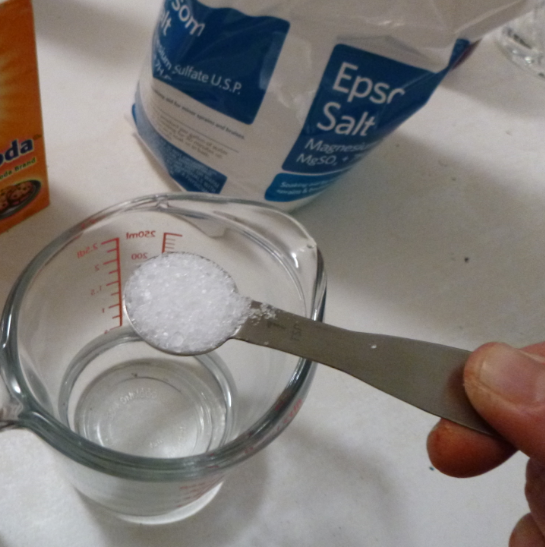
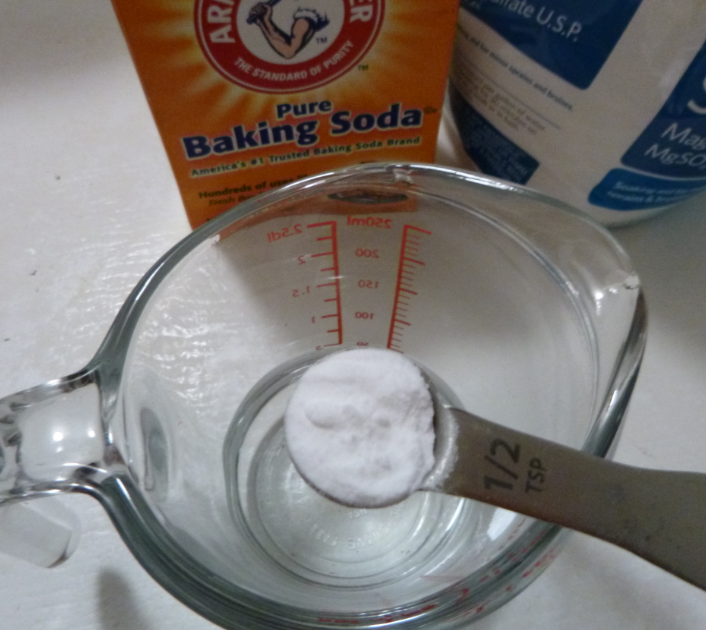
Stir the salts into the water until they are completely dissolved. The Epsom salt takes a little longer to dissolve, and you can microwave the solution a little to speed up the process.
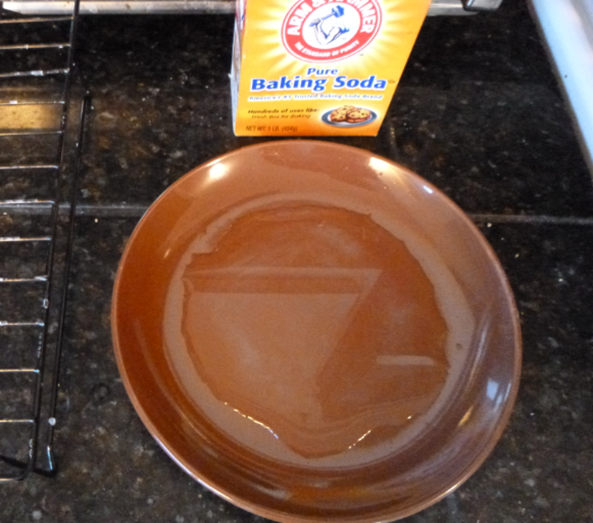
Take a plate and pour some of the saturated salt solution on it, covering most of the surface of the plate.
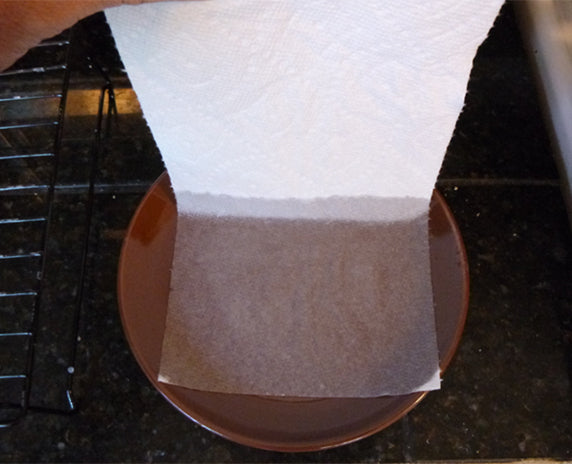
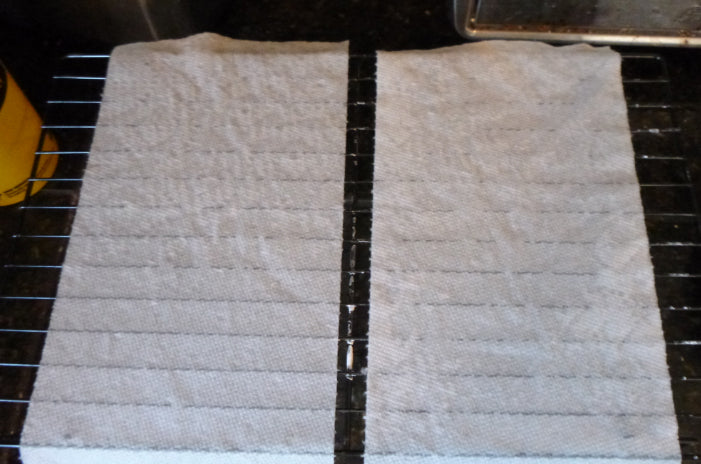
One by one, dip the squares onto the plate to soak up the salt solution, and lay the paper towels on a cookie cooling wire rack.
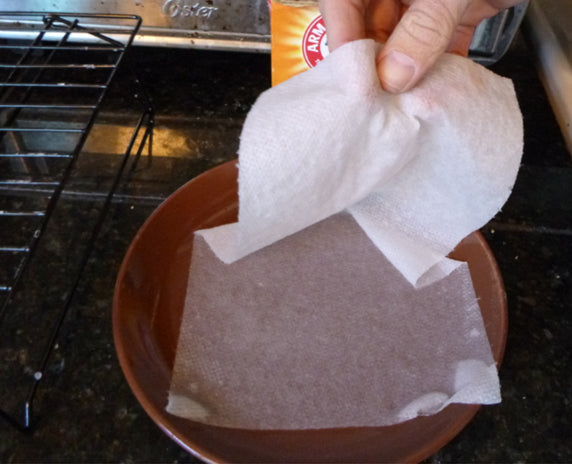
Once dry, cut the flame-resistant paper towels into 3” squares. These are your pieces of flame-proof wadding.

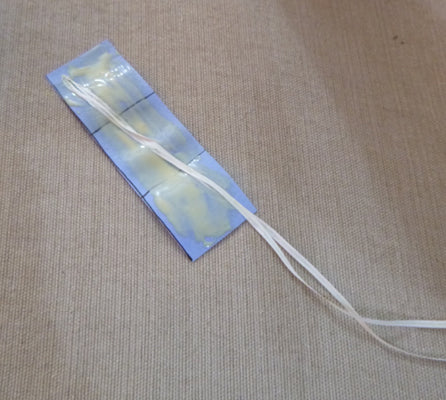
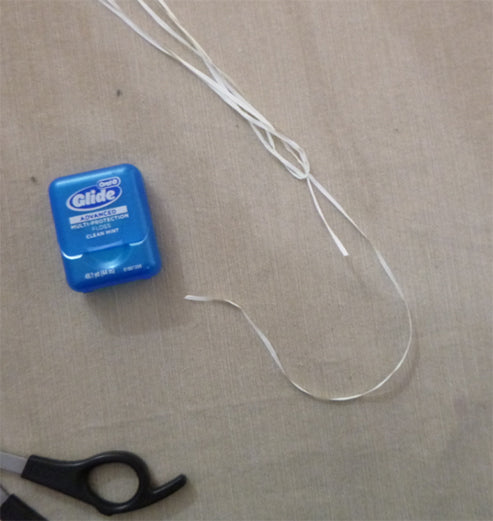
Making the Rocket Fastening Pads
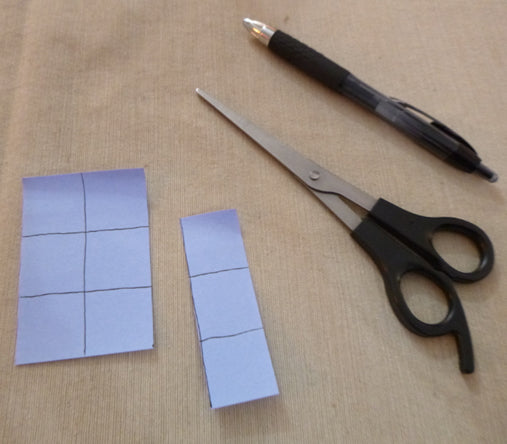
Take a Post-It pad (3" x 3"), and draw a tic-tac-toe stick pattern on the top pad. Remove a single Post-It from the pad. Trim ~1/3 of the Post-It off, forming a piece of paper 1" x 3" (cutting standard printer paper to this size will work too). The piece has fold lines designated by the tic-tac-toe pattern.

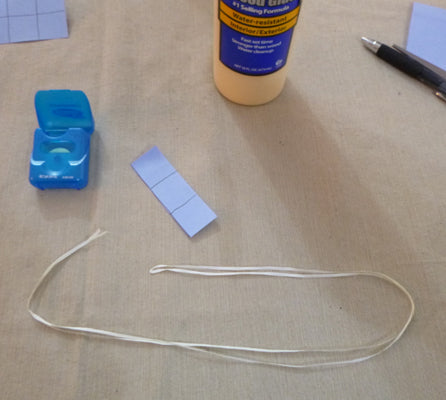
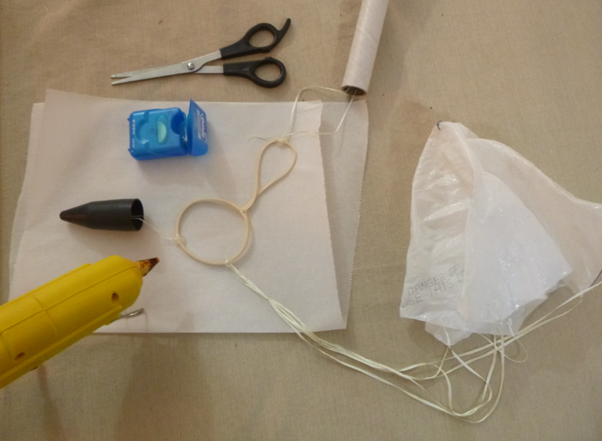
Pull out a 3 feet length of dental floss, and pinch it in half, bring the two strings together to form a double-floss length of ~1.5 feet long.
Put the pinched edge of the floss on one corner of the sticky part of the post-it, and lay the two strands down at a diagonal. Smear some glue over the floss onto the paper strip, covering everything, then fold it twice into a square, as shown below:
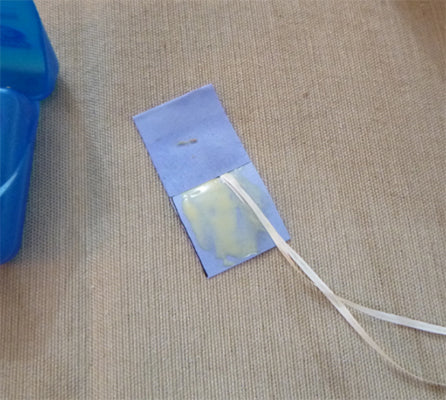
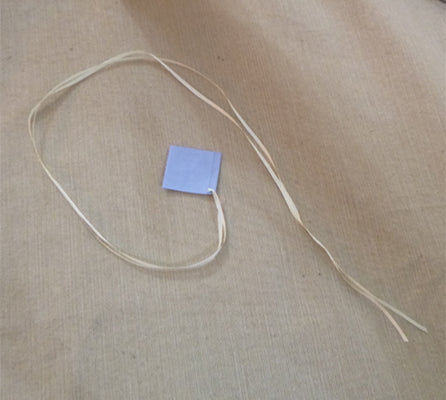
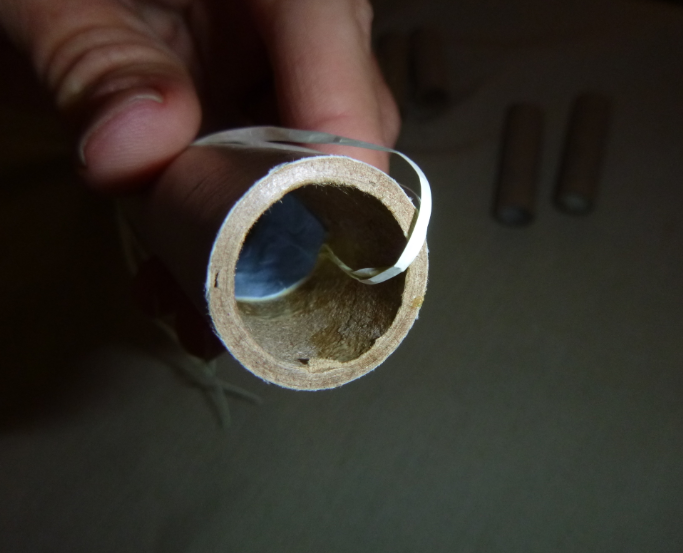
Add some more glue to one side of the paper square, and carefully shove it down the rocket tube, about an inch in below the edge of the tube.
Really press that paper square inside the inner wall of the rocket tube, so none of the edges stick out and block the open tube. The two pieces of floss should be hanging out of the end of this tube, as shown below:
Let this rocket fastening pad harden overnight.
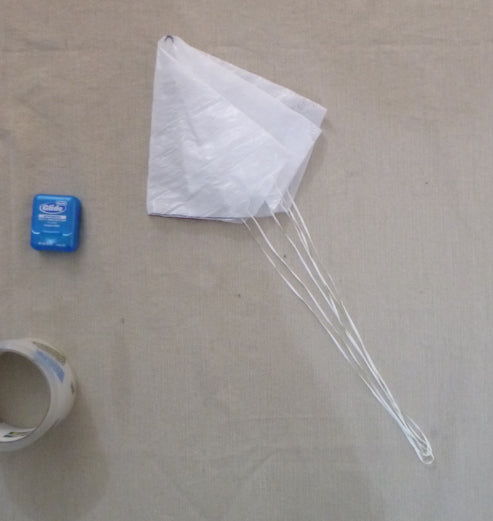
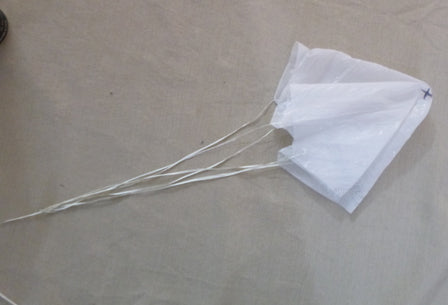
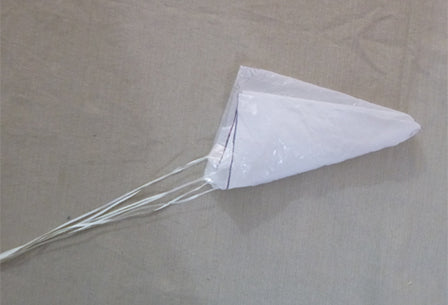
Making the Parachute
Instructables has a nice link, to get the basic idea of forming the parachute:
https://www.instructables.com/Make-a-model-rocket-parachute/Overall, this is a useful guide to make a simple and effective parachute. Here are a few pointers to these instructions that work with this rocket:
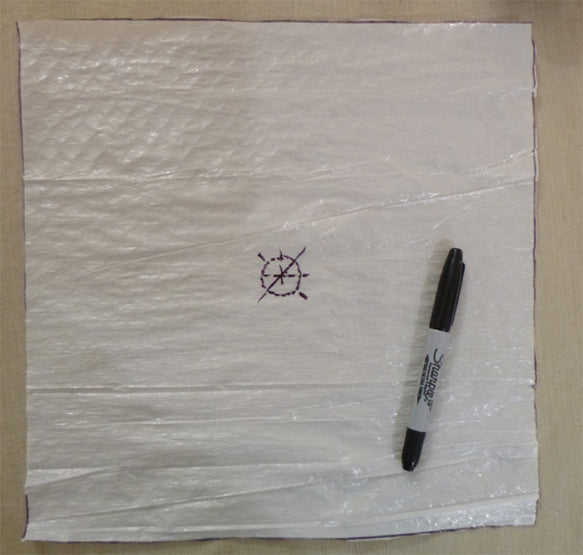
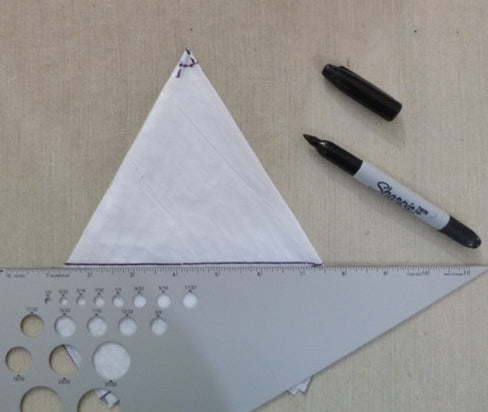
- Use a right triangle guide, a Sharpie, and scissors to cut out a 12” square from the garbage bag liner. Mark the center of the square.

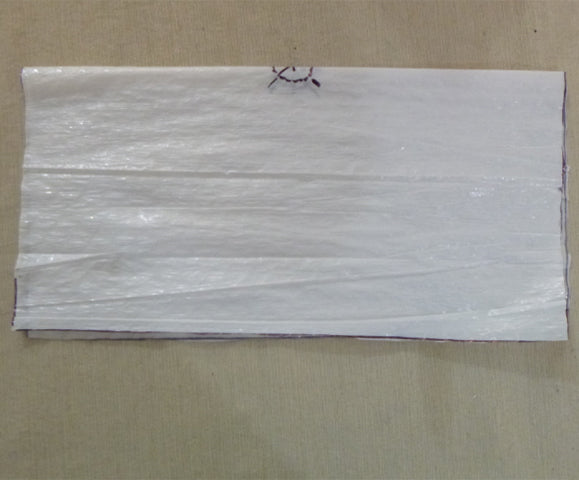
- Fold the plastic square in half, and with the help of the right triangle, fold it into 3 equal portions.

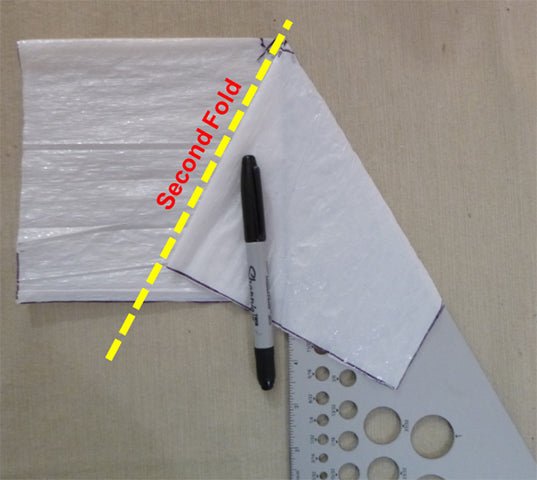
- Carefully remove the triangle, and draw a straight line on the bottom of the fold intersections.
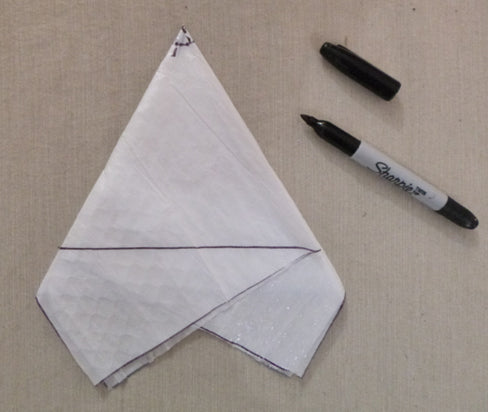
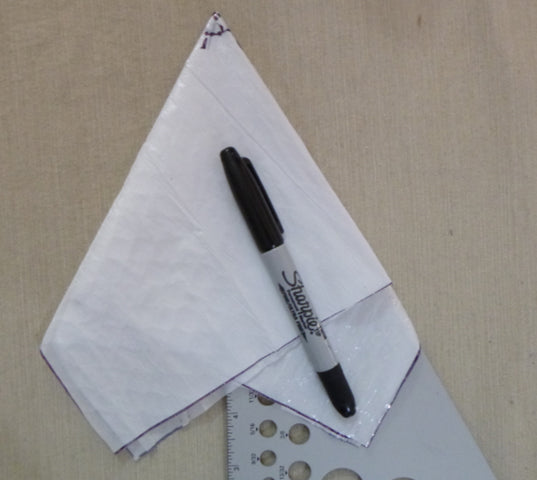
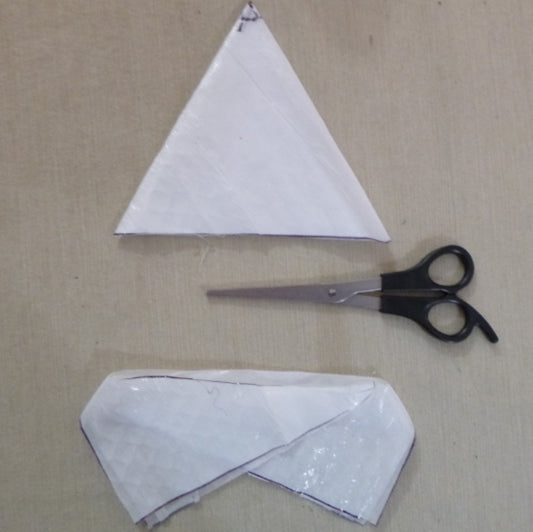
- Cut the folded bag across that line. Open it up and you have a hexagonal parachute.
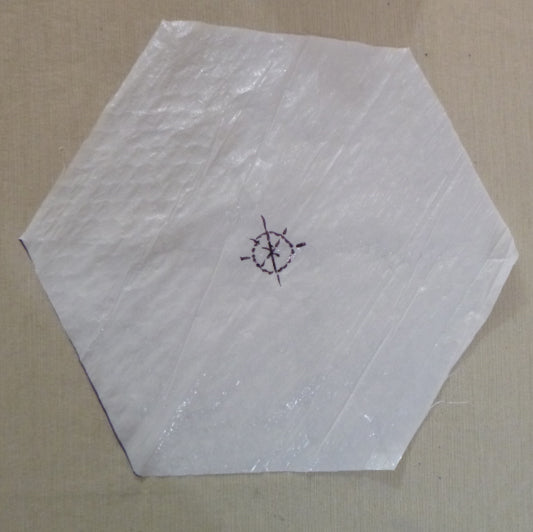
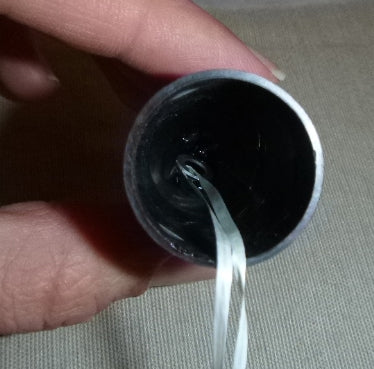
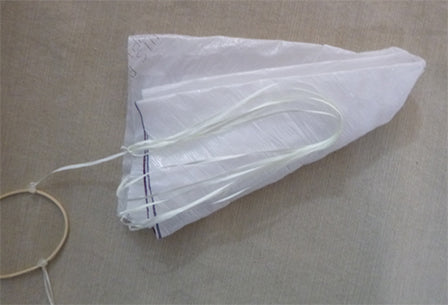
- Pull out 3 pieces of dental floss, at 18” length. Clear packaging tape sticks really well to trash bag liners. Cut some packing tape into small squares (~1/2” or so) and tape a curled piece of floss to each corner of the parachute.

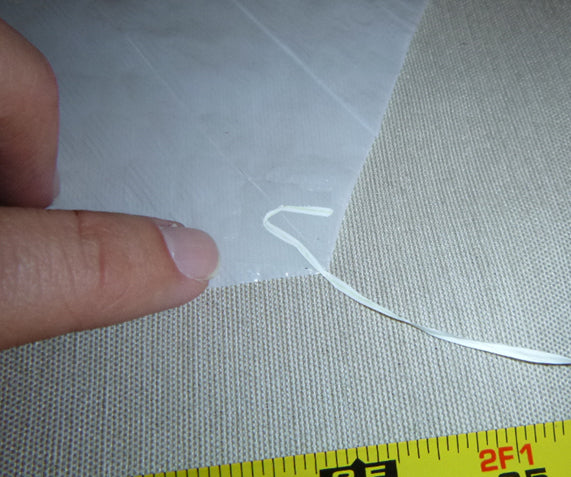
- To avoid crisscrossing the parachute strings, tape the strings across the corners of the parachute all in one direction, as shown below
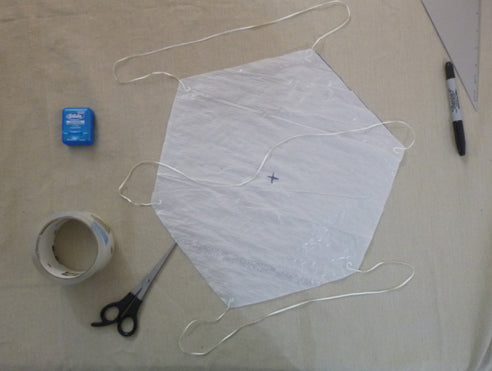
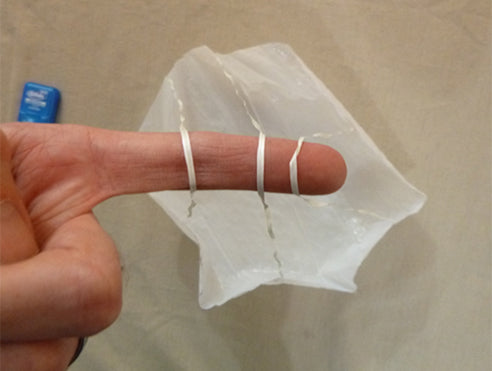
Now, with the three strings hanging onto the 6 corners of the parachute equally distanced, bunch up the chute by the corners and tie another piece of floss to the bunched up loops to bring the parachute strings together at an intersection point.
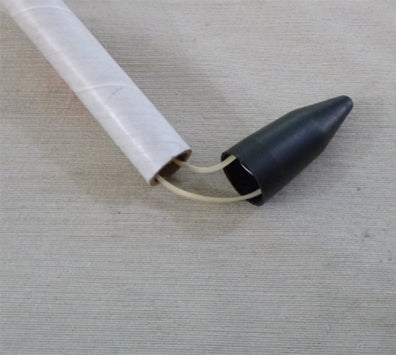
Nose Cone and Linking up the Recovery System
Heat up the hot glue gun. To connect the rocket body to the nose cone, cut off a piece of dental floss and tie it to a tiny washer. Gather the two pieces of floss coming off the washer into one string.
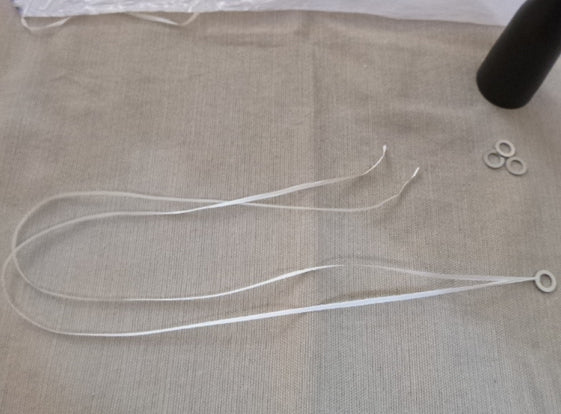
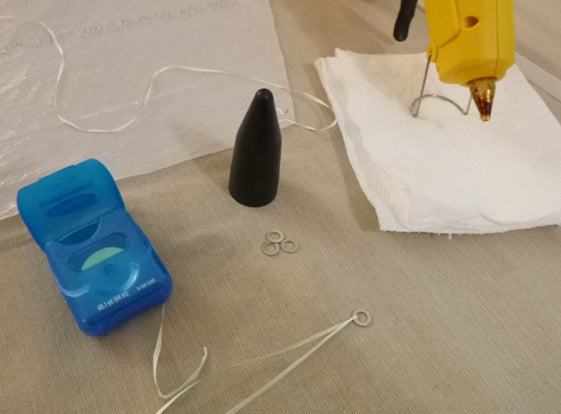
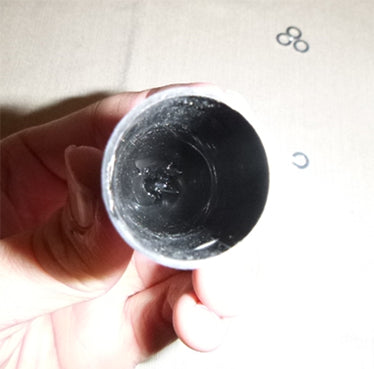
Put a hot glue dab into the tip of the nose cone, lower down the tiny washer suspended by the floss into this dab of hot glue, then cover the tiny washer with more hot glue and let it cool and cure solid. This will add a cord to tether your nose cone to the rest of the rocket.
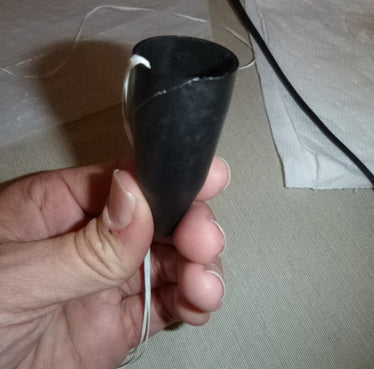
With the two strings hanging out, tie a knot about 6” out of the noise cone, and trim off the excess floss.
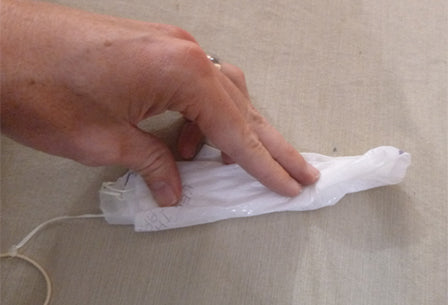
Bring all the parts together with a rubber band. Use parchment paper or aluminum foil as a backing, and tie the leads from the rocket fastening pad to the rubber band. Tie the leads from the nose cone at the 6” knot to the rubber band, as well as the leads from the parachute onto the rubber band equal distances from each other. Add dabs of hot glue to the knots, and let cool. Trim off the excess floss. The hot glue dabs make the connections resilient to shock from the ejection charge.
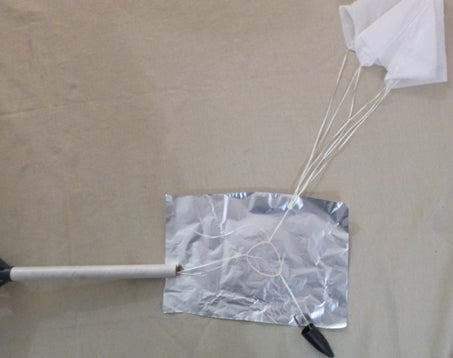
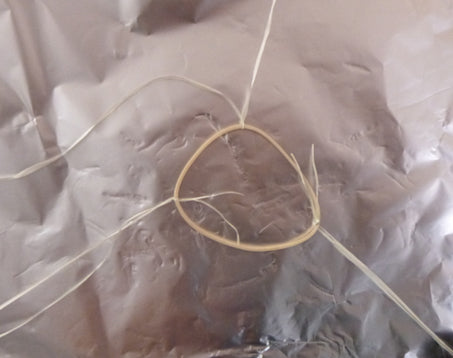
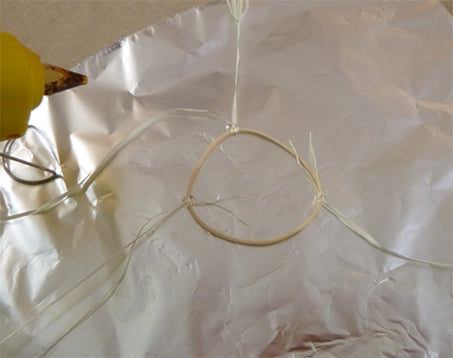

The rocket body tube, nose cone, and parachute should now all be connected to a common rubber band.
PRO TIP! If your BP ejection charge is a bit too powerful, and snapping the nose cone off of its string, you can use two rubber bands instead of one, putting them together in a similar fashion:
(Parchment paper works well as a backing to release the hot glue when it cools)
How do you get the two rubber bands to tie together? This video of bringing two hair ties together shows the process nicely:
https://youtu.be/SBGSMd7IuqMLoading the Recovery System
First, insert recovery wadding into the rocket body tube from the top end where the nose cone will be. Take Two pieces of your 3” x 3” wadding, and crumple them up. Put a few pieces into the rocket tube and press them down there with a wooden dowel, so they cover up the rocket motor portion. Make sure the wads go in crinkly side down, to better catch any embers from the ejection charge. Here is the order of addition into the rocket (rocket motor gets inserted the other way, into the fin section from the bottom):

Picture of the flame-resistant wadding pieces recovered after a static test fire of a fully-assembled model rocket. Notice how hardly any embers make it to the second piece of wadding.
To ensure the parachute has the best chance of opening up correctly at the top of its flight, fold it like shown below

Fold the parachute in half, insert into top of rocket body tube
Gently push the parachute down the tube, using the dowel or your pinky finger to leave a space of ~1”. Mash the rubber band into the nose cone and gently place the nose cone over the rocket tube.

Rocket Guide Tubes
Small pieces of soda straws hot-glued to the rocket body to help guide your rockets where you aim them. 1.5” straw lengths work well for this rocket. Start with gluing a piece of straw to the fin section, like this:

Make sure the straw piece sets parallel to the tube.

Do the same on the rocket body tube, about 2” from the end of the tube.

When the glue sets and you stand the rocket up, look down the two straw pieces and make sure they align.

Ready to FLY!!
Loading the Rocket to Fly
Get out the fuse bundle, a handful of recovery wadding pieces, and some rocket motors to load into your rocket.
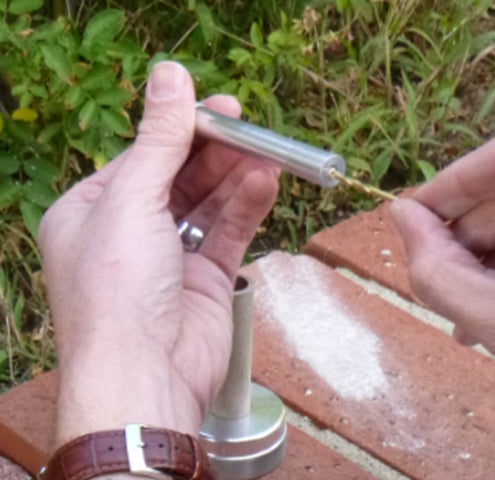
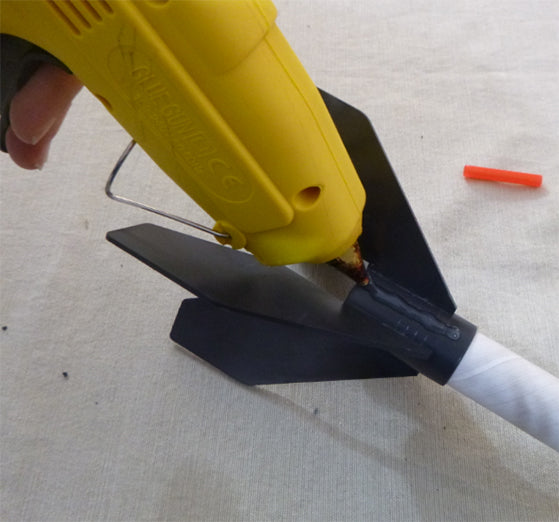
Cut a small piece of fuse off from the bundle provided in the kit, and stick it gently into the rocket nozzle of a rocket motor

Flying the Rockets
If needed, acquire a permit from your local Fire Marshal to fly model rockets on a field. You can use a steel rod that slides easily through the soda straw rocket guide tubes on your rocket, or you can get a model rocket launch pad from a hobby store or online, such as this:
https://estesrockets.com/product/002238-porta-pad-e-launch-pad/In an open field, away from trees, power lines, and dry brush, place your launch pad on firm ground. Slide the assembled rocket onto the launch pad guide wire, making sure the wire passes through both of the rocket guide tubes.
Light fuse, and back away. If you did everything right, your rocket will fly up into the sky, glide for a few seconds, and burst out its recovery system to gently fall back to land.