Gary Smith's Secret to Making Roman Candles
By Ned Gorski
What's All the Mystery about Making Roman Candle Fireworks?
I really like Roman candles. But even though Roman candles appear to be the simplest of fireworks devices, they are a real challenge to make so that they perform consistently. Especially if you use the traditional methods you'll find in all the books.I'm going to show you a secret method for making Roman candles that you haven't seen before. I promise you absolutely will not find Roman candles made like these in any of the books (at least, not yet!). Best of all, you can use this new method to overcome all the Roman candle problems that traditional candle-making methods create.
Look. Where rubber hits the road is how well your fire works in a fireworks display, right? Well, read on and learn how Roman candles work, what goes wrong, and how to make Roman candles like nobody you know has ever seen.
Here's a video of one of the first successful Roman candles I made using the method I'm about to teach you.
8-Shot Silver Streamer Star Roman Candle
Notice how consistent the timing is between the shots. One star is coming down and going out, quickly followed by the next shot. That kind of consistency and effect is what I was going for. And that's what is hardest to achieve using traditional Roman candle fireworks-making techniques.
With all the candles I've made using this new method, the timing between shots has been within one second of each other. If you talk with pyrotechnics folks who have made their own Roman candles, they'll tell you how remarkable that is.
You see, anyone can learn how to make a Roman candle, but making them so that the timing and height of the shots is consistent, well that's what you don't see very often. Of course, Roman candle fireworks are a great way to test the color, burn time, effect and ignitability of your new star compositions. And a single candle is just fun to light, sit back, and enjoy. You can gang multiple candles together, say 7 of them in a bundle, or set them up in a fanned rack to fill the sky from left to right with Roman candles' shots.
So Why is a Roman Candle Firework Called Roman?
Despite the fact that we Gorskis prefer to call these devices "Polish Candles," for some reason that name has not caught on yet. So, why were these devices called "Roman candles" to begin with?It seems that as far back as the early 1800's, both French and Italian authors were using the term "Roman candles" to describe such devices. Since Italy was one of the countries which greatly influenced the development of fireworks, it is not very surprising that one of its most prominent fireworks devices would have its name associated with its greatest city, and the name of its once-sprawling empire.
Exactly What Is a Roman Candle?
Traditionally, a Roman candle has been thought of as a single-tube fireworks device which fires multiple, consecutive shots of projectiles skyward, and which emits a fountain-like spray of sparks between shots.Those projectiles can be individual firework stars, comets with various colors and effects, single crossette comets, mine-shots of multiple stars, combination star-and-report devices, or small aerial star shells.

A Four-Pack of Consumer-Fireworks Roman Candles
But one comet fired skyward from a mortar is sometimes considered to be a single-shot Roman candle. And indeed, single-shot candles, arranged in fan-shaped mortar racks, have become common in many modern displays.
Consumer-firework Roman candles can be as small as 1/2-inch inside-diameter tubes, and large professional-display candles can be found with a tube ID as large as 3 inches.
I'd suppose if you asked someone, "What are the most common types of fireworks you can think of," the response would be something like, "Firecrackers, sparklers, bottle-rockets, and Roman candles."
Certainly Roman candles play a part in many of our childhood fireworks memories. Often they were held in our hands as they fired, but there have been so many mishaps resulting from malfunctioning candles that hand-held Roman candles are now discouraged.
I once made the mistake of thinking I could hold a one-inch display candle in my hand as it fired. The first shot propelled a star skyward, and the rest of the candle backward out of my hand to who-knew-where. I had to quickly find it and stabilize it with my foot as it finished firing. I still haven't lived that down in my local fireworks guild. I don't recommend you try any similar stunts.
With these larger Roman candles, it's best to tape them to a stake and firmly secure them to the ground before ignition.
How Is a Roman Candle Constructed?
The most common, and traditional method of Roman-candle construction involves alternating layers of black-powder lift charge, cylindrical stars, and a slow-burning candle/delay composition, with the bottom of the tube plugged with a clay bulkhead.
Roman Candle Cross-Section
If you imagine lighting the candle's fuse, it will burn down until it ignites the first increment of the delay composition. That rammed increment burns slowly like a gerb (fountain), spraying sparks out of the end of the tube, which would normally be pointing skyward. Of course, when I say "normally be pointing skyward," this "dog and Roman candle" video from YouTube pops into my mind: http://www.youtube.com/watch?v=i8mDAae7LEY. That one shot just about takes out the kid and the old man at the same time!
When the last part of that first increment of delay composition burns through to the first star, the prime on the star burns quickly and ignites its whole surface. That, in turn, lights the first layer of black-powder lift charge, which propels the star out of the tube. At the same time, the top of the second increment of candle composition is ignited, which begins a repeat of the whole process.
The Roman candle in the sketch is called a "four-ball" Roman candle, since it will sequentially shoot four stars out of the tube. "Ball" refers to the ascending ball of flame each star will produce.
Typically candles are made with pumped, cylindrical stars, which have flat bottoms and tops. The flat bottom holds the black-powder lift charge in place, and the flat top supports the delay composition nicely.
Why Do I Make Roman Candles?
In the past 20 years or so in this hobby, I've only tried to make Roman candles a few times, although they are among the most elementary of devices. Quite honestly, in those attempts I was never completely satisfied with the results.And you know what's funny? Even though I'd made 16-inch aerial fireworks shells and 36-inch diameter girandolas, I felt like I couldn't make a consistently performing Roman candle that would live up to my expectations.
One reason I wanted to get good at producing nice little Roman candles is that they can be fired in any location suitable for the discharge of consumer fireworks. Big fireworks devices like big shells and girandolas require a big display site and a display permit. But it's nice now and then to make a little rocket or Roman candle and be able to take it outside to shoot and see how it performs.
In his 1947 book "Pyrotechnics," George Weingart has a section on rolling cases (tubes), for Roman candles. He also has instructions for making an individual, 3/8-inch ID, eight-ball Roman candle.
Weingart describes a simple machine for mass-producing consumer-fireworks candles. I have seen the remains of a similar machine at the Rozzi's Famous Fireworks plant near Cincinnati, Ohio. My understanding is that the machine I saw was the very one Weingart based his sketches and descriptions on.
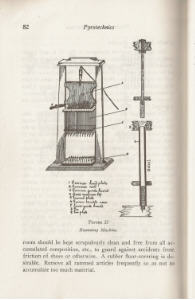
Weingart's Sketch of a Roman
Candle Making Machine
How to Make a Roman Candle
I've seen traditional Roman-candle-making instructions elsewhere, and they seldom differ significantly from the ones in Weingart.A parallel tube is plugged at the bottom with a rammed increment of clay or with a glued-in section of wooden dowel. A scoop of black-powder lift charge is loosely put into the tube, followed by a star, which fits nicely into the tube. This is capped off with an increment of the candle-composition delay powder, which is rammed "with about six light blows of a small mallet" according to Weingart.
And this is where Roman-candle construction gets tricky. That increment of delay composition must be rammed solidly enough to get it really consolidated and locked into the tube. That is necessary in order to prevent fire from being prematurely blown down the tube past it when the star above that increment is shot out of the tube.
The delay charge must also be in the tube tightly enough that fire cannot creep between it and the inner tube wall as it burns, which would also prematurely ignite the star below it.
If you've ever rammed fountain composition in a paper tube, you know it takes a fair amount of force to solidly compact the powder, in order to produce the right effect when the fountain is lit.
But, when one is ramming Roman-candle delay composition, that increment sits on top of a loose star sitting on loosely granulated black-powder lift charge. This is an inherent conflict: not an ideal situation for getting a solidly compacted increment of delay composition.
And here's what you see as a result--the most commonly seen Roman-candle failures--stars which fire from the tube in a rapid-fire, unevenly-paced manner; sometimes more than one star fires at once; or the paper tube ruptures because of the amount of pyrotechnic material, which ignites everything at once prematurely.
All of this results from not having a solid base on which to ram each increment of candle composition. That makes the construction of these simple devices a real challenge, especially in candles larger than about a half-inch ID. Larger diameter delay increments are harder to solidly compact sufficiently than smaller diameter ones.
There must be a better way.
Enter my pyro buddy, Gary Smith. Recently on Passfire.com Gary posted a video of a fairly complex Roman candle he'd made. The individual shots were color-to-report inserts, which are harder to make than simple stars.
But, what I noticed immediately was that his shots were very evenly spaced apart, and that there was a nice fountain of fire-dust spewing from the mouth of the tube between shots.
This was a very nicely constructed, consistently-performing Roman candle, that I knew from personal experience was hard to achieve. I simply had to know more. Gary was kind enough to share with you and me the unique method he developed of achieving nicely compacted, traditional delay increments between the shots. And that is what produced the consistent effects, which so impressed me when I first saw his video.
Using Multiple Tubes to Make One Roman Candle
Huh? Say what?I thought we'd already defined a Roman candle as a "single-tube fireworks device which fires multiple, consecutive shots of projectiles skyward."
How can we use more than one tube to make a Roman candle?
Well, therein lies Gary's trick, which hopefully will forever be known as the "Smith Method" of constructing candles.
Looking at the sketch of the Roman candle above once again, you'll notice there is a recessed, empty space below the clay bulkhead in the paper tube. Putting the tube on a base, which has a ramming nipple, and then dropping loose clay into the tube and ramming it with a drift and mallet creates that void.

Materials and Tools Ready to Ram
Clay Plug in Paper Tube
Way back I gave directions for mixing clay nozzle and bulkhead mixes. I also showed how to ram nozzles and bulkheads, and a photograph of a cutaway tube with a nozzle rammed in it.
Either of those clay mixes is usable for the clay plug at the bottom of a Roman candle. And the photo shows how a clay nozzle or bulkhead locks into a paper tube by slightly expanding the tube in that area.

Cutaway Paper Tube Showing Locked-In Clay Bulkhead
I can just imagine Gary thinking, "How can I get each delay increment solidly locked into the paper tube the same way the clay plug is?"
And then the light went on in his head: "Cut the tube into sections, ram each delay increment solidly into its section, and then reassemble the tube sections into one solid case."
I imagine a picture popping into his mind something like the sketch below.

The Tube Sections of a Smith Method Roman Candle
Although the sketch shows a 4-ball candle, additional 2-inch middle sections can be added or removed to increase or decrease the number of shots.
Note: The top, 3-inch or longer tube section creates the first "mortar" out of which the first star is shot. Within certain limits, the length of a mortar determines how high the projectile goes. Technically, 3 inches is the shortest practical tube from which to shoot the first star. But with a tube that short, the first shot will not go as high as the shots that follow it. So, I actually prefer to use a top tube section that's 5-inches long.
I have arrived at the specific dimensions for this particular Roman candle based on my particular stars and delay composition. To the left of each increment of the delay (candle) comp there is a 1/2-inch void just like the one to the left of the clay plug.
The nipple on the ramming base creates this 1/2-inch recess in each section. A tube section is slipped onto the ramming base. The proper amount of delay composition is loaded into the tube and then rammed with a drift and mallet.
This creates a very solid, securely positioned increment of delay composition, which prevents most types of Roman candle failures.
There it is, simple as that: the Smith secret to Roman candle construction.
Now, here's how to make a Roman candle using this method to show all the steps involved.
Now, How to Make a Roman Candle
For this Roman candle, I'm going to alternate shots of D1 glitter stars with shots of Willow Diadem silver-streamer stars. First a glitter shot, then a silver streamer, then glitter, silver streamer, etc. The candle in the video at the beginning had only silver-streamer stars.For the willow diadem stars, I'm still using the total amount of metal that is specified in the formula. But rather than using three different types of metal, I'm only using fine, spherical titanium, Skylighter #CH3010. This long-burning star leaves a nice, long silver tail behind it that "pops" as the bits of titanium catch fire and burn.
The dimensions in the sketch above are based on my primed 5/8-inch diameter, 5/8-inch long pumped stars, which I made the same way I've made the gold glitter comets.
I prime the ends and sides of the stars so that fire is transferred as quickly as possible from the top to the bottom of the star. The final primed stars end up being a little under 3/4-inch diameter and about 3/4-inch long.
The star dimensions dictate that I use 3/4-inch ID parallel tubes for this project. The standard, 1/4-inch wall Skylighter TU1065 tubes will work well in this project.
These long tubes work well because they can be marked, and all the Roman candle sections can be cut out of one length of tube. This makes it easy to reassemble the sections later on.
I want to make an 8-shot candle, so I mark and cut a tube as shown below. I write a number on each section, starting with #1 at the bottom of the tube.

Roman Candle Tube Marked into Numbered Sections before Cutting
The markings will enable me to reassemble the tube sections exactly as they came apart, which will increase the potential for me to arrive at a nice straight finished candle. I allow about 1/16-inch for each of the saw cuts.
In the drawing above, notice that there will be a star at each of the cuts. So I mark 8 cuts, plus the cut at the top of the candle. The bottom section will be 1.5-inches long and the top one will be 3-inches long.
Then I cut the tube into sections.
Cutting Paper Tube into Sections

Roman Candle Tube Cut into Sections
I use a little sandpaper to smooth the inside and outside edges of each end of the tube sections. Smooth ends make for smooth reassembly later on.
Sanding Ends of Roman Candle Tube Sections
Now I put section #1 on the nipple of the ramming block with the bottom of the tube down.
I made the ramming base and nipple by drilling halfway through a piece of 3/4-inch thick plywood, and epoxying a length of 3/4-inch diameter aluminum rod into the hole. I got the rod from Home Depot (in the nuts-and-bolts aisle where they have a rack of metal rods and angles), and cut it with a hack saw just long enough that 1/2-inch of it projects from the plywood. I used a file to smooth the top end and edges.

Ramming Base with Aluminum Nipple and Section #1
I load 10 grams (one flat 1/2-tablespoon) of bulkhead-clay mix through a funnel into the tube. When loading the clay into the short tube through the funnel, I use a 1/2-inch wooden dowel to push the clay through the funnel and slightly compact it into the tube. This helps get all the clay through the funnel and down into the short tube, so it doesn't spill out over the top.
I ram the clay plug with a 3/4-inch rammer from one of my sets of rocket tooling, and 8 moderate blows with the rawhide mallet. This results in a 1/2-inch thick plug in the tube section. A section of 3/4-inch wooden dowel could certainly be used as a rammer in this project, as shown in the article on making gerbs.
Ramming Clay Plug into Roman Candle Bottom Section
Note: I want to fully consolidate the clay and lock it into the tube without damaging or splitting the tube. This takes a bit of practice. With the softer, standard tubes, a slight bulge will form in the tube, which can be felt if one runs their fingers up and down the tube.
Now it's time to ram the delay-composition increments into the other sections of the tube. I have played with a variety of delay compositions, from relatively fast-burning ones to those that are slower burning. I like to keep the delay increments about 1-inch long between the stars. This provides a nice, solid plug, which does not allow fire to pass prematurely around it.
So, the burning speed of those 1-inch increments determines how much time there is between shots of the Roman candle. With the stars I am using, I prefer the timing I get using the following candle delay composition (This is a classic star formula which can be found in various books).
Chrysanthemum 8 (from Shimizu) Delay Composition
| Chemical | % | 79-gram batch |
| Potassium nitrate | 0.49 | 35 grams |
| Charcoal (airfloat) | 0.40 | 29 grams |
| Sulfur | 0.06 | 4 grams |
| Dextrin | 0.05 | 4 grams |
| Water | +0.10 | 7 grams |
| Total | 1.10 | 79 grams |
Note: The weights have been rounded off, and this size batch will make enough composition for the 8-shot Roman candle I'm making.
I grind the potassium nitrate in a blade-type coffee mill fine enough to pass a 100-mesh screen. I do the same with the sulfur. The charcoal and dextrin are already that fine.
Grinding Potassium Nitrate in a Coffee Mill
25-50% of the airfloat charcoal can be replaced with 80-mesh or even coarser charcoal for longer hanging sparks in the fountain plume between candle shots.
The chemicals are put in a sealed plastic tub and shaken to mix them. Then they are worked through a 20-mesh screen or kitchen colander 3 times to thoroughly mix them and break up any remaining clumps of chemical.
Sifting Powder through Screen
Using a spray bottle, I spritz the composition with water as it sits in a plastic tub on a scale, until 7 grams of water has been added. Between every couple of spritzes, I swirl the comp in the tub to spread the water around.
I work the water into the powder with gloved hands and then push the damp composition through the 20-mesh colander twice to really integrate the water.
Working Water into Delay Composition
Then, just as I did with the increment of the clay in tube section #1, I ram increments of the still-damp delay composition into the remaining tube sections. I always place each section with its bottom down on the ramming nipple. This creates that 1/2-inch void in the bottom of each section as shown in the sketch.
Sections #2 through #8 now get 10 grams of the composition rammed into them. Ramming that amount of comp yields delay increments that are 1-inch long in each section. Finally, I ram 5 grams of the composition in tube section #9, which produces a 1/2-inch long delay increment.
Then I allow the delay increments to dry overnight, using my drying box. They would dry in a few days if they were put in a warm location of the storage area.
Note: Often, directions for making candles specify ramming dry, granulated delay composition. At first I wondered if I should granulate and dry the comp, and I discussed this with Gary. His theory is that damp composition slightly wets the adhesive layer inside a paper tube, and when it dries it really glues the delay increment in place. Makes sense to me, and ramming it damp really creates a dense, hard plug of composition.
Once the tube sections and delay increments are dry, it's time to assemble the sections of the Roman candle, with lift charges and stars installed as I go along.
One homemade jig really helps at this stage, and ensures the assembled Roman candle ends up perfectly straight. I took this tip from one of the photos of Gary's process, and expanded upon it for my own purposes.

Homemade Jig for Assembling Roman Candle Sections
The jig is made up of two, 36-inch long pieces of 1-inch by 1-inch aluminum angle channel from the same section of Home Depot mentioned above. One of the pieces has two 1/4-inch diameter, 2-inch long carriage bolts and nuts installed in each end to act as feet to stabilize the channel during use.
I lay out the now-dry candle tube sections in numerical order on the jig. I also lay out my stars in the order in which I want them fired, along with a cup of FFg sporting-grade black powder from a gun shop.
Of course, with a bit of dialing in, I could also use my homemade black powder for the lift.
I'll be using Elmer's glue to assemble the candle and a 1/4-teaspoon kitchen scoop to measure the black powder lift charges.
Assembling Roman Candle Tube Sections
I have cut out little disks of tissue paper the same diameter as the tube OD to go between the stars and the lift powder. The tissue prevents the black powder from migrating up past the star between the star and the inner wall of the tube. I want to keep all the lift powder down below the star to maximize the star's propulsion out of the tube.

Roman Candle Parts--Ready to Assemble
To assemble section #1, I stand it, bottom down, on my workbench, and drop 1/4-teaspoonful of the black powder into the top of that section through a little funnel. I place a tissue paper disk over the top of the tube and push a star and the tissue down into the tube, seating it firmly against the black powder. Then I apply a thin ring of Elmer's glue around the top edge of that section.

First Roman Candle Section--
Loaded with Lift Powder,
Tissue Paper Disk and Star,
Elmer's Glue Applied
I then push section #2, bottom down, onto the glued section #1, and wipe any excess glue off with a paper towel. Then, while I'm pressing those sections together, I pick them up and lay them into the trough of the alignment jig. Pushing them down on the jig ensures that they are perfectly aligned, and I push them together end-to-end to make sure the glue joint holds tight.

Tube Sections 1 and 2 Glued
Together and Aligned on the Jig
Then I carefully pick them up, continuing to press the sections together, and stand the assembly upright.
Again I load lift powder, tissue, and star, and run a ring of glue around the top of the tube. Then, I assemble section #3 in the same manner as #2.
I repeat this process until all nine sections have been assembled and I have the whole shebang resting in the jig.

All Sections of Roman Candle
Glued Together and Aligned
I could just press the sections together end-to-end, make sure they're sitting nice and straight on the jig, and let the glue dry. But, nooo, not me. I'm a bit more of a perfectionist than that.
Note: That's kind of a funny revelation. When I was a kid, my Dad was always hollerin' at me for not cleaning up his shop after using his tools, or for not finishing up a project I'd started. Now, with my pyro avocation, I've gotten very particular about cleanliness in my shop in order to prevent serious accidents. And I've also come to know that meticulous work habits are a sure way to achieve consistency with my artistic fireworks devices. We live and learn. Sorry, Dad, and thanks; I finally got it!
So, I go one more step to really clamp the candle sections tightly, end-to-end as the glue dries, and to ensure my candle ends up perfectly straight when it's dry.
I lay another piece of the aluminum angle channel on top of the glued-up candle. (You were wondering what that extra piece was for in the pictures above, right?)

Roman Candle Sandwiched Between
Two Aluminum-Angle Sections
Then I take 12-inch pieces of masking tape and put bands of the tape, stretched tightly with the sticky-side-out, around the aluminum and candle sandwich. This really holds the glued tube sections nice and straight.

Masking Tape, Sticky-Side-Out,
Holding Tube Sections Straight
To really pull the tube sections tightly together as the glue dries, I install two 1/2-inch square, 4-inch long, pieces of steel bar, and two tightened strap clamps. Gently tightening the clamps snugs the tube sections together, but I don't tighten them so much that the ends of the tubes are damaged.
Of course, long rubber bands or elastic bungee cords could be used in place of the strap clamps. Pieces of wood could also be used instead of the steel crossbars.

Pulling the Tube Sections Together with
Steel Bars and Strap Clamps
It takes 2-3 hours for the glue to dry sufficiently to allow the assembled candle to be removed from the jig. I remove the strap clamps and steel bars, tear the bands of masking tape, which remove easily because they were applied, sticky-side-out. Et voilà! A sturdy, straight Roman candle emerges.
A little 100-grit sandpaper quickly knocks any rough spots off the outside of the tube joints.

Dry and Sanded Roman
Candle Removed from Jig
Well, let's stick a piece of Visco fuse into this puppy, take 'er outside, and fire it up. Right?
Hold on there, podnah. Not so quick. The candle tube, as it currently is, really is not that strong yet. End-to-end glue joints don't have much structural integrity. If this particular Roman candle is going to survive the pressures when it fires, those joints will have to be reinforced a teensy bit.
Reinforcing and Finishing the Roman Candle
Enter fiber-reinforced, gummed, kraft-paper tape. One of my favorite supplies is a tape that I get from Staples: 2.8-inch wide, fiberglass reinforced, paper packaging tape, Staples #468231. This stuff is light, thin, and really molds well to the tube once it's wet.
Although I usually cut the tape to length with scissors because of the fiber-reinforcement, I use my manual tape dispenser as a wetting station to wet the tape. A sponge could also serve this purpose.

Fiber-Reinforced, Gummed
Kraft Tape, and Manual Tape Dispenser
The glued-together candle is 18.5-inches long. I cut four 18-inch strips of the kraft tape to use to reinforce the tube. Each strip will run lengthwise on the tube, and will wrap around to cover about 3/4 of the tube circumference. Therefore, the four strips, staggered as they are applied, will create 3 complete layers of tape on the candle.
Four 18-Inch Strips of
Tape for Reinforcing Candle Tube
I run a strip of tape through the dispenser's wetting station, and carefully apply it lengthwise on the Roman candle tube. Each strip has to be kept straight; the long edge of the tape needs to be parallel to the length of the tube. I get the first strip pasted down tight. Then, I butt the long edge of a new strip right up against the edge of the first piece of tape. Since each strip only wraps around 3/4 of the tube's circumference, once it is pasted down, the second piece of tape will overlap the first one some. I repeat this process for all 4 pieces of tape. That way the gaps in the tape get staggered around the circumference of the tube.
In between each strip application, I burnish the previous strip down nice and smooth with a scrap of paper tube. When all the strips are on, I give the whole tube a nice hard burnishing to produce a flat, smooth application of all the tape.

Kraft Tape Applied to Tube
and Burnished Smooth
with Paper Tube Section
Oh, yeah, that baby's looking nice, and feeling strong now. After inserting a hooked piece of Visco fuse as shown in the candle cross-section sketch, I put on a wrapping of colorful paper, and tie the paper snug around the fuse. Now she's ready to take out, tape to a stake in the ground, and light.

Completed Roman
Candle Ready to Fire
3 Finished Roman Candles
Conclusion
You might be thinking, "That was a lot of work to produce one, simple fireworks device, wasn't it?"Naah. Not really. There was probably about an hour's worth of work in the construction of that one candle, all told. It may sound like a lot of time and effort, but once you get going on the project, it's really not that complicated.
This new Smith Method of making Roman candles is such an improvement and can produce such nice consistent results for the hobbyist, that I just can't help but be excited about it, especially after my past, less satisfying results.
When I carefully look at the videos of all the Roman candles I made using this new method, every initial delay after ignition was just about exactly 4 seconds, and every intermediate delay was within one second of 8-seconds long. It don't get no better than that.
On top of that, I'm already imagining creative variations on the above theme: mine-shot candles, crossette-comet candles, color-to-report-insert candles, married-comet ones, matrix-comet projectiles, and crackling-microstar-comet varieties.
I hope to tackle those projects in the coming months.
Additionally, the Roman-candle competition at the PGI (Pyrotechnics Guild International) convention allows candles up to 2-inches ID. I do have some nice, stout 1.5-inch ID tubes, so I just may have to come up with some larger versions of these babies to take to Mason City, Iowa in August.
Have fun and Stay Green,
Ned
Materials Needed
- Aluminum, atomized, 325 mesh (CH0116)
- Blackpowder, FFg
- Candle Holding Jig
- Charcoal, Airfloat (CH8068)
- Coffee Grinder, blade-type
- Dextrin (CH8107)
- Drying Box
- Elmer's Glue
- Ferro-Titanium, 30-60 mesh (CH8110)
- Ferro-Titanium, 40-325 mesh (CH8112)
- Funnel
- Hand Saw
- Kraft Paper, Fiber-reinforced
- Mallet
- Nozzle Mix
- Potassium Nitrate (CH5302)
- Rammer, 3/4-inch (TL1008)
- Ramming Base
- Sandpaper
- Scoop
- Screen, 20-mesh (TL2003)
- Sodium Bicarbonate (CH8275)
- Sulfur (CH8315)
- Titanium, medium spaherical (CH3009)
- Tubes, 3/4 Inch ID (TU1065)
- Water
- Visco Fuse